
Subscribe to Our Youtube Channel
Summary of Contents for Satfinder 5 HD SLIM
- Page 1 USER GUIDE Please read this manual carefully for using your Signal Meter. KULLANIM KILAVUZU Ürünü kullanmak için lütfen bu kılavuzu dikkatlice okuyunuz.
-
Page 2: Table Of Contents
INDEX: Safety Instructions....... Product Content......Basic Features......Technical Features....... Control Panel View....... Equipment Incl.With the Product..User Instructions......Satellite Search Menu....USALS Motor Settings....UNICABLE Settings...... Diseq-C 1.2 Motor Setting..... Spectrum Analysis Menu....Satellite Tp Control Menu....Constellation Menu....... Cross Polarity Menu..... Multi-Level Menu...... -
Page 3: Safety Instructions
devices which are left open will lose SAFETY INSTRUCTIONS: their function time. Issues to be Observed: Lighter charger, charging adapter and batteries are outside the scope Make sure to observe the following of warranty since their life span instructions order prevent varies depending... -
Page 4: Product Content
It is a super lightweight measuring BASIC FEATURES: device weighing only 800 grams SATFINDER 5 HD Slim Real Time with its carrying bag and batteries. Function Spectrum Analyzer, HD Video Display 3.5" Lcd PRODUCT CONTENT: Tft , DVBS/S2 Satellite Signal Meter 1 pc. -
Page 5: Technical Features
• Software update via USB TECHNICAL FEATURES • Windows XP/7/8 • Digital HD display. compatible(32/64bit) • Reads NIT Broadcaster Chart and • Detects Satellite position within 1 identifies satellite orbit and names. second (max) • Real time Full Band Spectrum •... -
Page 6: Control Panel View
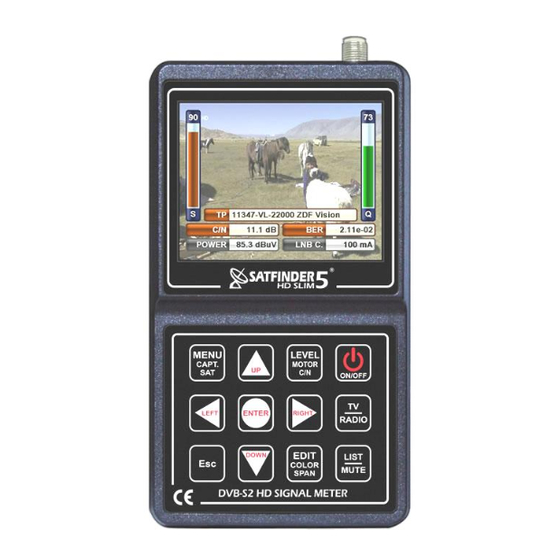
CONTROL PANEL VIEW: A/V INPUT LNB INPUT RETURN TO MENU SAVE THE DISPLAY SATELLITE SELECTION TURN ON/OFF SEE THE LEVEL UPWARDS DIRECTION MOTOR SETTINGS C/N DETAILS APPROVAL AND ENTRY TV / RADIO LEFT DIRECTION RIGHT DIRECTION TURN OFF SOUND DOWNWARDS &... -
Page 7: Equipment Incl.with The Product
1 piece of 220V Charging Device: EQUIPMENT INCLUDED WITH THE PRODUCT: 1 Protective Bag with Shoulder Strap: With your 12 Volt output electrical charging adapter, you can ensure your device is kept charged all the time, and thus use your device in environments where electricity is not available. - Page 8 1 A-V Tos Cable: You can test the external Video and Audio signals with the AV input of your device. also test devices such as security cameras which require focus and direction adjustment. 1 pc. 90° F Inter-Connector: Use your 90° F Inter-Connector in your device all the time.
-
Page 9: User Instructions
COLOR SETTINGS: USER INSTRUCTIONS: You can adjust the Color settings on TURNING ON THE DEVICE: the channel picture display if you Open your device by pressing the press and keep pressed the EDIT POWER ON/OFF button. button while you are watching any Tv/Radio channel list will appear on channel. -
Page 10: Satellite Search Menu
SATELLITE SEARCH MENU: You can see the signal levels on the displayed screen. You can check Enter the MAIN MENU by pressing whether the signal levels are at the the MENU button, and here select highest values. You can see the the SATELLITE SEARCH menu by levels on the detailed screen by using the up and down buttons. -
Page 11: Usals Motor Settings
USALS MOTOR SETTING : Choose the DISEQC type as USALS MOTOR order use Diseqc Motors with Usals commands. Enter the USAL SETTING menu by pressing and keeping pressed the EDIT button for 2-3 seconds. Enter the coordinates of the region for which you will make the satellite adjustment, tick the OK box and then press GO, ENTER, thus the... -
Page 12: Unicable Settings
UNICABLE SETTING MENU: DISEQC 1.2 MOTOR SETTING MENU: You can use this menu for UNICABLE First select Diseqc 1.2 Motor on the Multiswitch or Unicable SCR lnb DISEQC TYPE section and go to types, and you can test them after SATELLITE SETTING menu signal making these adjustments. -
Page 13: Spectrum Analysis Menu
SPECTRUM ANALYSIS MENU: We can save the spectrum levels on the screen using CAPTURE and SAVE Press MENU, then select SPECTRUM upon pressing the MENU button on ANALYSIS from the MAIN MENU. the SPECTRUM ANALYSIS screen, After making your satellite, LNB then later you can LOAD them from voltage, Scan Width and Diseq-c memory... - Page 14 NIT IDENTIFICATION FEATURE: You can find the CHANNEL LIST and the SATELLITE Position in the Uplink automatically by matching the IF Frequency arrow to any signal on the Spectrum Analysis menu and pressing ENTER. You can see the channel lists, and save channels adjustments...
-
Page 15: Satellite Tp Control Menu
SATELLITE TP CONTROL MENU: As indicated on the above screen, Press MENU, then select SATELLITE you can see the signal levels of 4 TP CONTROL from the MAIN MENU. different frequencies from 1 satellite Satellite Control menu on the same screen. This way you enables display of signal levels of can check whether the signal levels several TP frequencies on the same... -
Page 16: Constellation Menu
CONSTELLATION MENU: Press MENU, then select CONSTELLATION from MAIN MENU. constellation menu shows on a graphic the accuracy of coordinates Digital symbols received in any instance. There are 8 coordinate points in the DVBS2 8PSK signals constellation diagram. The closer the I / Q points are to each other, the more accurate it is. -
Page 17: Cross Polarity Menu
CROSS POLARITY MENU: MULTI-LEVEL CONTROL MENU : Press MENU, then select CROSS POLARITY from the MAIN MENU. You Press MENU, then select MULTI- can adjust the LNB position the best LEVEL CONTROL from the MAIN way according to the satellite and MENU. -
Page 18: Auto Port Search Menu
AUTO PORT SEARCH MENU : Diseq-C 1.0 Port Scan : Press MENU, then select AUTO PORT SEARCH from the MAIN MENU. Here which satellite connected to which Diseq-C port. Diseq-C 1.1 Port Scan : Select NONE when there is Diseq-C switch and the cable is directly connected to lnb. -
Page 19: Usb/Multimedia Menu
USB / MULTIMEDIA MENU : CHANNEL LIST MENU: You can perform the procedures You can display the CHANNEL LIST which are made via USB on this from the MAIN MENU or by pressing menu. You can see the photos you ENTER while watching any channel. - Page 20 ORDERING ACCORDING SATELLITE: Enter the CHANNEL LIST menu, press MENU and select a SATELLITE on the screen. In this case only the channels of the satellite you selected will appear on the screen. MOVING CHANNELS: Press EDIT while you are in the CHANNEL LIST menu, and select MOVE.
-
Page 21: Satellite Settings Menu
SATELLITE SETTINGS MENU: DEVICE SETTINGS MENU: You can fix the appropriate Diseq-C make optimum and LNB types for the satellites and adjustments for using your device in TP frequencies in the region you the device settings menu. These provide service in this menu. This settings will facilitate your works way the adjustments you made in all both... - Page 22 Below you can see the options in the MEMORY INFORMATION : device settings one by one. You can see how much of the memory is used with their usage LANGUAGE: English, Turkish, ratio details in this menu. Moreover, German, French, Spanish, you can monitor the SOFTWARE and Portuguese, Russian, Arabic, Dutch,...
-
Page 23: Troubleshooting
TROUBLESHOOTING : It is possible that you have not set If your Screen or Device does not your Dish Antenna in the right Open: direction. There might be obstacles in front of Your device might have run out of your dish antenna such as a tree, charge. -
Page 24: Warranty Certificate
NOTES:..............................................................................................................................................................................................................................................................................................................................................................................................................................................................................................................................................................................................................................................................................................................................................................................................................- 24 -...
Need help?
Do you have a question about the 5 HD SLIM and is the answer not in the manual?
Questions and answers