Samsung SDP-860 User Manual
Hide thumbs
Also See for SDP-860:
- User manual (49 pages) ,
- Quick start manual (4 pages) ,
- Basic operations (2 pages)

Related Manuals for Samsung SDP-860


Summary of Contents for Samsung SDP-860
- Page 1 DIGITAL PRESENTER USER'S MANUAL SDP-860 Before attempting to operate this product. Please read the instruction carefully. www.samsungpresenter.com...
- Page 2 This high-resolution projection system projects images on display devices such as PC monitors and projection screens. This user manual is for the SDP-860 product. Please read this manual and any supplementary document(s) thoroughly before attempting to install and/or operate the product.
- Page 3 Product Warranty and Limitations The manufacturer of this product is not responsible for the sale of the product, nor does the manufacturer delegate such responsibility to a third party. The product warranty does not cover accidents, negligence, abuse, or improper use of the item in whole or in any part. Additionally, the manufacturer does not provide warranty for any additional part or piece that was not supplied by the manufacturer.
- Page 4 When equipped with an adapter lens, it also delivers ultra-close-up shots Convenient Multimedia Options The SDP-860 not only saves and plays still images and videos (VGA/30 fps) but also supports audio mixing for more versatile multimedia capabilities. Many Output Device Choices The SDP-860 supports from XGA lo UXGA for VGA/DVI outputs, offering various choices of output devices.
-
Page 5: Table Of Contents
Table of Contents Safety Pre cautions -------------------------- Warning Caution Product Information Package Contents Part Names & Functions (Main Frame) Front Back (Rear Connection Terminals) Side (Side Connection Terminals) Part Names & Functions(Main Frame Control Board Remote Controller) Preparing Set Settings Menus & Default Values Installation Connecting In/Output Devices.. -
Page 6: Safety Precautions
Safety Precautions • To prevent possible user injury or damage to property, please read and follow all information below. Warning/Caution/Special Mark Messages Warning • Do not connect multiple power cords to a single outlet. o It is often the cause of short-circuits that may cause fire. •... -
Page 7: Caution
Caution • Do not insert the power plug to a loose socket. • It may result in electric shock and/or fire . • Avoid installing the product in places that are vulnerable to impact. • Avoid installing the product in places that are exposed to powerful magnetic fields or vibrations. -
Page 8: Part Names & Functions (Main Frame)
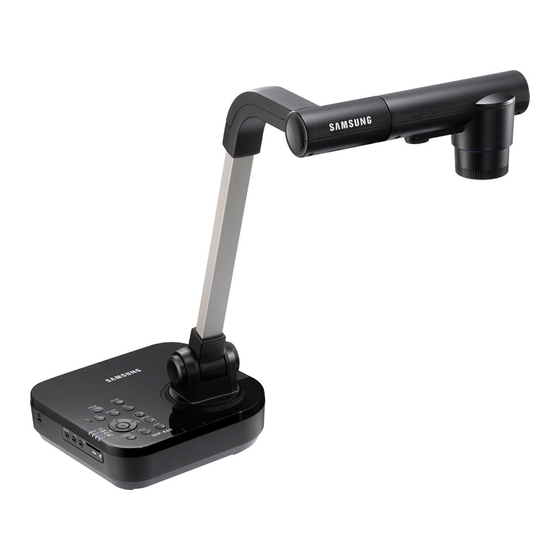
Part Names and Functions(Main Frame) Default Contents User’s Manual Remote Controller Power Cable Power Adapter DVI Cable VGA Cable USB Cable USB Program &CD & Manual Diffuser Sheet (290x190) - Page 9 Lens RS232C cables and adapter lenses from other brands may not be compatible with this product. Samsung Techwin cares for the environment at all product manufacturing stages to preserve the environment, and is taking a number of steps to provide customers with more environmentally friendly products.
-
Page 10: Front
Front Name Lens LED Light Main Support Mainframe control Board (P. 13) Status Remote Control Signal Receiver Rear Connection Terminal (P. 11 ) Side Connection Terminal (P.12) -
Page 11: Back (Rear Connection Terminals)
Back (Rear Connection Terminals) Terminal Function Connect the power adapter cable. Connect the video output terminal of a VGA output device. When External Input is selected, video is displayed via this VGA video output l (P 20) Connect the RGS video output terminal of a PC monitor or a projector.P. -
Page 12: Side (Side Connection Terminals)
Side (Side Connection Terminals) Terminal Function Connect Kensington Security Slot Connect a speaker or earphones for audio output signals. Connect an audio mixing mic for saving videos..Connect an RS-232C cable..Connect an SD/SDHC card for saving or importing videos and pictures. - Page 13 Button Function Turn On/Off Power Select Internal/External Video ( LIVE Mode) Auto Focus (While Playing Video) Play Previous File (Capture/LIST Mode) Page DOWN (LIVE Mode) MF/Auto Color Adjustment (While Playing Video) Play Next File Capture/LIST Mode) Page UP Cancel Command...
- Page 14 Button Function ( LIVE Mode) Brighten/Darken Screen (While Playing Video) Adjust Volume (Capture/LIST Mode) Move Up/Down ( LIVE Mode) Enlarge/Minimize Screen (While Playing Video) Rewind/Fast Forward. (Capture/LIST Mode) Move Left/Right. Page ( LIVE Mode) Open Menu (Capture/LIST Mode) Execute Selected Menu (While Playing Video) Play/Stop File (SD Card Required) -.
- Page 15 Face the lens straight down 2. Adjust the main support to face the lens toward a document...
- Page 16 3. Connect a VGA OUT, DVI, or USB cable and the power cord. (P.20) ···· ... 4. To turn on the power of the digital presenter, press the Power button on the digital presenter's control board or remote controller.
- Page 17 Pressing the Power button turns on the LIVE power LED light around the button and set status LED in blue. Initial Screen Displays the current digital presenter settings. • Displays the current screen-capture settings. • Displays the operational status of an SD card and the system. •...
- Page 18 Defaul Values States Output SXGA 1280X1024 43 resolution UXGA 1600X1200 4:3 Up-Scaled settings 1024x768 Down-Scaled SXGA 720p 1280x720 16:9 Window Cut-out 1080p 1920x1080 16:9 Window Cut-out 720p 1280x720 16:9 Stretched 1080p 1920x1080 16:9 Stretched WB Mode ATW (tracking)/AWB (One Push)/ Manual OFF/AUTO(DYNAMIC AUTO...
- Page 19 SETUP MENU DEFAULT VALUE/S TATE Manual Focus Enlarge/Mi MACRO Mode nimize MICROSCOPE Mode (ZOOM/F D-Zoom Off/4X/8X OCUS) JPEG/BMP JPEG Format FINE/NORMA L/BEST NORMAL Quality STANDARD/B STANDA Screen Quality Capture Mic Mute ON/OFF (CAPTUR Time OFF/5min/10 Elapse min/15min/20 SETTING min/30min/45 min/1h Reset File Number Preset...
-
Page 20: Connecting Output Devices
To use a normal or DVI monitor, you must connect the monitor to the digital presenter using a monitor or DVI cable. Connection * Depending on the specifications of the SDP-860 D/A converter and the monitor A/D converter, the color of RGB and DVI outputs may vary. - Page 21 Connecting Computer for Output You can watch projected images on a PC monitor by connecting the PC to the digital presenter via USB cable. CAUTION: For the USB cable connection, using a USB port on the main board of a computer is recommended.
-
Page 22: Connecting Peripheral Devices
RS-232C cables from other brands may not be compatible with this product. When connecting via USB, install the included USB drivers and SDP-860 Viewer program in your computer. For instructions on installing the software, please read the manuals. For connecting via RS-232C cable, no extra program is provided;... -
Page 23: Connecting Computer For External Input
Connecting Audio/Mic Audio and mic use the 3.50 terminal. Connecting Kensington Security Slot Kensington Security Slot is an anti-theft system that is integrated to the projector. Wind Kensington Security Cable around a fixture apparatus such as a rack , and then insert the end of the cable to the Kensington Security Slot in the projector. - Page 24 * DVI Output does not support this option. Note Bypass Option: Turn on the power of the digital presenter to output video from the VGA IN terminal to VGA OUT...
-
Page 25: Watching Video From External Devices
Basic Operation Functions Watching Video from External Devices Install the digital presenter as instructed in this manual. (PAGE 15) Select an Input option; press (in/text)on the digital presenter control board or remote controller to select an input. External input or digital presenter video switches back and forth each time the button is pressed. -
Page 26: Output Resolution Setup (Dvi/Vga Output Mode)
Output Resolution Setup(DVINGA Output Mode) Various output resolutions are available depending on the output device: monitors or projectors. Available resolutions are as listed below. - SXGA (1280x1024) - UXGA (1600x1200 ) - XGA (1024 x768) - 720p (1280x720) - 1080p (1920 x1080) - 720p (1280x720) - 1080p (1920x1080) 1. -
Page 27: Enlarging/Minimizing
Enlarging/Minimizing • You can zoom in and out on screen objects. • To enlarge or shrink, press the (Enlarge) or (Minimize) button on the control board or remote controller (6x Optical Zoom & 8x Digital Zoom). • When using the Enlarge and Minimize buttons, the blue gauge indicates the optical zoom portion while the red indicates digital. -
Page 28: Adjusting Focus
zoom works. Maximizing Digital Zoom (D-Zoom Max) You can select a maximum digital zoom power. In the Menu, select ZOOM/FOCUS > D-ZOOM MAX. • Pressing the Zoom in and Zoom out button changes the maximum zoom power to OFF > 4x > 8x. •... -
Page 29: Adjusting The Image
• To darken: Press on the control board or remote controller. Note • For glossy paper documents, turn off the upper light to use only natural light. For • better visual quality, use or the remote controller's Darken button to lower the brightness, and then adjust the position of the document. - Page 30 Operation (Functions) Select AWB between MF and AWB. SELECT FUNCTION AWB - SET(AWB KEY) MANUAL FOCUS CANCLE • Press MF/AWB to adjust the color automatically. • Save the settings and then exit to the Live screen. Auto Color Adjustment Method 2: ATW (Auto Tracking) ...
- Page 31 • Pressing the button changes the Noise Reduction mode to OFF > AUTO> MA X. • AUTO: Automatically controls the NR amount depending on the lighting conditions. • MAX: Always keep the maximum NR amount • Selecting Auto may cause after images if there are many movements on one screen.
-
Page 32: Preset Setting
• Pressing the button changes to TEXT > IMAGE > CUSTOM. • TEXT Mode: Optimizes the screen for documents with dense text. • IMAGE Mode: Optimizes the screen for pictures and videos. • When selecting CUSTOM Mode, the following sub menus appear. -
Page 33: Capturing Image & Videos
PRESET SETTING Preset EXE Preset1 Pre-SAV Preset1 BOOT PRESET Return P1: z: - 11, F:1271, B:60 P2: z: - 11, F:1271, B:60 P3: z: - 11, F:1271, B:60 P4: z: - 11, F:1271, B:60 • Select Preset-SAV, and then press the button to enter the current settings to a preset number. - Page 34 • Selecting capturing Image Format (PIC Format) • Press the button to select a desired resolution. Still image resolutions change to JPEG>BMP. • Press the button to select a desired resolution. Still image resolutions change to FINE> NORMAL > BEST. •...
- Page 35 Press the button to reset the filename of an image or video capture. Operation (Functions) Capturing Images • Install the digital presenter as instructed in this manual. • Insert an SD card. • To capture an image, press the button on the control board or remote controller.
- Page 36 mode. To check the captured image, press the MODE button to enter Picture List mode. 5. Picture List Mode:...
- Page 37 Screen Description 1. Indicates remaining free space of the current SD memory card. 2. Indicates the current folder name. 3. Indicates the number of images in the current folder. 4. Indicates the current page and total pages in the current folder.
- Page 38 Operation • Press to check the captured image. • Full Screen • While in full screen mode, use the Left and Right keys to move between images. • The AF button moves to the first file in the folder. The AWB button moves to the last file in the folder •...
- Page 39 Capturing Video Install the digital presenter as instructed in this manual. • To record audio, connect a mic. • When the control board or remote controller is turned on, the projector activates LIVE mode (LIVE). • Insert an SD card. •...
- Page 40 • While capturing video, the filename and running time display on the bottom of the screen. • If the video recording duration (TIME ELAPSE) is set, the remaining time displays instead of the running time. • To finish capturing and go back to Live mode, press the MODE button.
- Page 41 • Indicates remaining free space of the current SD memory card. • Indicates the current folder name. • Indicates the number of videos in the current folder. • Indicates the thumbnail of a selected video. • Press the buttons to select a video. •...
-
Page 42: Freeze Mode Setting & Operation
• Screen Description • The file that is currently being played • Playback Status (PLAY/ PAUSE) • Video Running Time • Volume For the playback screen controls, refer to Control Board/Remote controller functions. 10. To delete a video, select the video, and then press Freeze Mode Settings &... -
Page 43: Microscope Mode
Microscope Mode • Attach a microscope adapter lens to the digital presenter lens part. • Bring the microscope adapter lens to the ocular part of the microscope that is properly focused, as close as possible. Adjust the position of the digital presenter to bring the circular image of an object in the center of the monitor. -
Page 44: System Reset
• Check if the screen is focused properly. If not, adjust the micromanipulator of the microscope to refocus. Check if the screen is now focused. • To cancel Microscope mode, press the ® button. Ultra Macro Mode • When used in conjunction with an adapter lens, the projector can capture the screen at an extremely close range within 1cm. -
Page 45: Checking System Version Information(Ver. Info)
Checking System Version Information (VER. INFO) • Displays the current system version of the product. • In the Menu, select SPECIAL FUNCTION> VER.INFO. -
Page 46: Troubleshooting
PC when connected operational errors. via USB. For more detailed information about the SDP-860 program, please refer to the included manual. Check the remote controller's batteries. The remote Replace with new ones if necessary. -
Page 47: Replacing Remote Controller Batteries
Replacing Remote Control Batteries Remove the battery lid on the back of the remote controller Insert batteries matching the + and - signals. (Battery Type: CR-2025) - Page 48 Close the lid. Caution: Random replacement of built-in battery by other types batteries may cause explosion. The battery shall be replaced by the same battery. The used batteries shall be disposed carefully because they can cause environment pollutions.
- Page 49 The following specifications are subject to change and upgrade without prior notice. White Balance ATW / AWC (One-touch ) / Manual Aperture Function Image Mode /Text Mode/ Custom Mode Noise Reduction Available (Low Light presenter with 2D/3D NR) Preset Function Up to 4 User settings Image Freeze Available...
- Page 51 Lens F = 2.5(Wide)-3.12(Tele), f = 4.1- 24.6mm, 6X Shooting Area Max: 420 x 336 mm Zoom 48X Zoom(Optical 6X / Digital 8X) Focus Auto focus/ Manual Iris Auto (with fine level adjustment) Pick-up Device 1/3" PS CMOS Sensor Total Number of 1,384(H) x 1,076(V), 1.49M pixels Number of Effective 1,329(H) x 1,049(V), 1.39M pixels Frame Rate...
- Page 52 •...
- Page 53 •...
- Page 54 •...
- Page 55 •...
- Page 56 LENNINGRADSK Y PR-KT, 37-A KORP.14 RUSSIA, 125167, MOSCOW TEL: +7-095-2 58-9296, 9298 FAX: +7-095-258-9297 SAMSUNG OPTO-ELECTRONICS UK LTD (SOUK) Samsung House,1000 Hillswoo d Drive Hillswood Business Park Chertsey Surrey KT160PS TEL 44-(0)1932-45-5308 FAX 4 4- (0)1932-45-5325 TIANJIN SAMSUNG OPTO-ELECTRONICS CO.,LTD (TSOE) 7 Pingchang Rd,Nankai Dist,Tianjin,P.R China Post Code :300190...
Need help?
Do you have a question about the SDP-860 and is the answer not in the manual?
Questions and answers