Table of Contents
Advertisement
Advertisement
Table of Contents

Summary of Contents for Gewa Control Omni
- Page 1 M a nua l English Settings Manual Gewa Control Omni Rev F GB...
-
Page 2: Table Of Contents
Contents Introduction ..........................4 Advantages of the Control Omni ..................4 Description of the different parts of Control Omni ..............5 Symbols ..........................5 Starting your Control Omni for the first time ................6 Brief Demonstration ......................6 Settings ............................ 7 Language Selection ...................... - Page 3 Changing a Page Name ....................18 Adding/removing buttons on a row ................. 19 Exporting Pages ......................19 Copying a Page in your Control Omni to a PC ............... 20 Managing Buttons ......................21 Recording IR codes ......................21 Inserting GewaLink channels ..................22 Inserting 4096 Codes......................
-
Page 4: Introduction
The Control Omni is programmable, which means that it can “learn” IR codes from other remote control units such as those for a TV, DVD or stereo system. Control Omni is equipped with a built-in radio transmitter for environmental control. The screen is dynamic, which means information displayed can be arranged according to the users’... -
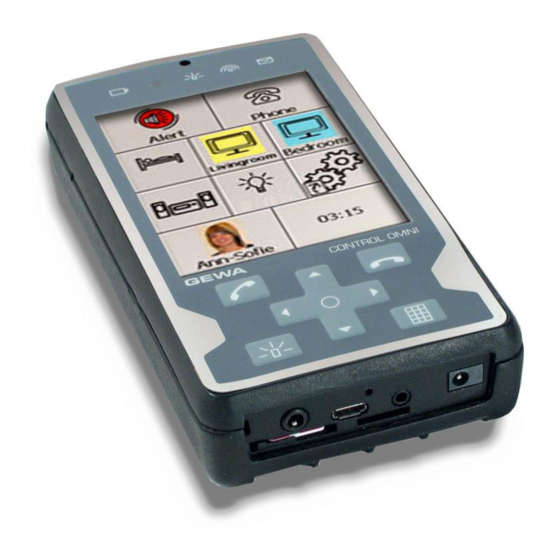
Page 5: Description Of The Different Parts Of Control Omni
Description of the different parts of Control Omni Speaker for IR/Radio Stylus Fig. 1 telephone indicator Off/on LED Alert indicator Battery status SMS status Hang up Touch screen Wake up screen Call/answer samtal Navigating on the screen Charger Alert Headset... -
Page 6: Starting Your Control Omni For The First Time
NOTE! The batteries must be charged at regular intervals, once a day. Do not let the batteries run out completely. 3. Start your Control Omni by pressing the stylus on the ON/OFF button (see fig 2). Brief Demonstration Fig 3 Once your Control Omni has started up it takes a few minutes before it is ready for use. -
Page 7: Settings
Fig 6 This section explains how to adjust various settings on your Control Omni. The Control Omni has been designed so that it is possible to adjust the settings simply, without a manual. In addition, help is available at strategic points (Help). You can use the stylus to adjust the settings by pressing the screen, or you can connect one switch and use scanning. -
Page 8: Activate The Mobile Phone
Activate the mobile phone Fig 7 Your Control Omni has a built-in mobile phone. To make it work it must be equipped with a SIM-card. The SIM-card is not included but must be bought separately. Activate the Mobile phone by using the following procedure: 1. -
Page 9: Scanning Settings
Automatic scanning: Your Control Omni continues to steps forward automatically following a press on the switch. Manual scanning: Your Control Omni steps forward one step at a time for each press of the switch. Forced scanning: It is possible to force automatic scanning by pressing the switch several times. -
Page 10: Switches
Switches Fig 12 Your Control Omni has a port for external switches. The switch is a 3.5 mm jack plug. Only switches with the CE mark should be connected. To connect two switches a Y-cable is needed. There is not a Y-cable included, this must be ordered separately. -
Page 11: Scanning Speed
Default setting: 1 step/sec Number of scanning loops A scan loop is completed when your Control Omni has stepped through a page and starts again from the beginning. The number of scan loops can be adjusted between 1 and 5. -
Page 12: Automatic Scanning Start
The acceptance delay is the time delay between the pressing of a switch and a function being activated in Control Omni. This delay can be used to prevent Control Omni being activated by mistake, as might happen if the user has, for example, muscle spasms. The delay can be set between 0 and 0.9 sec. -
Page 13: Sound Settings
Sound Settings The sound can be set individually for different functions Built-in on your Control Omni. The sound is divided into 2 main earphone Speaker groups, so to say. Sound when making phone calls and sound for system sound. The figure shows different Fig 13 sound units used. -
Page 14: Advanced Setting
Advanced setting The sound can also be set individually for both the headset and the built-in earphone/built-in microphone. This can only be done by entering advanced setting. Change the sound volume, microphone sensitivity and ring signal by using the following procedure: ... -
Page 15: Auditory Feedback
Default setting: recorded sound. Auditory Scanning Auditory scanning is the sound that is heard as your Control Omni steps between the different buttons. The sound may be a recorded sound, for example your Control Omni may say the words “lamp”, “telephone”, “TV”, etc., or it may simply be a tone. You can select between recorded sound, a tone, or silent. -
Page 16: Backups And Default Settings
System Back-up Restore Default settings It is possible to return your Control Omni to its default setting in three different ways. 1. Factory restore: Returns the Control Omni to the conditions as they were when delivered from the factory. Note! Personal images, contacts, SMS, settings, pages etc. -
Page 17: Managing Pages
Managing Pages Adding a Completed Page Fig 15 Your Control Omni is delivered with standard pages that are described in the chapter Brief Demonstration on page 6. An additional 30 completed pages are also included so that you don't have to create pages from scratch. -
Page 18: Removing A Page
Adding or Removing a Row or Column It is possible to add and remove rows and columns on your Control Omni. The contents of the actual buttons is removed when you remove a row or a column. If you want to retain the actual content of a button or buttons, the content must be moved before removing the row or column. -
Page 19: Adding/Removing Buttons On A Row
Note! There are three things you should be aware of when exporting a page: 1. Give the new page a new name, incase your Control Omni needs to be reset. If the page has the same name as one of the completed pages on your Control Omni it will be overwritten when it is reset. -
Page 20: Copying A Page In Your Control Omni To A Pc
Do as follows to copy a page to a PC. 1. Make a backup copy on your Control Omni in order to save the settings, see the section “Making a Back-up”, Page 16. -
Page 21: Managing Buttons
Managing Buttons Recording IR codes If your Control Omni is to be used to control a TV, for example, or a stereo, DVD, toys, lamps, etc., these devices must have a remote control unit that emits infrared light (IR light). -
Page 22: Inserting Gewalink Channels
There are 128 GewaLink channels, numbered from 0-127. These channels do not need to be recorded, they are included with your Control Omni. GewaLink channels must not be mixed up with codes from products that are purchased in other shops, such as TVs and DVD players. -
Page 23: Creating Macros
Merten (System M). We recommend you to start by resetting GR units (Delete GR units) before entering them in Control Omni. If a GR unit has been programmed it cannot be added again without a reset. Control Omni must always be used as the primary transmitter. Start by progamming Control Omni and then add other GR transmitters. - Page 24 Exclude GR unit from Control Omni (is recommended if GR unit is available). Remove GR unit from list Exclude GR unit from the list in Control Omni. Is to be used if GR unit is not available. Switch Multi level A dimmer function with different buttons for different dimmer levels.
-
Page 25: Adding Gr Units
1. Start by resetting all GR units by “Excluding GR units”. 2. Add all GR receivers to your Control Omni. 3. Enter functions on each page and button. 4. Add other GR transmitters if any. -
Page 26: Adding Buttons For Telephone Functions
Adding buttons for telephone functions It is possible to add buttons to your Control Omni where functions can be easily reached in order to modify telephone functions. The same button can be placed in several different locations. The following functions can be added: ... -
Page 27: Adding Button For System Functions
Adding button for system functions It is possible to add buttons to your Control Omni where functions can be easily reached in order to modify system functions. The same button can be placed in several different locations. The following functions can be added: ... -
Page 28: Recording Sound
For example, if the function of a button is to switch on the light, your Control Omni can be made to say “Lamp”. A maximum of 10 seconds can be recorded for each button. A built-in microphone or a microphone via headset can be used to record sound, see fig 13, page 13. -
Page 29: Adding Background Colours
Adding Your Own Images It is also possible to use your own images in on your Control Omni. For this a PC is needed. The images to be used should be approximately 100 x 100 pixels, and they should be in PNG-format. -
Page 30: Adding Text To A Button
Adding text to a button It is possible to add text and edit text on a button on your Control Omni. The maximum width of the line of text depends on the size of the button. The maximum number of lines of text depends on the size of the button. -
Page 31: Setting The Alert Function
The relay function is to be connected to the same input as the switch. If you need to connect both a switch and a relay function, a Control Omni Y connector is needed. The Y connector can be ordered separately (item no 429050). -
Page 32: Using An Alert Button On Screen
Using an Alert button on screen A button can be put on the screen for the alert function. The button can be placed in any location or in several locations. The image is added at the same time as the function is selected. -
Page 33: Completed Pages
Completed Pages The following completed pages are delivered with your Control Omni. Select a completed page as required and add it using the Settings page. Once a page has been added, it is easy to add or remove functions. Many of the pages already have IR channels set up, for example, for controlling the GewaTel loudspeaker telephone. -
Page 34: Predefined Gewalink Channels In Your Control Omni
Predefined GewaLink channels in your Control Omni The following GewaLink channels have been used on the completed pages. Bed Control Gewa- Hall telephone Lamps Window- openers Blinds Curtains Doors Gewa- The GewaLink channel 62 is only a stop code. It cannot be used for controlling. - Page 35 Bed 6 Func + Bed 6 Func Bed 8 Func + Bed 8 Func Included as a standard page on default...
- Page 36 CD Changer + CD Changer DVD +...
- Page 37 GewaTel Dial + GewaTel Dial GewaTel Direct + Included as a standard page on default...
- Page 38 GewaTel Direct HIFI 2+ HIFI 2 HIFI Included as a standard page on default...
- Page 39 Info Lamp window etc + Lamp window etc Tape Included as a standard page on default...
- Page 40 Phone functions Tuner TV Simple + TV Simple...
- Page 41 TV Text + TV Text TV +...
- Page 42 TV + Decoder + TV + Decoder Included as a standard page on default...
-
Page 43: Images And Symbols
Images and Symbols The following images and symbols are included with Control Omni. All the images are grouped into various categories. Number... - Page 44 Telephone...
- Page 46 Symbols...
- Page 48 TV/Digital box...
- Page 49 HIFI...
-
Page 50: Accessories Included
429000 Control Omni 429020 Control Omni Charger GEW100 429035 Control Omni Headset 429030 Control Omni Micro SD Card incl. USB adapter 429025 Control Omni Stylus 429045 Control Omni Rubber protection 890410 Control Omni Safety strap Control Omni User Guide SE/GB... -
Page 51: Technical Data
The Medical Device Directive Control Omni is marketed as a technical aid for persons with disabilities and it satisfies the requirements of the Medical Device Directive 93/42/EEC. This includes, for example, relevant requirements for EMC, for electrical safety and risk management. - Page 52 Abilia AB, Kung Hans väg 3, Sollentuna, Box 92, 191 22 Sollentuna, Sweden Phone +46 (0)8-594 694 00 | Fax +46 (0)8-594 694 19 | info@abilia.se | www.abilia.org.uk 429000-2 Control Omni Settings Manual GB RevF Feb 2016...
Need help?
Do you have a question about the Control Omni and is the answer not in the manual?
Questions and answers