
Summary of Contents for HRM U80K
- Page 1 Fully Automatic Upper Arm Style Blood Pressure Monitor Model:U80K Instruction manual...
-
Page 2: Table Of Contents
Table of Contents Introduction -------------------------------------------------------- Safety Information ------------------------------------------------ Product Structure --Each part name ------------------------------------------------ Battery installation ------------------------------------------------ Setting mode --How to set ---------------------------------------------------------- Proper use of the unit --Pre-measurement --------------------------------------------- --Common factors of wrong measurement ------------------- --Fitting the cuff -------------------------------------------------- --Measuring procedure ----------------------------------------- --Discontinuing a measurement... -
Page 3: Introduction
Introduction ▲ Your new digital blood pressure monitor uses the oscillometric method of blood pressure measurement. This means the monitor detects your blood’s movement through your brachial artery and converts the movements into a digital reading. An oscillometric monitor does not need a stethoscope, so the monitor is simple to use. -
Page 4: Safety Information
Safety Information ▲ To assure the correct use of the product,basic safety measures should always be followed including the warning and the caution listed in the instruction manual : Symbol descriptions The following symbols may appear in this manual, on the label, on the device, or on it's accessories. - Page 5 Safety Information Those who have arrhythmia, diabetes, blood circulation or apoplexy problem, please use under the physician's instruction. Contact your physician for specific information about your blood pressure. Self diagnosis and treatment which use measured results may be dangerous. Follow the instructions of your physician or licensed healthcare provider.
- Page 6 Safety Information Do not use a cellular phone near the unit. It may result in operational failure. Please avoid using in high radiant area in order to make your measuring data correctly. Do not use the equipment where flammable gas (such as anesthetic gas, oxygen or hydrogen) or flammable liquid (such as alcohol) are present.
-
Page 7: Product Structure
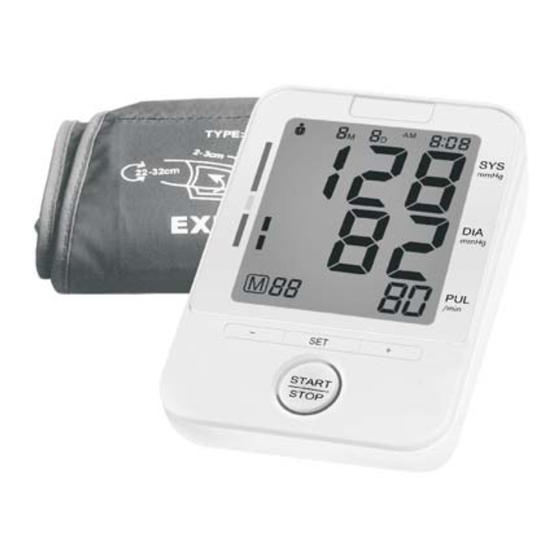
Product structure Body AC/DC socket Air socket Memory button Setting button Memory button Start stop button Display /Date Year/Month /Time User Systolic blood pressure Blood pressure classification Diastolic blood pressure Irregular heart beat Memory symbol Pulse Memory times Pulse rate Low battery Cuff size and connection The accessories cuff is M size, for upper-arm circumference... -
Page 8: Battery Installation
Battery installation Battery installation Remove the battery cover from the battery compartment, insert the battery, a)Remove the battery cover as picture showed. b)Insert 4 AA powerful batteries into the compartment and ensure each battery is in the proper direction. Low battery and replacement When power on,the low battery symbol will display once the unit start to work,and you must replace with new batteries,... - Page 9 Battery installation Adapter usage (option) 1. When optional AC adapter should comply with the requirement of IEC 60601-1:2005. Furthermore all configurations shall comply with the requirements for medical electrical systems (see IEC 60601-1-1or clause 16 of the 3Ed. of IEC 60601-1, respectively). Anybody connecting additional equipment to medical electrical equipment configures a medical system and is therefore responsible that the system complies with the requirements for...
-
Page 10: Setting Mode
Setting mode Note: ·When use AC adapter,the power of battery won't be consumed. ·When suddenly stop during measurement( like the plug off from the outlet by carelessness),it must be reinserted the plug into the unit,and restart the measurement. How to set User setting: Press button SET when power off, the screen will display press button + or - ,it will be changed between... -
Page 11: Proper Use Of The Unit
Proper use of the unit 3.Month and date setting Continue to above step, the screen will display xxMxxD Month setting and xxxx, and keep flashing on month ,the digit will increase 1 when press button + each time, and decrease 1 when press button - each time, you could choose from 1 to 12.Press button SET when you confirm the month, then it will set the date. -
Page 12: Pre-Measurement
Proper use of the unit Pre-measurement ▲ Please keep quiet for 5-10 minutes,and avoid eating, drinking alcohol,smoking,exercising and bathing before taking measurement. All these factors will influence the measurement result. ▲ Remove any garment that fits closely to your upper arm. ▲... -
Page 13: Fitting The Cuff
Proper use of the unit Fitting the cuff 1).Put the cuff on a table flatly with the velcro side down.Pass the end of the cuff through the metal loop so that a circle is formed.The velcro closer will now be facing outwards(ignore this step if the cuff has already been prepared). -
Page 14: Measuring Procedure
Proper use of the unit Measuring procedure After the cuff has been appropriately positioned,the measurement can begin: 1).Press the START/STOP button, all symbols appear on the display , you can hear 2 short beep after 0 flash for 2 seconds, then the pump begins to inflate the cuff, the rising pressure in the cuff is shown on the display. -
Page 15: Memory-Recall Of Measurements
About blood pressure Memory-recall of measurements This blood pressure monitor automatically stores 2x90 sets measurements value, the oldest record will be replaced by the latest measurement value when more than 90 sets each user. Read memory record Press the button + or - when power off, the latest 3 times average value will be shown, press the button + again, the oldest measurement value will be shown, or press the button - again, the latest measurement value will be shown, as well as subsequent... - Page 16 About blood pressure According to the blood pressure classification by the WHO/ISH. SYS lower than 100mmHg is considered as hypotension. Diastolic blood pressure mmHg Severe hypertension Moderate hypertension Mild hypertension High normal value Normal blood pressure Optimal blood pressure target value Systolic bl od pressure 120 130 140 160 180...
-
Page 17: Exceptional Situations
Exceptional Situation Error indicators The following symbol will appear on the display when measuring abnormal. Trouble removal 17/25... -
Page 18: Care And Maintenance
Care and maintenance Care for the main unit and blood pressure monitor cuff Keep the unit in the storage case when no use. Clean the unit with soft dry cloth. Do not use any abrasive or volatile cleaners. Never immerse the unit or any component in water. -
Page 19: Specification
Specification Automatic upper arm blood pressure monitor Description Display LCD digital display Measuring principle Oscillometric method Measuring localization Upper arm ~2 Pressure 99 mmHg Measurement range 4 ~ 0 199 pulses/min Pulse Pressure 3mmHg Accuracy Pulse 5% of reading Pressure 3 digits display of mmHg 3 digits display Pulse... -
Page 20: Warranty Information
Warranty information Statement ▲ The intended use: the unit is intended to be used by adults at home or medical center to measure blood pressure and pulse rate from the upper arm. ▲ The unit satisfies the requirements of EN 1060-1:1995+A2:2009 Non- invasive sphygmomanometers, EN 1060-3:1997+A2:2009 Non-invasive sphygmomanometers. -
Page 21: Emc Declaration
EMC Declaration – Guidance and manufacturer s declaration electromagnetic immunity “ ” blood pressure monitor is intended for use in the electromagnetic “ environment specified below The customer or the user of the blood ” pressure monitor should ensure that it is used in such an environment. IEC 60601 Electromagnetic Compliance... - Page 22 EMC Declaration IEC 60601 Electromagnetic Compliance Immunity test – test level environment guidance level Portable and mobile RF communications equipment should be used no closer to any part “ ”, of the blood pressure monitor including cables than the recommended separation distance calculated from the equation applicable to the frequency of the transmitter.
- Page 23 EMC Declaration – Guidance and manufacturer s declaration electromagnetic emissions “ ” blood pressure monitor is intended for use in the electromagnetic “ environment specified below. The customer or the user of the blood ” pressure monitor should ensure that it is used in such an environment. –...
- Page 24 EMC Declaration Recommended separation distances between portable and mobile RF communications equipment and the blood pressure monitor “ ” blood pressure monitor is intended for use in an electromagnetic environment in which radiated RF disturbances are controlled. The customer or the user of the blood pressure monitor can help prevent electromagnetic interference by maintaining a minimum distance...
- Page 25 Fully Automatic Upper Arm Style Blood Pressure Monitor Model:U80K Rev.01...
Need help?
Do you have a question about the U80K and is the answer not in the manual?
Questions and answers
WHAT DOES THE TWO RED LINES AROUND THE HEART EMBLEM MEAN AFTER TESTING?
The two red lines around the heart emblem on the HRM U80K indicate that an irregular heartbeat was detected during the measurement.
This answer is automatically generated
Not function….digit 0 blinking
When the digit 0 is blinking on the HRM U80K, it indicates that the device is in time setting mode, specifically allowing you to set the hour.
This answer is automatically generated