Table of Contents
Advertisement
Quick Links
Advertisement
Table of Contents

Related Manuals for SL Analytics TitroLine 5000

Summary of Contents for SL Analytics TitroLine 5000
- Page 3 Gebrauchsanleitung ....................Seite 3 ... 78 Wichtige Hinweise: Die Gebrauchsanleitung ist Bestandteil des Gerätes. Vor der ersten Inbetriebnahme bitte sorgfältig lesen, beachten und anschließend aufbewahren. Aus Sicherheitsgründen darf das Gerät ausschließlich für die beschriebenen Zwecke eingesetzt werden. Bitte beachten Sie auch die Gebrauchsanleitungen für eventuell anzuschließende Geräte.
-
Page 4: Table Of Contents
TABLE OF CONTENT Technical Specifications of the Titrator TitroLine® 5000 ........81 Summary ..........................81 ® Specifications Titrator TitroLine 5000 ..................82 Warning and safety information ....................84 Unpacking and First Operation ................85 Unpacking and First Operation of the titrator ................85 Connection and installing of Piston Burette and magnetic stirrer TM 50 ........ - Page 5 Connection of Analytical Balances and Printers ..........148 Connection of Analytical Balances ..................148 Balance data editor ....................... 148 Data Communication via RS-232- and USB-B interface ........150 General Information....................... 150 Chaining multiple devices —“Daisy Chain Concept“ ............150 Instruction Set for RS-Communication .................. 151 ®...
-
Page 7: Technical Specifications Of The Titrator Titroline® 5000
1 Technical Specifications of the Titrator TitroLine® 5000 1.1 Summary The TitroLine® 5000 is a potentiometric titrator and suitable for the following applications: The possible range of titrations includes pH, and mV with a maximum of 5 memorisable methods. The examples of possible use of the TitroLine ®... -
Page 8: Specifications Titrator Titroline ® 5000
® 1.2 Specifications Titrator TitroLine 5000 State 01.09.2014 CE sign: EMC compatibility according to the Council Directive: 2004/108/EG; applied harmonized standards: EN 61326-1:2006 Low-voltage directive according to the Council Directive 2006/95/EG Testing basis EN 61 010, Part 1 Country of origin: Germany, Made in Germany The following solvents/titration reagents are allowed to be used: ... - Page 9 RS-232-C Interface: RS-232-C interface Daisy Chain function available. Data bits: adjustable, 7 or 8 Bit (default: 8 Bit) Stop bit: adjustable, 1 or 2 Bit (default: 1 Bit) Start bit: static 1 Bit Parity: adjustable: even / odd / none Baud rate: adjustable: 1200, 2400, 4800, 9600, 19200 (Default 4800 baud) Address:...
-
Page 10: Warning And Safety Information
1.3 Warning and safety information ® The TitroLine 5000 corresponds to protection class III. It was manufactured and tested according to DIN EN 61 010, Part 1, Protective Measures for electronic measurement devices and control devices and has left the factory in an impeccable condition as concerns safety technology. -
Page 11: Unpacking And First Operation
2 Unpacking and First Operation 2.1 Unpacking and First Operation of the titrator The titrator itself as well as all related accessory and peripheral parts have been carefully checked at the factory to ensure their correct function and size. Please ensure that the small accessories are also removed in full from the packaging. For the scope of delivery, please refer to the enclosed parts list. -
Page 12: Connecting The Titrator - Combination With Accessories And Additional Devices
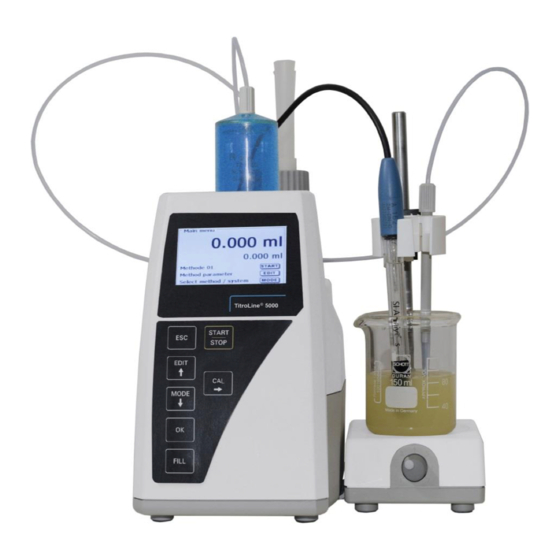
2.3 Connecting the Titrator - Combination with Accessories and Additional Devices 2.3.1 Back panel of the titrator TitroLine® 5000 Fig. 3 2.3.2 Connection ports of the TitroLine® 5000 . Connection of Electrodes ® The TitroLine 5000 has following connections: 1) pH/mV measurement input (DIN or BNC through adapter) for the connection of pH, redox and other measurement or combination electrodes. -
Page 13: Setting The Language Of The Country
2.4 Setting the Language of the Country The ex-factory default language setting is English. When the piston burette is switched on, the main menu will appear once the boot sequence is completed: Fig.4 Using <MODE> followed by <System settings> you navigate to the system settings. The very first menu is to be used for setting the language of the country: Fig. - Page 14 Fig. 7 The selected language will appear immediately. Pressing the <ESC> key twice will return the user to the main menu.
-
Page 15: Dosing Unit And Accessories
2.5 Dosing unit and Accessories Fig 8 1) TZ 2003 - drying tube 2) TZ 3282 - dosing hose without dosing tip and holding bracket 3) TZ 3802 - threaded cap with borehole GL 45, incl. adapter with 2 openings for drying tube and suction hose 4) TZ 1748 - stand rod 5) Z 305... -
Page 16: Initial Filling And Rinsing
2.6 Initial Filling and Rinsing The dosing unit and the tubes are already mounted and ready-to-use. After the reagent bottle is connected, the initial filling of the dosing unit can be performed. While performing the initial filling or washing program, an adequately sized waste bin has to be placed below the titration tip. On the main menu (fig. - Page 17 Fig. 12 Fig. 13 Fig 14 Fig. 15 The rinsing program (Fig.12-15) can be canceled at all time with <STOP> and the continued with <START>. When the rinsing is finished, you can get back to the start menu by pushing 2 x<ESC>.
-
Page 18: Working With The Titrator Titroline 5000
® 3 Working with the Titrator TitroLine 5000 3.1 Front Keyboard Fig. 16 Apart from alphanumeric input (a-z, A-Z, 0-9) and a few other functions, almost all functions can be performed using the front keyboard. <Mode>: Methods selection, rinsing, system settings <EDIT>: Changing the current method, new method, copy and delete method <ESC>:... -
Page 19: Manual Controller "Mouse
3.3 Manual controller “mouse“ The “mouse“ (Fig. 18) is needed for manual titration. It can also be used for starting dosage or automatic titration methods. Fig. 18 Mode Black key Grey Key Manual titration Start of titration, single-step and Filling continuous titration (please refer Stop of titration including evaluation to chapter 3.6.1, manual titration) -
Page 20: Menu Structure
3.5 Menu Structure There are 5 selection menus: Start or main menu Method parameters Method selection CAL menu System settings After power-up, the main menu is always the first menu to appear. The method displayed will always be the last method that was used (Fig. - Page 21 <MODE>/F6 leads you to the “select method“ menu (Fig. 21). Fig. 21 Existing methods (maximum 5) can be selected by pressing the <↓> und <↑> keys and confirming the selection with <OK>/<ENTER>. Once the selection made, you will return to the main menu with the newly selected method.
-
Page 22: Main Menu
3.6 Main Menu After power-up, the main menu is always the first menu to appear. The method displayed will always be the last method that was used (Fig. 24). Fig. 24 3.6.1 Automatic Titration The method being displayed can now be carried out immediately with <START>. Depending on the method settings, you will be prompted for the sample identification (Fig. - Page 23 In the case of an automatic acceptance of the balance data, the weighed-in quantities will be read in from a memory. If the memory does not contain any balance data, a message will appear to indicate that no balance data are present: Fig.
-
Page 24: Calibration (Cal Menu)
The consumption in ml will be displayed on the X axis, the Y axis will show the measurement reading. Scaling of the chart will be done automatically. The result will be displayed at the end of the titration (Fig. 30). Fig. - Page 25 The titrator will ask you to rinse the electrode and immerse it successively into 2 or 3 buffers. Fig. 33 The 1 buffer is started with <Start>. The 2 and 3 buffers (optional) are to be started with <Enter/OK>. During calibration, you can view the current mV and temperature values of the buffer: Fig.
- Page 26 Once calibration completed, the display will show the slope and the zero point of the electrode. Fig. 37 The calibration values will be automatically printed or stored as a PDF file. <ESC> will take you back to the main menu. The current calibration values can be viewed at any time by pressing the <CAL> keys: Fig.
-
Page 27: Manual Titration
3.6.3 Manual Titration Manual titration is always performed using the “mouse“. Manual titration is impossible without the “mouse“. The mV or pH reading will be displayed. The value can be selected in the “Titration parameter“ menu item. In the present case this is the pH value. Fig. - Page 28 Fig. 42 Stage 5 corresponds to maximum titration speed. Speed is reduced by 50% each time. Example: 20 dosing unit: Stage 5 100 % (ca. 40 ml/min) Stage 4 50% (ca. 20 ml/min) Stage 3 25% (ca. 10 ml/min) Stage 2 12.5 % (ca.
-
Page 29: Dosage
3.6.4 Dosage To start a dosage method, please use the <START>/<F1> or the black key of the “mouse“. Fig. 44 Fig. 45 Fig. 46 The dosed volume will be briefly displayed before the display returns to the main menu (Fig. 44) The next dosage operation can be started immediately. - Page 30 Fig. 47 This is the point to input the volume which will be dosed following the confirmation with <OK> or <ENTER>: Fig. 48 Pressing the <ENTER>/<OK> key will cause the next dosing operation to be performed immediately. In this case further dosages can be performed using<OK>. or <ENTER>. Filling of the unit following dosage will not occur automatically here, unless the maximum cylinder volume has been reached.
-
Page 31: Method Parameters
4 Method Parameters From the main menu (Fig. 40), <EDIT> will take you to the method parameters: Fig. 49 4.1 Method editing and new method If you select <edit method> or <new method> you will be taken to the modification or new creation of a method. -
Page 32: Default Methods
4.2 Default methods The <Default methods> item of the TitroLine® 5000 contains a series of ready-made standard methods which can be conveniently selected (Fig. 51). Fig. 51 Once the selection made, you are directly prompted for the input of the method name. Fig. -
Page 33: Delete Methods
4.4 Delete Methods If this function is selected, you will be prompted to know whether the current method is actually to be deleted. You have to reply <Yes> in explicit terms and also confirm this reply with <OK>/<ENTER>. Fig. 54 4.5 Print method The currently selected method can be printed on a connected printer or stored on a USB drive as PDF file. -
Page 34: Method Type
4.6.1 Method type On the <Method type> you can select whether you wish to perform a manual or automatic titration or a dosage: Fig. 57 The selection of the Method type will have an influence on the further parameterisation of the method. For instance, if you select the dosing mode, neither a selection of a formula nor a change of the Titration mode (dynamic or linear, etc.) will be available. - Page 35 4.6.2.2 Dynamic titration in the case of dynamic titration, the titration steps are adapted to the change of the measurement readings/ml (slope, curve slope). Small slope values mean a large step sizes, and large slope values indicate small step sizes. Within that section, this leads to the inclusion of most of the measurement points which are later on of importance with regard to the evaluation of the equivalence point (EQ).
-
Page 36: Result
Fig. 60 4.6.3 Result At first, the calculation options are specified (dynamic and linear titration only): Fig. 61 ® One inflection point (1 EQ) can be analyzed in the TitroLine 5000: Fig. 62 With „only total consumption“ the consumption at the last measured pH/mV value will be used. With „1 EQ“respectively the calculated equivalence points of the titration curve will be used. - Page 37 ”Formula“ offers the following settings: Fig. 63 The Result text may contain up to 21 alphanumeric characters including special characters. Fig. 64 Please confirm your input with <OK</<ENTER>. If there are two results - such as in the case of titration for two pH end points - you can enter two result texts.
- Page 38 The following calculation formulae are available for EQ and EP: Formula for linear and Formula for titrations to end- Additional information dynamic titration to EQ1 point (EP 1 and EP2) No formula No result will be determined.. (EQ1-B)*T*M*F1/(W*F2) (EP1-B)*T*M*F1/(W*F2) Formula for calculating the concentration of a sample taking into account a blank value in terms of ml.
- Page 39 After selecting a formula, please confirm your selection with <OK>/<ENTER>: Fig. 66 The values for the blank value, the titers and factors F1-F5 can be entered or read from a global memory. The values from the global memory were defined in advance by a titration or were manually entered: Fig.
- Page 40 The global memory used is displayed. Here, in this example, it is M01: Fig. 69 Storing results in global memories is described in Chapter 4.6.3.5. The values of the individual parameters of the selected calculation formula can now be input one by one.
- Page 41 4.6.3.2 Sample weight and volume (sample quantity) Fig. 71 Fig. 72 The Sample Quantity (W) item is used to select whether one is wishing to use a sample weight or a sample volume for titration or solution preparation. You have the following options: ...
- Page 42 4.6.3.3 Formula unit The formula unit can be selected in the Unit submenu. Fig. 73 Once the selection made (e.g. %), the unit will also be displayed as piece of information on the display. Fig. 74 4.6.3.4 Decimal places To conclude, it is possible to determine the number of decimal places from 1-6. The standard setting is 2.
- Page 43 Using F3 it is possible to add a global memory: Fig. 76 Fig. 77 The titrator proposes a memory name, such as M01 (M01- M10). The name of the memory can be changed in reference to the application. Here in this example of “M01” for “Blank value Chloride”. Fig.
- Page 44 The blind value which was possibly titrated in advance, is always taken into consideration automatically. Fig. 80 Example: The blank value of a chloride titration is defined with the support of an extra method. The result in ml is thereby automatically written into global memory M01 by using the name "Blanc value Chloride“.
-
Page 45: Titration Parameters
The calculation of the mean value is already possible from 2 individual values, the calculation of the relative standard deviation is only possible from 3 single values. the maximum quantity is 10. Fig. 83 The mean value and relative standard deviation (RSD) are shown directly on the display. Fig. - Page 46 Fig. 86 Generally applicable titration parameters Depending on the titration mode (dynamic, linear and end-point titration), it is possible to enter a variety of parameters. The following parameters are valid for all automatic titration modes: Measured value (pH, mV) ...
- Page 47 <Measuring speed> or drift will determine the span of time after which the measured value will be accepted following a titration step. Fig. 89 Drift-controlled acceptance of the measured value in terms of mV/min is set by selecting “normal“, “fast or ”user-defined”. The drift values at predefined in terms of in mV/min for normal and fast drift: Normal drift 20 mV/min Fast drift...
- Page 48 Fig. 91 Drift-controlled acceptance of the measured value is used in most applications. However, there are applications in which the setting of a fixed holding time for measured value acceptance following the titration step is recommendable. Examples hereof include titrations in non-aqueous media. In the case of dead-stop titration no holding time other than the fixed one can be selected.
- Page 49 Dynamic control If dynamic control was selected, one has a selection of 3 different stages: steep, medium and flat: Fig. 94 Dynamic parameters Min./max. step size Applications Steep 0.02/1.0 Strong acids and alkali (HCl, NaOH, HNO3 etc.), redox titrations such as iron (permanganometric or cerimetric), halogenides high concentrations...
- Page 50 Linear titration If linear titration control was selected, you have to define the step size. Fig. 95 Linear step size can be set from 0.001 to 5.000 ml. Fig. 96 Linear step width can also be set for end-point titration (pH and mV). In this type of titration, linear step width is used after the first continuous titration stage.
- Page 51 Pretitration If the titration agent consumption is roughly known, you can set a pretitration volume on the <Pretitration> menu. In this process, a defined volume is dosed ( = pretitrated) following the initial waiting time. After the addition of the pretitration volume, another defined span of time is observed as the waiting time before the next titration step is added.
- Page 52 Fig. 100 The possible pH end value input ranges from 0.000 to 14.000. The possible mV end value ranges from -2000 to +2000. The range of the µA input can be selected between 0.0 and 100.0. Automatic detection of the equivalence point (EQ) can be switched on and off for linear or dynamic titration.
-
Page 53: End-Point Titration' Titration Parameters
Fig. 103 ‘End-point titration’ Titration parameters 4.6.5 When working with end-point titration, there are some differences in context with linear and dynamic equivalence-point titration. As was already described in Chapter 4.5.2.3, end-point titration, in a first stage, proceeds by continuously dosing until a specific Delta value (“Delta end-point”) at a distance from the set end value is reached. -
Page 54: Dosing Parameter
4.6.6 Dosing parameter Fig. 106 The dosing parameters (dosing speed, filling speed and max. dosing/titration volume) are determined for each method. This applies to all types of methods such as manual and automatic titration, dosing and Solution Preparation. Fig. 107 The dosing speed can be set in % from 1 to 100 %. -
Page 55: Sample Identification
The following filling options can be set for the dosing mode Fig. 108 If”off“is selected for filling, filling it will not occur automatically after each dosing step. If “intelligent before“ is selected for filling, a verification will be performed each time prior to the next dosing step in order to determine whether the dosing step can still be made without a filling operation. -
Page 56: Documentation
4.6.8 Documentation Fig. 111 Three different format settings are available for documentation on a printer or USB device: “short”, “standard (with curve)” and “GLP”: Fig. 112 Method type Short documentation Standard documentation GLP-Documentation Automatic Method name, date, time, Same as Same as ‘Short documentation’... -
Page 57: System Settings
5 System settings Fig. 113 From the main menu (Fig. 113), using the front keys <MODE> and then <System settings> will get you to the system settings: Fig. 114 Setting the national language was already described in Chapter 2.5. 5.1 Calibration settings The Calibration settings item is used to select the buffers for the calibration of the pH electrode as well as to set the temperature of the buffer solution. - Page 58 The temperature can be set from 0.0 to 100.0 °C in increments of 0.1 °: Fig. 116 The type of calibration items is used to define whether a 2-point or a 3-point calibration is to be performed: Fig. 117 The pH buffers for the buffers 1 - 3 can be determined individually. Fig.
-
Page 59: Reagents – Dosing Unit
Fig. 119 After having determined the buffers for buffers 1 - 3, the selection is to be confirmed with <Accept values>. If the distance between 2 buffer values is too small (for instance, buffer 1 “6.87“ and buffer 2 “7.00“), an error message will appear: Fig. - Page 60 Fig. 122 Select <Dosing unit exchange>: Caution: the exchange procedure starts directly with any additional warning. Please take care that the titration tip is placed in a beaker or in the reagent bottle. The piston is raised to about 85%: Fig.
- Page 61 Now unlock the dosing attachment as shown in Figure 125: Fig. 125 Confirm with <OK> after the attachment has been unlocked. Now, the attachment will be raised all the way up: Fig. 126 The following message will be displayed: Fig. 127 Pull the attachment off toward the top and attach the new dosing attachment in the same manner.
- Page 62 Fig. 128 Confirm with <OK>/<ENTER>. If you changed the attachment size, you can select the size here now: Fig. 129 If you want to change reagents, you can reset the data completely: Fig. 130 Then, the attachment will lower back down. Now please lock the attachment.
- Page 63 Fig. 131 Fig. 132 Reagents: Unit size 20 or 50 ml (selectable) Reagent name (default: empty) Conzentration (default: 1.000000) Concentration determined on (default: empty) Expire date (default: empty) Opened/Produced on: (default: empty Test according to ISO 8655: (default: empty) ...
-
Page 64: Replacing The Titration Solution
Fig. 134 5.2.2 Replacing the titration solution If titration solutions are to be changed, since differing analysis methods are used, one should first consider whether the time required for frequent changes is not more expensive than the acquisition of another dosing unit. As a principle and in the case of all piston/cylinder- systems, a substitution of the titration solution by another one involves mixing and carry-over processes. -
Page 65: Rs232 Settings
5.4 RS232 Settings The <RS232 settings> item can be used to determine the device address of the TitroLine® 5000 and set the parameters of the two RS232 interfaces independent from each other: Fig. 135 The device address can be set from 0 – 15. Address 1 is the default setting: Fig. - Page 66 The baud rate is present to 4800. It may be set to 1200 – 19200: Fig. 138 The parity can be selected amongst <No>, <Even> and <Odd>. <No> is the default setting. Fig. 139 You may select between 7 and 8 data bits. 8 bits is the default setting. Fig.
-
Page 67: Connection Of Printers
Fig. 141 The connection via RS can be changed to USB (USB-PC). Fig. 142 After switching from RS232 to USB and vice versa, a restart is always necessary. Fig. 143 The USB driver can be downloaded from our homepage or it may be available on an included USB stick. -
Page 68: Stirrer
Fig. 144 Only one printer should be connected for one Titrator because an automatic printer recognition is not activated. Print PDF is the default setting. If you select “Print PDF“, please make sure that a USB stick is connected to the device. 5.6 Stirrer Stirrer <ON>... -
Page 69: Reset
5.8 RESET RESET will reset all settings to the factory setting. Please note: All methods will also be deleted. So please print the methods or export/copy them to a connected USB storage medium (cp. chapter 5.11). The RESET has to be confirmed separately once again: Fig. -
Page 70: System Tone
5.10 System Tone The system tone (sound) can be set on or off. Fig. 149 5.11 Data exchange All methods with all parameter settings and global memories can be stored and restored on a connected USB-memory. It is also possible to transfer the settings from one titrator to another one. The backup will be started with Settings backup: Fig. - Page 71 The backup folder on the USB-memory Stick starts with the backup date. Here it is 141002_151627 Settingsb…That means the backup is from 02 October 2014 15.16 hour: Fig. 152 Fig. 153...
-
Page 72: Software Update
5.12 Software Update Fig. 154 An update of the device software requires a USB stick containing a new version. For this operation, the two files that are needed have to be located in the root directory of the USB device: Plug the USB device into a free USB-A port, wait for some seconds, and then select the Software Update function. - Page 73 Fig. 156 which will change after a few seconds to the following display: Fig. 157 Fig. 158 Upon completion of the update (approx. 2-3 minutes), the device will shut down the software completely and proceed to a new start. Important: In the course of an update, the methods will not be deleted! You can continue to use them. If no valid update file is stored on the USB stick, the following message will appear: Fig.
-
Page 74: Connection Of Analytical Balances And Printers
6 Connection of Analytical Balances and Printers Connection of Analytical Balances As it often happens that the sample is weighed in on an analytical balance, it makes sense to connect ® ® this balance to the TitroLine 5000. To connect the balance to the TitroLine 5000, the balance must have a RS-232-C-interface and the connection cable must be configured accordingly. - Page 75 Fig. 160 The balance data can be edited one by one. Following a change, a cross will appear opposite the weighed-in quantity: Fig. 161 Weights may be deleted or added individually. It is also possible to delete all weights at one stroke. Fig.
-
Page 76: Data Communication Via Rs-232- And Usb-B Interface
7 Data Communication via RS-232- and USB-B interface 7.1 General Information The burette TitroLine® 5000 has two serial RS-232-C interfaces to communicate data with other devices. By means of these two interfaces it is possible to operate several devices on one computer (PC) interface. -
Page 77: Instruction Set For Rs-Communication
7.3 Instruction Set for RS-Communication The commands consist of three parts: Address two-digit aa, e.g.: 01 Command e.g.: DA Variable, if necessary e.g.: 14 and end of command <CR> <LF> Every command must be completed with the ASCII - sign <CR> and <LF> (Carriage Return and Line Feed). - Page 78 ® 8 Maintenance and Care of the TitroLine 5000 The preservation of the proper functioning of the piston burette requires testing and maintenance work to be performed on a regular basis. Regular inspections are essential prerequisites for the correctness of the volume and the proper functioning of the piston burette.
-
Page 79: Storage And Transportation
Please note: Depending on the respective application, there may be different specifications for the entirety of the inspection and maintenance work to be performed. The individual intervals may be extended if no complaints occur, but they will have to be shortened again as soon as any problem has arisen. -
Page 80: Index
11 Index analytical balance 84 Sample weight and volume (sample quantity) 110 Balance data editor 142 Calculation Formula 107 Setting the Language of the Country 84 Calibration settings 126 Software Update 139 change method parameters 104 Statistics 114 Connection of Analytical Balances 142 storage 147 Connection of Printers 136 System settings 126... - Page 82 ® Typ / type / type / tipo TitroLine 5000 Bescheinigung des Herstellers Wir bestätigen, dass oben genanntes Gerät gemäß DIN EN ISO 9001, Absatz 8.2.4 „Überwachung und Messung des Produkts“ geprüft wurde und dass die festgelegten Qualitätsanforderungen an das Produkt erfüllt werden.
Need help?
Do you have a question about the TitroLine 5000 and is the answer not in the manual?
Questions and answers