Table of Contents
Advertisement
Advertisement
Table of Contents
Troubleshooting

Summary of Contents for Dawes Cycles ARC
- Page 1 OWNER’S MANUAL...
-
Page 2: Table Of Contents
Contents About this Manual Important Safety Information Dawes Arc Folding E-Bike Diagram Operating Instructions 7-19 Important Notices, Helmets & Reflectors (Safety) Setup: Battery & Charging Setup: Battery Checking Setup: Folding Method Setup: Saddle Position Setup: Pedals Setup: Derailleur System Getting Started: Battery Charging... -
Page 3: About This Manual
About this Manual This manual is written to help you to get the best performance, comfort, enjoyment and safety when riding your new E-bike. The manual describes specific care and maintenance procedures that help protect your warranty and ensure years of trouble free use. Please pay particular attention to the section on battery charging and maintenance. It is important for you to understand the features and operation of your new E-bike so that you can get maximum enjoyment with maximum safety. -
Page 4: Important Safety Information
Important Safety Information Your E-Bike can provide many years of service, fun and fitness, if you take good care of it. Understand the features of your E-Bike and become aware of the challenges that you will meet on the road. There are many things you can do to protect yourself while riding. -
Page 5: Important Safety Information
Important Safety Information Ride Within Your Limits! Take it slow until you are familiar with conditions that you encounter. Be especially careful in wet conditions as traction can be greatly reduced and brakes less effective. Never ride faster than conditions warrant or beyond your riding abilities. Remember that alcohol, drugs, fatigue and inattention can significantly reduce your ability to make good judgments and ride safely. -
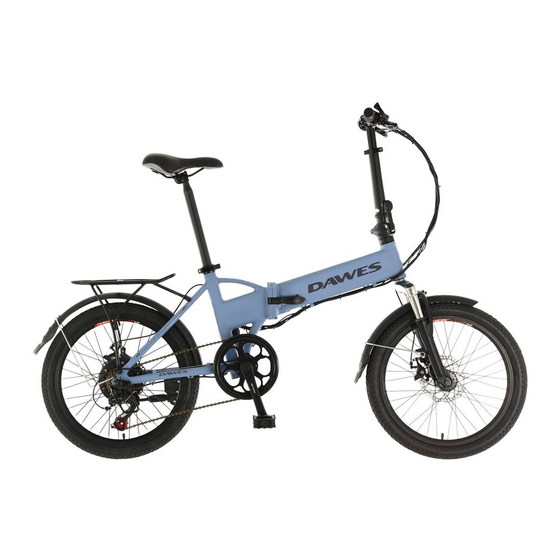
Page 6: Dawes Arc Folding E-Bike Diagram
Dawes Arc Folding E-Bike Diagram... -
Page 7: Operating Instructions
Important Notices, Helmets & Reflectors (Safety) Please read and understand these instructions completely before operating your E-bike to prevent serious injury to yourself and others, and to prevent damage to the bike. IMPORTANT NOTICES • Always recharge the battery immediately after each use. Failure to do so may damage the battery. •... -
Page 8: Setup: Battery & Charging
Setup: Battery & Charging Battery Warning • Do not immerse the battery in water • Store in a cool, dry environment • Only use the supplied official charger • Do not tamper with the battery case or internal cells for any reason, instead consult the supplier •... -
Page 9: Setup: Battery Checking
Setup: Battery Checking Inserting, unlocking and removing the battery: 1. Release the lock lever from its clasp on the side of the bike (as can be seen in step 4 on page 10) 2. Slot the battery into the downtube slot. 3. -
Page 10: Setup: Folding Method
4. Release the lock lever from its clasp on the side of the E-Bike. 5. Undo the lock lever and lift upwards to release inter- nal locking pin. Fold bike in half. Fig B - Dawes Arc folding method... -
Page 11: Setup: Saddle Position
Your leg should be slightly bent and just touching the center of the pedal. If this is not the case, Fig C - Dawes Arc Saddle your saddle height needs to be adjusted. -
Page 12: Setup: Pedals
Setup: Pedals Pedal installation Pedals come in pairs with “R” & “L” labels (Right and Left) (Fig D) Corrently tighten the pedals to avoid thread damage and personal injury (Fig E & F). Fig E - Drive side R (Clockwise fastening) Fig D - Right and Left Pedals Fig F - Non-Drive side L (Anti-Clockwise fastening) -
Page 13: Setup: Derailleur System
Setup: Derailleur System The derailleur system includes a rear derailleur, the shift levers, and the derailleur control cables, all of which must function properly for smooth gear shifting to occur. Rear Derailleur Begin by shifting the rear shifter to largest number indicated, loosen the cable from the rear derailleur cable anchor bolt, and place the chain on the smallest sprocket. -
Page 14: Getting Started: Battery Charging
Getting Started: Battery Charging When the ride is over or the battery is running low, charge the battery immediately. This will help maximise it’s useable life. There are two ways to charge the battery: 1. Uninstall from the bike to charge it separately 2. - Page 15 Getting Started: Battery Charging Check the battery Pack before using for the first time • The battery pack is supplied partially charged. To ensure full battery pack capacity, completely charge the battery pack for 7 hours before using for the first time. Battery Care Even with proper care,rechargeable batteries do not last forever.
-
Page 16: Getting Started: Pedal Assist System
This bike has a pedal assisted drive system. In EU countries, it is known legally as “PAS” cycle or Pedal Assisted System. The drive assisted system consists of a driving unit, a battery, a controller, and various electronic components (harness wires, sensors and switches). -
Page 17: Getting Started: Shifters
Getting Started: Shifters Your E-Bike Is equipped with a Shimano drivetrain. This consists of: • A rear sprocket cluster, called a freewheel • A rear derailleur • One shifter • One control cable • One front sprocket called a chaining •... -
Page 18: Getting Started: Riding Safely
Getting Started: Riding Safely Be familiar with all of the component parts of the e-bike and test all the electric functions before riding. Make sure all the components of the bicycle are in good condition, the battery is charged and the tyres are correctly inflated. When riding, please follow the road laws as all other road vehicles, including giving way to pedestrains, stopping at red lights and stop signs. -
Page 19: Getting Started: Riding Safely
Getting Started: Riding Safely Bike Control • Don’t carry packages or passengers that will interfere with your visibility or control of the bicycle. • Don’t use items that may restrict your hearing. • Do not lock up the brakes. When braking, always apply the rear brake first, then the front. The front brake is more powerful and if it is not correctly applied, you may lose control. -
Page 20: Maintenance And Cleaning
Maintenance and Cleaning Technological advances have made the E-Bike and the components more complex than ever before. With the pace of innovation increasing, this on-going evolution makes it impossible for this manual to provide all the information required to properly repair and/or maintain your E-Bike. In order to help minimise the chances of an accident and possible injury, it is recommended that you have any repair or maintenance performed by your local cycle store. -
Page 21: Important Notices, Helmets & Reflectors (Safety)
Inspection and Maintenance Checklist For your safety and enjoyment and to insure a long life for your E-Bike, inspect and maintain your E-Bike regularly. Use the table below for guidance. It is very important that you check certain systems and components before each and every ride. -
Page 22: Battery Storage
Battery Storage When storing your batteries for a long period of time: • Charge your batteries every 30 days to avoid capacity loss. Batteries slowly self-discharge when left unused for a long period of time;if the battery cells are allowed to reach a critically low voltage, their lifespan and capacity will be permanently reduced. -
Page 23: Faq
Q: Is it normal that the batteries get warm when recharging? A: Yes, it is normal that the batteries will become warm to the touch during the recharging process.This is because the increase of internal resistance and less energy conversion efficiency from electric energy to chemical energy. Q: How long will my batteries last before needing replacement? A: Average battery life depends on use and conditions. -
Page 24: Service & Maintenance
Service & Maintenance Some service and maintenance can and should be performed by the owner, and requires no special tools or knowlwdge beyond what is presented in this manual. The following are examples of the type of service you should perform yourself. All other service, maintenance and repair should be performed in a properly equipped facility by a qualified E-Bike mechanic using the correct tools and procedures specified by the manufacturer. - Page 25 Service & Maintenance After every long or hard ride or after every 10 to 20 hours of riding: • Squeeze the front brake and rock the E-Bike forward and back. Does everything feel solid? If you feel a clunk with each forward or backward movement of the E-Bike, you probably have a loose headset.
- Page 26 Service & Maintenance Inflate the tube just enough to give it some shape. Starting at the valve stem use your thumbs to seat the tyre bead inside the rim. Work your way around both side of the wheel until the entire bead is seated in the rim. Be careful not to pinch the tube between the tyre bead and the wheel rim.
-
Page 27: Basic Maintenance
Service & Maintenance Twist the broken spoke around the spoke next to it keep if from flopping around and getting caught between the wheel and the frame. Spin the wheel to see if the rim clears the brake pads. If the wheel will not turn because it is rubbing against a brake pad, try turning the brake cable adjusting barrel(s) clockwise to slacken the cable and open up the brakes. -
Page 28: Service & Maintenance
Service & Maintenance Storage Keep your bicycle in a dry location which is away from the weather and sun. Direct sunlight may cause paint to fade or rubber and plastic parts to crack. Before storing your bicycle for a long period of time, clean, lubricate all components and polish the frame. -
Page 29: Troubleshooting
Troubleshooting PROBLEM POSSIBLE CAUSE SOLUTION... - Page 30 Troubleshooting PROBLEM POSSIBLE CAUSE SOLUTION...
- Page 31 Troubleshooting PROBLEM POSSIBLE CAUSE SOLUTION...
- Page 32 Troubleshooting PROBLEM POSSIBLE CAUSE SOLUTION...
-
Page 33: Troubleshooting
Troubleshooting PROBLEM POSSIBLE CAUSE SOLUTION... - Page 34 Information Card Purchase record card Your new bicycle is supplied by: Fill in immediately and retain as a record of your purchase: Tandem Group Cycles * Please retain your sales receipt for any possible warranty claims 35 Tameside Drive Castle Vale Your name: Birmingham West Midlands...
- Page 35 Please visit W W W . T G C . B I K E To see all of our brands You can e-mail us at: support@tgc.bike...
Need help?
Do you have a question about the ARC and is the answer not in the manual?
Questions and answers
How do I straighten the handle bar? Is there any video? The manual is not very clear. I **** frustrated.