Table of Contents
Advertisement
Advertisement
Table of Contents

Related Manuals for ACTinBlack DTNVG

Summary of Contents for ACTinBlack DTNVG
- Page 1 DTNVG Binocular Night Vision Device OPERATOR MANUAL...
- Page 2 Inside Cover...
- Page 3 OPERATOR MANUAL DTNVG Binocular Night Vision Device ACTinBlack S.à r.l. Rue de l’Industrie, +352-20 30 10 30 L-3895 Foetz, info@actinblack.com Grand Duchy of Luxembourg www.actinblack.com...
- Page 4 Blank Page...
-
Page 5: Table Of Contents
TABLE OF CONTENTS Table of Contents List of Illustrations List of Tables viii CHAPTER 1: GENERAL INFORMATION Introduction Equipment Description Standard Kit Parts List System Performance and Data CHAPTER 2: PREPARATION FOR USE Introduction Battery Precautions Battery Installation Eyecup Installation Demist Shield Installation Sacrificial Window Installation CHAPTER 3: OPERATING INSTRUCTIONS... -
Page 6: Table Of Contents
TABLE OF CONTENTS (CONT.) CHAPTER 4: MAINTENANCE INSTRUCTIONS Introduction Deactivation Battery Removal Cleaning the DTNVG Cleaning the Optics Checking for Damage and Corrosion Neck Cord CHAPTER 5: TROUBLESHOOTING Troubleshooting Procedures APPENDIX A: SPARE AND REPAIR PARTS LIST Introduction Contact Information... -
Page 7: List Of Illustrations
LIST OF ILLUSTRATIONS Product Illustration Controls and Indicators... -
Page 8: List Of Tables
LIST OF TABLES Standard Kit Parts List System Performance and Data Controls and Indicators Troubleshooting... -
Page 9: Chapter 1: General Information
GENERAL INFORMATION Introduction: This manual provides operation and field level maintenance instructions for the DTNVG. It also provides specifications and data on the performance of the Binocular. To ensure the safety of the operator and the correct operation of the Binocular it is recommended that this manual is read carefully in its entirety before any deployment or field application. - Page 10 Monoculars may be pivoted sideways (when pivoted outside the field of view, the monocular will individually turn off.) When the DTNVG is mounted to a helmet or head mont, the DTNVG may be flipped up and temporarily stowed, the DTNVG will automatically go into Standby Mode turning off the Monoculars.
-
Page 11: Standard Kit Parts List
Standard Kit Parts List: Standard Kit Parts List: Standard Kit Parts List: The standard DTNVG kit comes with the items listed The standard DTNVG kit comes with the items listed The standard DTNVG kit comes with the items listed in the following table. -
Page 12: System Performance And Data
System Performance and Data: The chart below lists the technical specifications and data of the DTNVG system. The data contained herein is subject to change without notice. ITEM LIMITS Electrical Data Power Source Battery (1.5V/3.0V DC) Battery Requirements 1 AA or... - Page 13 Focus Range 25(PVS14) or 41(AN/AVS) cm to infinity Eye Relief 25 mm Objective Lens F/1.23 27mm (AN/AVS) or F/1.2 25mm (PVS14) Resolution up to 1.3 cy/mR with 64 lp/mm tube Environmental Data Operating Temperature -30°C to 50°C Storage Temperature -50°C to 70°C Illumination Required Overcast starlight to moonlight Immersion...
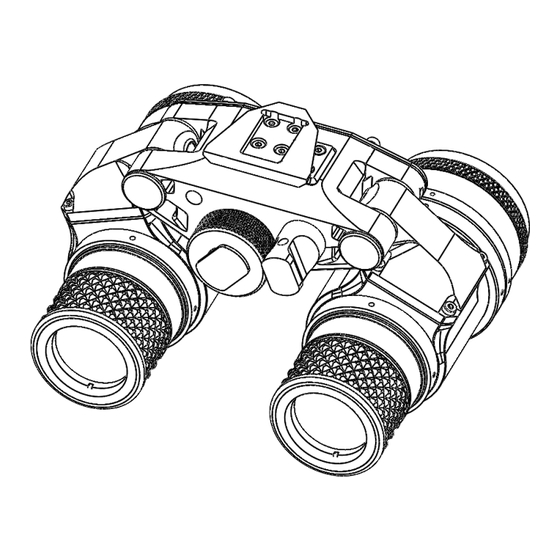
- Page 14 Figure 1-1 Product Illustration...
-
Page 15: Chapter 2: Preparation For Use
Do not heat, puncture, disassemble, short circuit, incinerate, attempt to recharge or otherwise tamper with the batteries. Turn OFF the DTNVG if the battery compartment becomes unduly hot. If possible, wait until the batteries have cooled before removing them. WARNING Do not replace batteries in a potentially explosive atmosphere. -
Page 16: Battery Installation
Battery Installation: Install one (1) AA or CR123A battery as follows. Remove the battery cap by turning it counter- clockwise. Check to ensure the O-ring is present. If not, replace it. Observe polarity as indicated on the outside of the battery compartment. Insert battery into the battery compartment, Minus (-) end first. -
Page 17: Eyecup Installation
Eyecup Installation: Perform the following procedure to install eyecup onto the Binocular. Carefully press the eyecup over the end of the Rotate the eyecup into proper eyepiece lens. viewing position. Adjust for best fit. The eyecup must seal around your eye and prevent the green glow from escaping. -
Page 18: Sacrificial Window Installation
Sacrificial Window Installation: Perform the following procedure to install the sacrificial window onto the objective lens assembly. CAUTION If adverse operating conditions (blowing dust or sand) are expected to exist, attach the sacrificial window to protect the objective lens from scratches or other damage. -
Page 19: Chapter 3: Operating Instructions
DTNVG under normal circumstances and environments. Controls and Indicators: The DTNVG is designed to adjust for different users and corrects for most differences in eyesight. The controls and indicators for the DTNVG are shown in Figure 3-1 and are described in Table 3-1. - Page 20 Figure 3-1 Controls and Indicators...
- Page 21 Control and Functions Indicators Power Switch Controls Binocular and IR source, ON or OFF. OFF System OFF. ON activates the Binocular. IR/PULL momentarily activates the IR source when the knob is turned clockwise. Pull and turn the knob clockwise from the ON position to continuously activate the IR source.
- Page 22 IR Source On A steady red light indicates that the IR source is Indicator ON. It is visible through the eyepiece just outside the intensified field-of-view. Objective Focus Focuses objective lens. Adjusts for sharpest image of viewed object. Dioptre Focuses eyepiece lens to user’s eye. Adjust for Adjustment sharpest image of intensifier screen.
-
Page 23: Operation
Operation: CAUTION Operate the binocular only under darkened conditions or use the objective lens cap to cover the objective lens for daylight conditions. NOTE When using the binocular without a mounting device, make sure to place the neck cord around your neck. Ensure that the battery is installed correctly. -
Page 24: Operations With Ir Source
Operations with IR Source: WARNING The IR source is a light that is invisible to the unaided eye for use during conditions of extreme darkness. however, the light from the IR source can be detected by the enemy using night vision devices. -
Page 25: Operation In Conditions Of Blowing Dust Or Sand
Keep the carrying case closed unless removing or replacing items. Ensure that all dust and sand is removed from the DTNVG and carrying case after operation. Operation in Rainy or Humid conditions: CAUTION Operation in rainy or humid conditions can... -
Page 26: Operation In Salt Water Areas
Install objective lens cap. CAUTION Prior to placing DTNVG into carrying case, ensure DTNVG and case are free of dirt, dust, and moisture. Place the Binocular, accessories and cleaning supplies back into their storage/carrying case. It is... -
Page 27: Chapter 4: Maintenance Instructions
CHAPTER 4: MAINTENANCE INSTRUCTIONS Introduction: The DTNVG is designed to be used in diverse environments and rugged conditions. It is recommended that regular and simple maintenance be performed for optimal system performance. CAUTION The binocular is a precision electro-optical instrument and must be handled carefully. -
Page 28: Cleaning The Optics
Checking for Damage and corrosion: As a general guideline, conduct an inspection of the DTNVG, accessories, and the case after every use. Look for heavy wear and cracks in rubber or plastic. Inspect for moisture or corrosion in... -
Page 29: Neck Cord
Report missing or damaged items, for replacement. As a general guideline, conduct an inspection of the DTNVG, accessories, and the case after every use. Look for heavy wear and cracks in rubber or plastic. Inspect for moisture or corrosion in electronic housings and in the battery compartment. - Page 30 Blank Page...
-
Page 31: Chapter 5: Troubleshooting
Visual. Turn switch to RESET/OFF fails to position and then ON. activate. Check for defective, Replace battery or install missing or improperly correctly. installed battery. If DTNVG still fails to activate, refer to higher level of maintenance. Table 5-1 Troubleshooting... - Page 32 IR source In a dark location If IR source still fails to fails to with system turned activate, refer to higher activate. on, activate IR source. level of maintenance. Visually check IR source operation; scene should brighten. IR source Visual. Refer to higher level of indicator maintenance.
-
Page 33: Introduction
This section provides information needed to identify, contact and order spare and/or repair parts for the DTNVG. Contact Information: To order spare or repair parts for the DTNVG or any of your night vision products contact: ACTinBlack S.à r.l. Rue de l’Industrie,... - Page 34 Blank Page...
-
Page 35: Appendix B: Warranty Information
Defects after Delivery and Warranty Subject to the following provisions, ACTinBlack warrants to Purchaser that the goods manufactured by ACTinBlack shall be free from defects in material and workmanship. ACTinBlack’s obligations, set forth below, shall apply only to failures to meet the foregoing warranties for parts only occurring within twenty- four (24) months from the date of shipment. - Page 36 Return Material Authorization Number (RMA#): Warranty and non-warranty items returned to ACTinBlack for repair or replacement require a RMA#. Email info@ACTinBlack.com, with a serial number and detailed information to obtain a RMA#. THIS WARRANTY IS EXCLUSIVE AND IN LIEU OF ANY OTHER WARRANTY,...
- Page 37 Blank Page...
- Page 38 ACTinBlack S.à r.l. Rue de l’Industrie, L-3895 Foetz, Grand Duchy of Luxembourg www.actinblack.com...
Need help?
Do you have a question about the DTNVG and is the answer not in the manual?
Questions and answers