Table of Contents
Advertisement
Quick Links
Advertisement
Table of Contents

Related Manuals for Teleco TSV20D


Summary of Contents for Teleco TSV20D
-
Page 2: Table Of Contents
Contents Safety Information ..........76 Markings on the Product........77 Environmental Information........78 Features ...............78 Accessories Included..........78 CAUTION: TO REDUCE THE RISK OF ELECTRIC SHOCK DO Standby Noti cations ..........78 NOT REMOVE COVER (OR BACK). TV Control Switch & Operation......78 NO USER-SERVICEABLE PARTS INSIDE. REFER SERVICING TO QUALIFIED SERVICE PERSONNEL. - Page 3 Carefully attach the stand to the TV. If the stand is provided with screws, tighten the screws rmly to prevent the TV from tilting. Do not over-tighten the Do not ingest the battery, Chemical Burn Ha ard screws and mount the stand rubbers properly. This product or the accessories supplied with the Do not dispose of the batteries in re or with ha ardous product may contain a coin/button cell battery.
- Page 4 AVL (Automatic Volume Limiting) PLL (Frequency Search) This television is designed to be environment friendly. To reduce energy consumption, you can follow these PC input steps Game Mode (Optional) If you set the Picture off function the TV will reduce the energy Programme recording consumption accordingly.
- Page 5 appear on the screen. Scroll through the available sources by pushing the button up or down. Press the middle of the button down and hold it down for a few seconds, the TV will turn into standby mode. Connect the ground terminal of the AC adaptor with the ground terminal provided at the power outlet using the enclosed If you turn the TV off, this circle starts again...
- Page 6 usage, content owners may require Microsoft to revoke the device’s ability to consume PlayReady-protected content. Revocation should not affect unprotected content or content protected by other content access technologies. Content owners may require you to 2400 - 2483,5 MHz (CH1-CH13) <...
- Page 7 Switches On / Off the TV Remote Control Launches the Net ix application Switches the channel, enters a number or a letter in the text box on the screen. Displays channel list / Switches to TV Source Returns to previous screen, opens index page (in TXT mode) Opens the portal page, where you can reach many web based applications...
- Page 8 See the illustrations on the left side. | You can use YPbPr to VGA cable to enable YPbPr signal via VGA input. You cannot use VGA and YPbPr at the same time. | To enable PC/YPbPr audio, you will need to use the side audio input s with a YPbPr/PC audio cable f or audio connect ion.
-
Page 9: Features
should be made. Before the satellite search starts, a menu will be displayed where you can select to start a installation. Set the Connect the power cord to a power source such as a and than set the as the wall socket (11 -2 V AC, H ). -
Page 10: Remote Control
available in menu and can Back up the les on your storage devices be turned off/on later. before connecting them to the TV. Manufacturer will not be responsible for any le damage or data loss. Press OK button on the remote control to continue Certain types of USB devices (e.g. -
Page 11: Recording A Programme
If the AC cord is unplugged while there is an active USB-recording timer setting, it will be cancelled. Select the item in the Multipartition support is available. A maximum of two menu to con gure the recording different partitions are supported. The rst partition of settings. -
Page 12: E-Manual
To close the E-Manual screen press the button. This function allows to control the CEC-enabled The contents of the E-Manual may vary according to devices, that are connected through HDMI ports by the model. using the remote control of the TV. option in the menu should be set as... - Page 13 System - Picture Menu Contents You can change the picture mode to suit your preference or requirements. Picture mode can be set to one of these options: (optional), Adj u sts the light and dark values on the screen. Adj u sts the brightness values on the screen. Sets the sharpness value for the obj e cts displayed on the screen.
- Page 14 Adj u sts the volume level. Selects the eq u alizer mode. Custom settings can be made only when in mode. Adj u sts whether the sound comes from the left or right speaker. Sets headphone volume. Please ensure before using headphones that the headphone volume is set to a low level, to prevent damage to your hearing.
- Page 15 Changes timeout duration for menu screens. You can enable or disable this feature by setting it as Ensures that your TV has the latest rmware. Press OK to see the menu options. Displays current software version. This option is used to select which subtitle mode will be on the screen ( subtitle / subtitle) if both is available.
-
Page 16: Software Upgrade
This setting allows you to select only the broadcasts within the selected network to be listed in the channel list. This feature is available only for the country option of Norway. Deletes all stored channels and settings, resets TV to factory settings. Displays Fransat options. - Page 17 Displays detailed information about selected events. Some channels send information about their Views ltering options. broadcast schedules. Press the button to view The TV will start to menu. record the selected events. You can press again to There are 3 different types of schedule layouts stop the recording.
- Page 18 O n the main menu select and then If you cannot select an input source, it is possible . Navigate to and press the that no device is connected. If not; OK button. In menu select Check the AV cables and connections if you are and press OK button to check for a new trying to switch to the input source dedicated to the software upgrade.
- Page 19 The following table is an illustration of some of the typical video display modes. Your TV may not support PAL O all resolutions. SEC A M N T SC 4 . 4 3 6 4 0 x 35 0 8 5 H z N T SC 3 .5 8 O 6 4 0 x 4 0 0 7 0 H z 6 4 0 x 4 8 0 6 0 H z...
- Page 20 .dat, vob MPEG 1 / 2 1 0 8 0 P@ 3 0 fps - 4 0 Mbps MPEG 1 / 2 , .mpg, .mpeg MPEG 4 MPEG 1 / 2 , H . 2 6 4 , 1 0 8 0 Px2 @ 3 0 fps - 6 2 . 5 Mbps, 1 0 8 0 P@ 6 0 fps - 6 2 . 5 Mbps .ts, .trp, .tp AVS, MVC 1 0 8 0 P@ 3 0 fps - 6 2 .
- Page 21 MPEG1/2 Layer1 32Kbps ~ 448Kbps .mp3, MPEG1/2 Layer2 8Kbps ~ 384Kbps 16KHz ~ 48KHz MPEG1/2 Layer3 8Kbps ~ 320Kbps MPEG1/2 Layer1 32Kbps ~ 448Kbps MPEG1/2 Layer2 8Kbps ~ 384Kbps 16KHz ~ 48KHz MPEG1/2 Layer3 8Kbps ~ 320Kbps 32Kbps ~ 640Kbps 32KHz, 44.1KHz, 48KHz AAC, HEAAC 8KHz ~ 48KHz...
- Page 22 MPEG1/2 Layer1 32Kbps ~ 448Kbps MPEG1/2 Layer2 8Kbps ~ 384Kbps 16KHz ~ 48KHz MPEG1/2 Layer3 8Kbps ~ 320Kbps .wav LPCM 64Kbps ~ 1.5Mbps 8KHz ~ 48KHz IMA-ADPCM, 384Kbps 8KHz ~ 48KHz MS-ADPCM G711 A/mu-law 64Kbps ~ 128Kbps 8KHz MPEG1/2 Layer3 8Kbps ~ 320Kbps 16KHz ~ 48KHz 32Kbps ~ 640Kbps...
- Page 23 Wh e n c o n n e c t in g devic e s to your T V ’ s c o n n e c t ors by usin g DVI c o n v erter c a ble( D VI to HDMI c a ble - n o t supplied) , you c a n refer to th e followin g resolution in f ormation .
- Page 24 Highlight and press the OK button. On the next screen you can change the IP and D S settings of the TV. Highlight the desired one and press Left or Right button to change the setting from . ow you can enter the ou must have a modem/router connected to an active / or values.
- Page 25 values for th e wireless stan d ards. T h e y are n o t th e in your devic e . For th i s, your mobile devic e must h a ve ac t ual speeds of data tran s mission . an appropriate sh a rin g software.
-
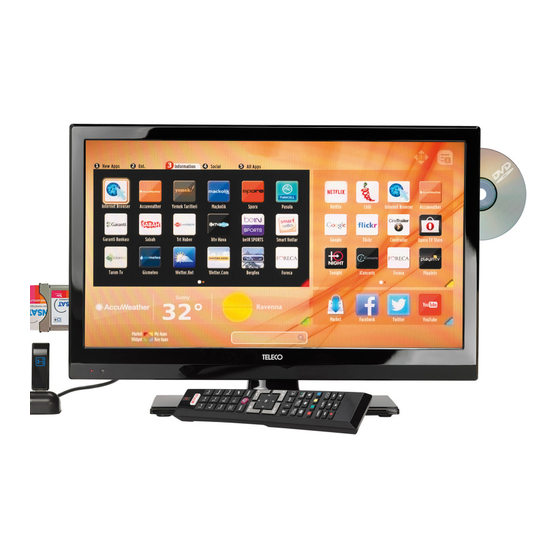
Page 26: Internet Portal
In such a case, the MAC address is authenticated If you select the media type as and choose a each time when you connect to the internet. This is a device from the selection menu. Then select the folder precaution against unauthorized access. Since your TV with video les in it on the next screen and all the has its own MAC address, your internet service provider available video les will be listed. -
Page 27: Internet Browser
Possible application dependent problems may be caused by Some web pages include ash content. These are not the content service provider. supported by the browser. Portal service content and the interface may be changed at any Your TV does not support any download processes from time without prior notice. -
Page 28: Smart Center
Make sure the TV and mobile device are connected to the same network. For media sharing feature option should be enabled if available . Press the button on the remote, select menu and press OK. Highlight change as . Your TV is ready to connect to your mobile device now. - Page 29 FollowMeTV function (if If the Media Share widget is pressed, a screen is available) will start automatically when this setting is displayed where you can select the media le type to enabled. Default is disabled. share with your TV. When enabled, your mobile Not all image le formats are supported.
-
Page 30: Dvd Mode
DVD Mode efore playing, clean the disc with a cleaning cloth. Wipe the disc from the center out. DVD Player is a class 1 laser product. However this product uses a visible laser beam which could cause hazardous radiation exposure. e sure to operate the player correctly as instructed. -
Page 31: Remote Control
Press on the power button Make sure the DVD disc surface is not damaged. Please insert a disc into the loader. (Scratch, ngerprint etc.) The disc will be automatically loaded and play will Clean the DVD disc and try again. commences if the disc does not have any menus See instructions described in “Notes on Discs”... - Page 32 DVD contains excellent sound and video Single- Audio due to Dolby Digital and MPEG - 2 System. sided; 24 0 min. 12 cm Various screen and audio functions can Double- be easily selected through the on screen Video sided; 4 8 0 min. menu.
- Page 33 Remote Control Standby Numeric buttons B a ck Navigation buttons OK / Select Info Angel Zoom Repeat L a nguage selection Rapid reverse Play Stop Pause Rapid advance Subtitle Root Title Display / DVD Menu Search mode Source TV Menu Buttons not indicated with a number are not functional in DVD mode.
- Page 34 You can operate DVD, movie CD, music or picture CD’s content by using the proper buttons on your remote control. Below are main functions of commonly used remote control buttons. Play Play Play Play Pause Pause Pause Pause Stop Stop Stop Stop Skip backward/...
- Page 35 Connect the cigarette lighter plug cable into the cigarette lighter socket of your car. Plug the other side of 12 volt cable into DC 12 socket on the back side of the TV. Then the standby L E D will light up. Press the button, buttons or a numeric button on the remote control or press...
- Page 36 Sizes (mm) min. (mm) th (X) max. (mm) - 111 -...
- Page 37 TELECO TSV20D DIAGONALE VISIBLE ECRAN 49,8 CM 19,6 POUCES 14 Watt 20 kWh/an 0,5 Watt 1366x768...
Need help?
Do you have a question about the TSV20D and is the answer not in the manual?
Questions and answers