Table of Contents
Advertisement
Quick Links
Advertisement
Table of Contents

Summary of Contents for Phonic STUDIO WIZARD
- Page 1 STUDIO WIZARD Studio Monitor Controller...
- Page 2 IMPORTANT SAFETY INSTRUCTIONS The apparatus shall not be exposed to dripping or splashing and that no objects with liquids, such as vases, shall be placed on the apparatus. The MAINS plug is used as the disconnect device, the disconnect device shall remain readily operable.
-
Page 3: Table Of Contents
Initial Setup..........................5 Level Setting..........................5 Signal Routing.........................5 MAIN UNIT.............................6 Front Panel..........................6 Rear Panel..........................7 REMOTE UNIT..........................8 Front Panel..........................9 TROUBLESHOOTING.........................12 APPLICATIONS...........................13 SPECIFICATIONS........................14 DIMENSIONS..........................16 BLOCK DIAGRAM........................17 Phonic preserves the right to improve or alter any information within this document without prior notice. V1.4 FEB 05,2008... -
Page 4: Introduction
DAW setup. The possibilities are endless Switch amongst 3 sets of studio monitors with the Studio Wizard, as you can accept mul- Built-in Talkback microphone for easy com- tiple audio signals and send them to any num- ... -
Page 5: Quick Setup
Choose the output you wish to route any Initial Setup signal to from the Studio Select area of the 1. Turn all power to the Studio Wizard off. To remote unit. This could include the Record fully ensure this, disconnect the AC cable. -
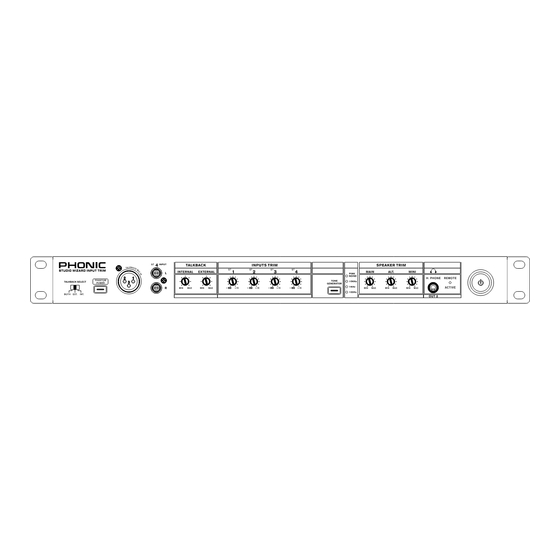
Page 6: Main Unit
Internal and External Talkback Controls These two recessed trim level controls adjust the The main unit of the Studio Wizard can be placed gain level of the internal and external talkback in a typical audio rack with the rest of your gear microphones. -
Page 7: Rear Panel
13. “To Remote" Connector This RJ-45 jack allows users to connect the main 18. Head Phone Outputs unit of the Studio Wizard to the remote desk-top These 1/4" TRS outputs provide balanced line- controller. level signals ideal for use with headphone distri- bution amplifiers. -
Page 8: Remote Unit
Remote Unit The Studio Wizard’s Remote Unit is where all the magic happens. With all the inputs and outputs made else where (and out of your way), users are free to move this small unit around as they see fit. You can route your input signals to any number of possible outputs (record, studio, etc.), as well as to speakers... -
Page 9: Front Panel
Setting" mode. 29. Sum Button When any of the Studio Select buttons is pressed, the sum key will allow you to select all of the in- puts from your Group Setting and send them to the corresponding output. STUDIO WIZARD... - Page 10 Press this button once and release to route the only or all outputs simultaneously. talkback microphone signal to both the Studio and Headphone outputs. 41. Dim Level This knob adjusts the amount of attenuation ap- plied when the Dim button is pushed. STUDIO WIZARD...
- Page 11 LED panel. One to two seconds after level changes have been made, the LED will return to displaying the monitor level. Rear Panel 56. RJ-45 Jack This is an RJ-45 jack. The cable that connects this unit to the main unit is plugged in here. STUDIO WIZARD...
-
Page 12: Troubleshooting
No Sound? one-by-one. If one or more of the sources Is the power on? Check the LED indicator. signal quality is poor, the Studio Wizard is If the indicator remains dark, consult the not the culprit in this case. -
Page 13: Applications
APPLICATIONS HEADPHONE MICROPHONE TURNTABLE SPEAKER COMPUTER SOUNDCARD PHONIC P8A ACTIVE MONITORS HELIX BOARD 24 FIREWIRE AMPLIFIER TAPE RECORDER MIXER HEADPHONES ACTIVE SUBWOOFER SPEAKERS DAT RECORDER STUDIO WIZARD REMOTE UNIT STUDIO WIZARD... -
Page 14: Specifications
REC OUT 1 Type 1/4" TRS Balanced Impedance 600Ω THD+N Less than .003% (1KHz @ 0dBu) Frequency Response 10Hz-30KHz, +/-0.5dB Output level maximum +18dB Gain control Range -∞ to +18dB REC OUT 2 Type RCA-unbalanced Impedance 60 Ω STUDIO WIZARD... - Page 15 Volume Display Type 7 segment numeric LED Display Remote connect RJ45 Power requirements Main voltage ~100V to ~120 V AC,50~ 60 Hz Fuse 100-120V AC: 1A, 200-240V AC:500 mA Power consumption 30 Watts Mains Connection Standard IEC Receptacle STUDIO WIZARD...
-
Page 16: Dimensions
DIMENSIONS 482/19 195/7.7 * All measurements are shown in mm/inches. STUDIO WIZARD... -
Page 17: Block Diagram
BLOCK DIAGRAM STUDIO WIZARD...
Need help?
Do you have a question about the STUDIO WIZARD and is the answer not in the manual?
Questions and answers