
Summary of Contents for Sharper Image SI561
- Page 1 “Bright As Day!” ® Power-Port Desk Lamp SI561 Instructions Read and save these instructions. SI561 IM_v2 1106.indd 1 12/7/06 4:08:15 PM...
- Page 2 Dear Sharper Image Customer, Thank you for your purchase of a Sharper Image product. We appreciate your business very much. Our goal is that you will be completely satisfied with this product’s quality and performance. We offer generous return privileges and excellent warranties on all our products.
- Page 3 4. Do not remain in direct light from the lamp if skin feels warm. 5. Do not look directly at lighted lamp. 6. Keep lamp away from materials that may burn. 7. Use only with a 27-watt lamp/bulb. SI561 IM_v2 1106.indd 3 12/7/06 4:08:16 PM...
- Page 4 If the plug does not fit into the outlet, contact a qualified electrician to install the proper outlet. Never use with an extension cord unless plug can be fully inserted. Do not alter the plug in any way. SI561 IM_v2 1106.indd 4 12/7/06 4:08:16 PM...
-
Page 5: Maintenance
Maintenance caution: If any malfunction occurs, do not try to repair the unit yourself. Return it to an authorized facility or to the manufacturer. The appliance has no user-serviceable parts. SI561 IM_v2 1106.indd 5 12/7/06 4:08:16 PM... -
Page 6: General Instructions
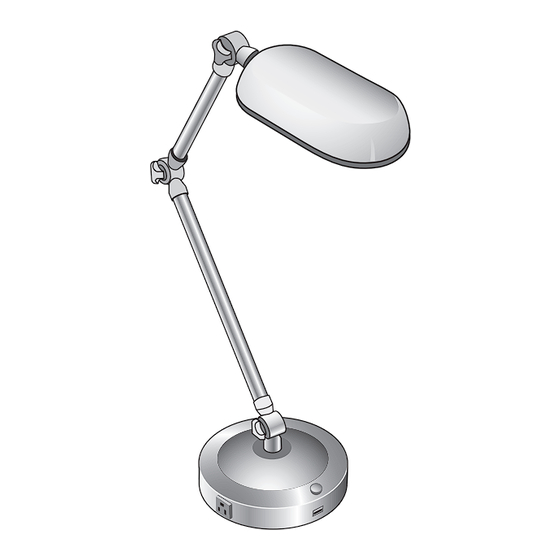
Instructions Parts Diagram Adjustment Knobs Lamp Cover Arms Lamp/Bulb (FML27) Power Control Base Knob Grounded USB Port Power Outlets SI561 IM_v2 1106.indd 6 12/7/06 4:08:17 PM... - Page 7 3. To adjust the lamp height and angle, loosen the knobs on the fixture arms and move the arms to the desired height and angle, then tighten the knobs to secure the new positions. SI561 IM_v2 1106.indd 7 12/7/06 4:08:17 PM...
-
Page 8: Operation
The built-in USB power port can be used to connect, power and charge compatible USB products. note: Not all products that have a USB cable can be charged by a USB port. Consult your USB product manual if it isn’t obtaining correct power. SI561 IM_v2 1106.indd 8 12/7/06 4:08:17 PM... -
Page 9: Lamp Replacement
(See Figure B below.) Figure B 2. Replace with a new lamp. Replacement lamps are available from The Sharper Image (Item No. SI928). Do not use any other lamp with this product. 3. Gently push the lamp and socket back into place. - Page 10 — Model sI561 WARnIng: Changes or modifications to this unit not expressly approved by the party responsible for compliance could void the user’s authority to operate the equipment. This equipment has been tested and found to comply with the limits for a Class B digital device, pursuant to Part 15 of the FCC Rules.
- Page 11 — Model sI561 • Reorient or relocate the receiving antenna. • Increase the separation between the equipment and receiver. • Connect the equipment into an outlet on a circuit different from that to which the receiver is connected.
-
Page 12: One Year Warranty
The Sharper Image warrants this product against defects in materials and workmanship. When repair is not practical, The Sharper Image will have the option to replace the defective product with a fully warranted, factory-reconditioned product that is the same or has similar functionality.
Need help?
Do you have a question about the SI561 and is the answer not in the manual?
Questions and answers