
Summary of Contents for Sirona XIOS XG
- Page 1 MVKOMNS kÉï=~ë=çÑW= uflp=ud=rp_=ãçÇìäÉ=~åÇ=ëÉåëçêë léÉê~íáåÖ=fåëíêìÅíáçåë=~åÇ=fåëí~ää~íáçå båÖäáëÜ båÖäáëÜ Operating instructions and installation, XIOS XG USB module and sensors XIOS XG Select XIOS XG Supreme...
-
Page 3: Table Of Contents
Sirona Dental Systems GmbH Table of contents Operating Instructions and Installation XIOS XG USB module and sensors Table of contents General information ....................Dear Customer, .................... Contact information ..................General information about this operating manual ........Other valid documents ................. - Page 4 Table of contents Sirona Dental Systems GmbH Operating Instructions and Installation XIOS XG USB module and sensors 3.10 Certification, registration and standards............3.11 Symbols ......................3.12 Position of the labels ..................Installation ........................ Fitting a second protective ground conductor on the PC ......
- Page 5 Sirona Dental Systems GmbH Table of contents Operating Instructions and Installation XIOS XG USB module and sensors Maintenance and inspection..................Hygiene ......................6.1.1 Care, cleaning agents, and disinfectants ........6.1.2 USB module and sensors..............6.1.3 Sensor holders ................Regular inspections..................
-
Page 6: General Information
XIOS XG can be operated with two types of sensor – the XIOS XG Select and XIOS XG Supremesensors. Both types of sensor are available in three sizes (0, 1 and 2). By using XIOS XG Supreme sensors enhanced image processing functions are available to you in SIDEXIS XG / SIDEXIS 4 through special filters. -
Page 7: General Information About This Operating Manual
Intended use The XIOS XG X-ray system is designed for digital acquisition of intraoral X-ray images for diagnostic purposes. The system is used on patients by dental professionals. The digital images produced are transferred to a PC and displayed on a monitor. -
Page 8: Indications And Contraindications
1 General information Sirona Dental Systems GmbH 1.6 Indications and contraindications Operating Instructions and Installation XIOS XG USB module and sensors Indications and contraindications Indications in the areas: ● Conservative dentistry ● Caries diagnosis, especially of proximal lesions ● Endodontics ● Periodontology ●... -
Page 9: Structure Of The Document
Sirona Dental Systems GmbH 1 General information Operating Instructions and Installation XIOS XG USB module and sensors 1.7 Structure of the document Structure of the document 1.7.1 Identification of the danger levels To prevent personal injury and material damage, please observe the warning and safety information provided in these operating instructions. -
Page 10: Safety Instructions
Do not use single use devices more than once. The sterilizable exposure accessories such as the rods and rings of the XIOS XG sensor holder must be sterilized to prevent any possible transmission of infective agents which might under certain circumstances cause serious illnesses. -
Page 11: Trouble-Free Operation
For reasons of product safety, this product may be operated only with original Sirona accessories or third-party accessories expressly approved by Sirona. The user is responsible for any damage resulting from the use of non-approved accessories. If devices that are not approved by Sirona are connected, they must comply with the applicable standards, e.g.:... -
Page 12: Radiotelephones
2 Safety instructions Sirona Dental Systems GmbH 2.10 Radiotelephones Operating Instructions and Installation XIOS XG USB module and sensors 2.10 Radiotelephones Mobile RF communications equipment can affect electro-medical equipment. Therefore, the use of mobile wireless phones in medical office or hospital environments must be prohibited. - Page 13 Sirona Dental Systems GmbH 2 Safety instructions Operating Instructions and Installation XIOS XG USB module and sensors 2.11 Electrostatic discharge ● audible at 5,000 V or higher (cracking, crackling) ● visible at 10,000 V or higher (arc-over) The transient currents resulting from these discharges have a magnitude of over 10 amps.
-
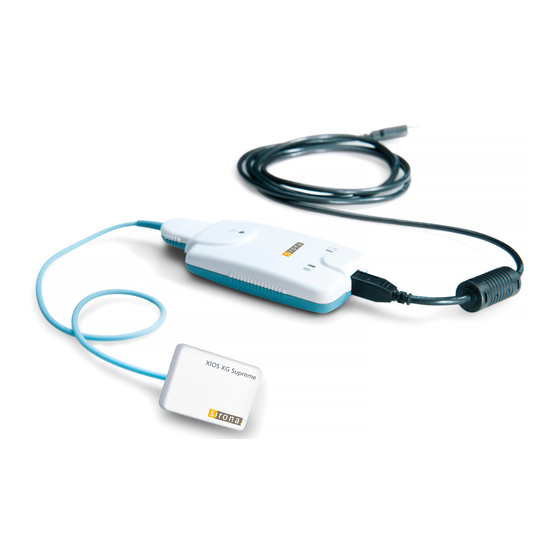
Page 14: System Description
3 System description Sirona Dental Systems GmbH 3.1 System structure Operating Instructions and Installation XIOS XG USB module and sensors System description System structure 64 09 713 D3610 D3610.201.01.08.02 09.2016... - Page 15 Sirona Dental Systems GmbH 3 System description Operating Instructions and Installation XIOS XG USB module and sensors 3.1 System structure USB module [ → 16] USB cable [ → 16] Sensor (size 0, 1 or 2) with cable and plug [ → 17] Single-use sensor holder system with localizer rings, guide rods, sensor holder tabs, [ →...
-
Page 16: Usb Module
PC via the USB module and USB cable. Further information can be found in the "Operation" [ → 33]section. USB cable A USB cable is supplied by Sirona with the delivery. It meets the USB 2.0 standard and is designed especially for use on XIOS XG. CAUTION Standard commercial USB cables do not offer adequate protection from electromagnetic interference. -
Page 17: Sensors
Operating Instructions and Installation XIOS XG USB module and sensors 3.4 Sensors Sensors XIOS XG can be operated with two types of sensor – the XIOS XG Select and XIOS XG Supreme sensors. Both types of sensor are available in three sizes (0, 1 and 2). -
Page 18: Aimright Reusable Sensor Holder System
3 System description Sirona Dental Systems GmbH 3.5 Sensor holder systems Operating Instructions and Installation XIOS XG USB module and sensors 3.5.2 Aimright reusable sensor holder system There are different sensor holders available depending on the type of exposure. The sensor holders are color-coded. -
Page 19: Intraoral X-Ray Tube Assembly
Sirona Dental Systems GmbH 3 System description Operating Instructions and Installation XIOS XG USB module and sensors 3.6 Intraoral X-ray tube assembly Intraoral X-ray tube assembly The following requirements apply to the intraoral X-ray tube assembly: Intraoral X-ray tube assembly with multipulse technology (direct current) 0.14 –... -
Page 20: Pc System
In addition to SIDEXIS XG / SIDEXIS 4 (SIDEXIS XG version 2.56 and above) the SIDEXIS plug-in for XIOS XG must be installed. Information on the PC software can be found in the "SIDEXIS Plug-in for XIOS XG Operator's Manual". -
Page 21: Usb Hub (Optional)
Sirona Dental Systems GmbH 3 System description Operating Instructions and Installation XIOS XG USB module and sensors 3.8 USB hub (optional) USB hub (optional) A USB module can be connected to the USB port of a PC either directly or via an active USB hub. An active USB hub is only required if there is inadequate power supply via the USB port of the PC. -
Page 22: Technical Data
3 System description Sirona Dental Systems GmbH 3.9 Technical data Operating Instructions and Installation XIOS XG USB module and sensors Technical data USB module Electric class: Protection class II Type of protection against electric shock: Applied part type BF Degree of protection... -
Page 23: Certification, Registration And Standards
Operating altitude: ≤ 2000 m 3.10 Certification, registration and standards The XIOS XG USB system complies with the following standards, among Certification others. It complies with the requirements of these regulations: EMC / safety ● IEC 60601-1 (Standard for Safety Medical Electrical Equipment - Part 1: General Requirements for Safety) ●... -
Page 24: Symbols
3 System description Sirona Dental Systems GmbH 3.11 Symbols Operating Instructions and Installation XIOS XG USB module and sensors This product bears the CE mark in accordance with the provisions of the Council Directive 93/42/EEC of June 14, 1993 concerning medical devices. -
Page 25: Position Of The Labels
3 System description Operating Instructions and Installation XIOS XG USB module and sensors 3.12 Position of the labels 3.12 Position of the labels The following labels are attached to components of the XIOS XG USB system: USB module sensors Sensor cable 64 09 713 D3610... -
Page 26: Installation
4 Installation Sirona Dental Systems GmbH 4.1 Fitting a second protective ground conductor on the PC Operating Instructions and Installation XIOS XG USB module and sensors Installation Fitting a second protective ground conductor on the PC Depending on whether the PC is operated inside or outside of the patient environment (up to 1.5 m around the patient), an additional protective... - Page 27 Sirona Dental Systems GmbH 4 Installation Operating Instructions and Installation XIOS XG USB module and sensors 4.1 Fitting a second protective ground conductor on the PC environment (A). This applies to all possible patient positions (B) during the examination or treatment. Variant: PC located outside the patient environment CAUTION The PC must not then be moved closer to the patient.
-
Page 28: Install The Pc Software
The installation of SIDEXIS XG / SIDEXIS 4 is described in the installation instructions for SIDEXIS XG / SIDEXIS 4. The SIDEXIS XG / SIDEXIS 4 plug-in for the XIOS XG USB module must be installed in addition to SIDEXIS XG. To do this, proceed as follows:... -
Page 29: Connect Usb Module And Hub
5. Follow the additional instructions. 6. Restart the PC if you are required to do so. The SIDEXIS plugin for XIOS XG USB system is installed. Connect USB module and hub A USB module can be connected to the USB port of a PC either directly or via an active USB hub. - Page 30 IMPORTANT Only one XIOS XG USB module may be connected to this PC. ✔ SIDEXIS XG / SIDEXIS 4 and the SIDEXIS plug-in for XIOS XG has been successfully installed on the PC, see "Install PC software" [ → 28].
-
Page 31: Install Holder For The Usb Module
Sirona Dental Systems GmbH 4 Installation Operating Instructions and Installation XIOS XG USB module and sensors 4.4 Install holder for the USB module Install holder for the USB module A holder is supplied with the USB module. It can be screwed to a wall using the drywall screws provided or any other mounting material. -
Page 32: Connect Sensor
Operating Instructions and Installation XIOS XG USB module and sensors Connect sensor A calibration file is saved on the XIOS XG Select and XIOS XG Supreme sensors which is transferred to the PC the first time that the sensor is used. -
Page 33: Operation
Sirona Dental Systems GmbH 5 Operation Operating Instructions and Installation XIOS XG USB module and sensors 5.1 Enable exposure readiness Operation Enable exposure readiness ✔ The USB module and the sensor are installed in accordance with the instructions in the "Installation" [ → 26] section. - Page 34 "Exposure readiness " The window is displayed. SIDEXIS XG / SIDEXIS 4 Is ready for exposures when the green display is flashing here. "Exposure readiness " window when using a XIOS XG Select sensor 64 09 713 D3610 D3610.201.01.08.02 09.2016...
- Page 35 5.1 Enable exposure readiness "Exposure readiness " window when using a XIOS XG Supreme sensor 6. When using a XIOS XG Supreme sensor: Select the desired filter to be applied to the x-ray image produced depending on the indication. The selection can also be changed after the exposure.
-
Page 36: Determine Unit Status
Sirona Dental Systems GmbH 5.2 Determine unit status Operating Instructions and Installation XIOS XG USB module and sensors Determine unit status The XIOS XG USB module features three LED displays. They indicate the unit status. Sensor SIDEXIS Status / bug fixing... -
Page 37: Sliding The Hygienic Protective Sleeve Over The Sensor
Sliding the hygienic protective sleeve over the sensor Hygienic protective sleeves are available depending on the size of the sensor (0, 1 or 2). They fit both XIOS XG Select and XIOS XG Supreme sensors. To reorder the hygienic protective sleeves, see"Consumables and spare parts"... -
Page 38: Position The Sensor
XG sensor holder system or with the #AimRight# sensor holder system is recommended for optimal positioning of the sensors. With the XIOS XG sensor holder system the sensor is affixed to the sensor holder with a sensor holder tab. Sensor holder tabs may be detached and reaffixed several times during an exposure series on the same patient. -
Page 39: Position Sensor With Single-Use Sensor Holder System
Sirona Dental Systems GmbH 5 Operation Operating Instructions and Installation XIOS XG USB module and sensors 5.4 Position the sensor 5.4.1 Position sensor with single-use sensor holder system Anterior tooth exposure 5.4.1.1 For anterior tooth exposures use the blue sensor holder. 1. Place the blue localizer ring (B) onto the triple-angled guide rod (C). -
Page 40: Posterior Tooth Exposures
5 Operation Sirona Dental Systems GmbH 5.4 Position the sensor Operating Instructions and Installation XIOS XG USB module and sensors Posterior tooth exposures 5.4.1.2 For posterior tooth exposures use the yellow sensor holder. 1. Place the yellow localizer ring (B) onto the double-angled guide rod (C). -
Page 41: Bite Wing Exposures
Sirona Dental Systems GmbH 5 Operation Operating Instructions and Installation XIOS XG USB module and sensors 5.4 Position the sensor Bite wing exposures 5.4.1.3 For bite wing exposures use the red sensor holder. 1. Place the red localizer ring (B) onto the straight guide rod (C). -
Page 42: Endodontics Exposures With The Half-Angle Technique
5 Operation Sirona Dental Systems GmbH 5.4 Position the sensor Operating Instructions and Installation XIOS XG USB module and sensors Endodontics exposures with the half-angle technique 5.4.1.4 For endodontics exposures with the half-angle technique use the green universal sensor holder tab. 1. Slide the sensor into the hygienic protective sleeve, see section "Slide the hygienic protective sleeve over the sensor". -
Page 43: Measurement Exposure For Endodontics
Sirona Dental Systems GmbH 5 Operation Operating Instructions and Installation XIOS XG USB module and sensors 5.4 Position the sensor Measurement exposure for endodontics 5.4.1.5 Endodontic needles and files can remain in the root canal for the measurement exposure. For endodontics exposures use the grey sensor holder. -
Page 44: Position Sensor With Aimright Reusable Sensor Holder System
5 Operation Sirona Dental Systems GmbH 5.4 Position the sensor Operating Instructions and Installation XIOS XG USB module and sensors 5.4.2 Position sensor with Aimright reusable sensor holder system Anterior tooth exposure 5.4.2.1 Preparing the sensor holder For anterior tooth exposures use the blue sensor holder. - Page 45 Sirona Dental Systems GmbH 5 Operation Operating Instructions and Installation XIOS XG USB module and sensors 5.4 Position the sensor Positioning the sensor for exposures of the lower jaw 1. Look through the localizer ring to check the alignment of the sensor.
- Page 46 5 Operation Sirona Dental Systems GmbH 5.4 Position the sensor Operating Instructions and Installation XIOS XG USB module and sensors Positioning the sensor for exposures of the upper jaw 1. Look through the localizer ring to check the alignment of the sensor.
- Page 47 Sirona Dental Systems GmbH 5 Operation Operating Instructions and Installation XIOS XG USB module and sensors 5.4 Position the sensor 5. Align the cone of the X-ray tube assembly parallel to the sensor directly on the localizer ring. 6. Release an X-ray exposure. Refer to sections Select the exposure parameters for the X-ray tube assembly [ →...
-
Page 48: Posterior Tooth Exposures
5 Operation Sirona Dental Systems GmbH 5.4 Position the sensor Operating Instructions and Installation XIOS XG USB module and sensors Posterior tooth exposures 5.4.2.2 Preparing the sensor holder For posterior tooth exposures use the yellow sensor holders. 1. For the right upper jaw and left lower jaw: Fasten the guide rod for the sensor holder (C) in the perforation (B) of the localizer ring (A). - Page 49 Sirona Dental Systems GmbH 5 Operation Operating Instructions and Installation XIOS XG USB module and sensors 5.4 Position the sensor Position the sensor 1. Look through the localizer ring to check the alignment of the sensor. The sensor must be located centrally in front of the opening in the localizer ring.
- Page 50 5 Operation Sirona Dental Systems GmbH 5.4 Position the sensor Operating Instructions and Installation XIOS XG USB module and sensors 3. Align the cone of the X-ray tube assembly parallel to the sensor directly on the localizer ring. 4. Release an X-ray exposure. Refer to sections Select the exposure parameters for the X-ray tube assembly [ →...
-
Page 51: Horizontal Bite Wing Exposures
Sirona Dental Systems GmbH 5 Operation Operating Instructions and Installation XIOS XG USB module and sensors 5.4 Position the sensor Horizontal bite wing exposures 5.4.2.3 Preparing the sensor holder For bite wing exposures use the red sensor holder. 1. Fasten the guide rod for the sensor (C) in the perforation (B) of the localizer ring (A). - Page 52 5 Operation Sirona Dental Systems GmbH 5.4 Position the sensor Operating Instructions and Installation XIOS XG USB module and sensors 2. Position the sensor directly on the dental arch. The bite block of the sensor holder must be located between the upper molars, parallel to the occlusal plane.
-
Page 53: Select The Exposure Parameters For The X-Ray Tube Assembly
5.5.2 Recommended dose for XIOS XG sensors XIOS XG sensors have a very wide effective dose area, so that, depending on the object and diagnostic question at hand, the selection of an optimal parameter adjustment is always possible. -
Page 54: Heliodent Plus Exposure Times
0.05 0.06 0.08 0.10 0.12 0.16 0.20 0.25 0.32 0.40 Upper jaw Exposure times by dental region XIOS XG sensors cone 8" WW Lower jaw Upper jaw Lower jaw Exposure time in seconds with: 60kV 0.06 0.08 0.10 0.12 0.16 70kV 0.03... -
Page 55: Pre-Programmed Exposure Times For Xios Xg Sensors
0.20 0.25 0.32 0.40 0.50 0.64 0.80 Exposure times XIOS XG sensors cone 12" WW Exposure times by dental region XIOS XG sensors cone 12" WW Upper jaw Lower jaw Upper jaw Lower jaw Exposure time in seconds with: 60kV 0.12... -
Page 56: Releasing The Exposure
5 Operation Sirona Dental Systems GmbH 5.6 Releasing the exposure Operating Instructions and Installation XIOS XG USB module and sensors Releasing the exposure ✔ The exposure parameters for the X-ray tube assembly are set, see "Select the exposure parameters for the X-ray tube assembly" [ → 53]. -
Page 57: Removing The Hygienic Protective Sleeve From The Sensor
Sirona Dental Systems GmbH 5 Operation Operating Instructions and Installation XIOS XG USB module and sensors 5.7 Removing the hygienic protective sleeve from the sensor Removing the hygienic protective sleeve from the sensor 5.7.1 With single-use sensor holder system Have the sensor holder tab and the sensor holder glued onto the hygienic protective sleeve. - Page 58 5 Operation Sirona Dental Systems GmbH 5.7 Removing the hygienic protective sleeve from the sensor Operating Instructions and Installation XIOS XG USB module and sensors 3. Slide the sensor further out of the hygienic protective sleeve with your thumb. 4. Hold the sensor cable firmly to prevent the sensor from falling out of the hygienic protective sleeve.
-
Page 59: With Aimright Reusable Sensor Holder System
Sirona Dental Systems GmbH 5 Operation Operating Instructions and Installation XIOS XG USB module and sensors 5.7 Removing the hygienic protective sleeve from the sensor 5.7.2 With Aimright reusable sensor holder system NOTICE The sensor cable is sensitive to mechanical influences. The cable may become damaged or may wear out prematurely. -
Page 60: Alignment Of The X-Ray Image
5 Operation Sirona Dental Systems GmbH 5.8 Alignment of the X-ray image Operating Instructions and Installation XIOS XG USB module and sensors Alignment of the X-ray image The sensor alignment is shown on the X-ray image by a small rectangle of inverted pixels. -
Page 61: Maintenance And Inspection
Sirona Dental Systems GmbH 6 Maintenance and inspection Operating Instructions and Installation XIOS XG USB module and sensors 6.1 Hygiene Maintenance and inspection Hygiene Disinfect and sterilize accessories prior to initial use and after each patient. 6.1.1 Care, cleaning agents, and disinfectants... -
Page 62: Usb Module And Sensors
6 Maintenance and inspection Sirona Dental Systems GmbH 6.1 Hygiene Operating Instructions and Installation XIOS XG USB module and sensors 6.1.2 USB module and sensors NOTICE 134°C 273,2°F Liquids can get into the USB module or the sensor during cleaning and disinfection. The plug contacts may become wet. -
Page 63: Sensor Holders
6.1.3 Sensor holders The rods and rings of the XIOS XG single-use sensor holder system and all parts of the reusable sensor holder system can be sterilized. The rods and rings or sensor holder and rings must be sterilized before initial use and once a treatment has ended. -
Page 64: Regular Inspections
CAUTION Should you identify faulty components on your XIOS XG product, please inform your appointed service engineer. In this case, the device should no longer be used for patient exposures. - Page 65 Sirona Dental Systems GmbH 6 Maintenance and inspection Operating Instructions and Installation XIOS XG USB module and sensors 6.2 Regular inspections CAUTION The USB module must not be opened or repaired by the user. All parts of the device are maintenance-free. In case of malfunctioning, please always contact your specialized dealer.
-
Page 66: Replace The Sensor Cable
6 Maintenance and inspection Sirona Dental Systems GmbH 6.3 Replace the sensor cable Operating Instructions and Installation XIOS XG USB module and sensors Replace the sensor cable The sensor cable can be replaced with a new one in the event of damage. - Page 67 Use the new parts supplied with the cable for the assembly! IMPORTANT The spare parts for XIOS XG Select sensors are blue while those of the XIOS XG Supreme sensors are red. Always replace the existing Elastomer strip with one of the same color.
- Page 68 6 Maintenance and inspection Sirona Dental Systems GmbH 6.3 Replace the sensor cable Operating Instructions and Installation XIOS XG USB module and sensors Attach a replacement cable 1. Place the plug for the sensor cable properly on the sensor. Both parts must interlock.
-
Page 69: Consumables And Spare Parts
Sirona Dental Systems GmbH 7 Consumables and spare parts Operating Instructions and Installation XIOS XG USB module and sensors Consumables and spare parts Hygienic protective sleeves for sensors Hygienic protective sleeves for sensor size 0 and 1, quantity 300 REF 64 09 960... - Page 70 7 Consumables and spare parts Sirona Dental Systems GmbH Operating Instructions and Installation XIOS XG USB module and sensors Aimright reusable sensor holder system Aimright spare parts Localizer ring (red), quantity 1 REF 65 45 599 Sensor holder for bite wing exposures (red), for sensor size 1, quantity 2...
- Page 71 Sirona Dental Systems GmbH 7 Consumables and spare parts Operating Instructions and Installation XIOS XG USB module and sensors Sensor holder for posterior tooth exposures (yellow), for sensor size 1, quantity 4 (2 for right lower jaw / left upper jaw and 2 for left lower jaw / right upper...
- Page 72 7 Consumables and spare parts Sirona Dental Systems GmbH Operating Instructions and Installation XIOS XG USB module and sensors Sensors with cable for USB port XIOS XG Select USB size 0, 270 cm REF 64 83 478 XIOS XG Select USB size 1, 270 cm...
-
Page 73: Electromagnetic Compatibility
8.1 Accessories Electromagnetic compatibility XIOS XG complies with the requirements for electromagnetic compatibility (EMC) according to IEC 60601-1-2. XIOS XG is hereinafter referred to as "UNIT". Observance of the following information is necessary to ensure safe operation regarding EMC aspects. Accessories... -
Page 74: Interference Immunity
8 Electromagnetic compatibility Sirona Dental Systems GmbH 8.3 Interference immunity Operating Instructions and Installation XIOS XG USB module and sensors Interference immunity The UNIT is intended for operation in the electromagnetic environment XGPF-38231; limit values for magnetic fields specified below. The customer or user of the UNIT should make sure that it is used in such an environment. - Page 75 Sirona Dental Systems GmbH 8 Electromagnetic compatibility Operating Instructions and Installation XIOS XG USB module and sensors 8.3 Interference immunity Interference immunity IEC 60601-1-2 test Compliance level Electromagnetic environment - tests level guidelines Conducted RF d= [1.2] √P interference 150 kHz to 80 MHz...
-
Page 76: Working Clearances
8 Electromagnetic compatibility Sirona Dental Systems GmbH 8.4 Working clearances Operating Instructions and Installation XIOS XG USB module and sensors Working clearances Recommended working clearances The UNIT is intended for operation in an electromagnetic environment, between portable and mobile RF where radiated RF interference is checked. The customer or the user of... -
Page 77: Disposal
Sirona Dental Systems GmbH 9 Disposal Operating Instructions and Installation XIOS XG USB module and sensors Disposal In accordance with Directive 2012/19/EU and national disposal regulations regarding old electrical and electronic devices, please be advised that such items must be disposed of in a special way within the European Union (EU). - Page 80 tÉ=êÉëÉêîÉ=íÜÉ=êáÖÜí=íç=ã~âÉ=~åó=~äíÉê~íáçåë=ïÜáÅÜ=ã~ó=ÄÉ=êÉèìáêÉÇ=ÇìÉ=íç=íÉÅÜåáÅ~ä=áãéêçîÉãÉåíëK «=páêçå~=aÉåí~ä=póëíÉãë=dãÄe=OMNS péê~ÅÜÉW ÉåÖäáëÅÜ mêáåíÉÇ=áå=dÉêã~åó aPSNMKOMNKMNKMUKMO MVKOMNS ûKJkêKW= NOO=SRP páêçå~=aÉåí~ä=póëíÉãë=dãÄe `çåí~Åí=áå=íÜÉ=rp^W páêçå~=aÉåí~äI=fåÅK SQ=MV=TNP=aPSNM c~Äêáâëíê~≈É=PN QUPR=páêçå~=aêáîÉ lêÇÉê=kç aJSQSOR=_ÉåëÜÉáã `Ü~êäçííÉI=k`=OUOTP dÉêã~åó ïïïKëáêçå~KÅçã...
Need help?
Do you have a question about the XIOS XG and is the answer not in the manual?
Questions and answers