Advertisement
Table of Contents
- 1 Technical Support
- 2 Table of Contents
- 3 Safety Instructions
- 4 Important Information
- 5 Step 1: Inspect System Components
- 6 Step 2: Connect the Cables
- 7 Step 3: Install and Mount the Light Tower
- 8 General Settings
- 9 Step 4: Printer / Media Setup
- 10 Step 5: Log on to LVS-7510 Integrated System Software
- 11 Appendix A: LVS-7510 Integrated System Preventive Maintenance
- Download this manual
Advertisement
Table of Contents

Summary of Contents for Microscan LVS 7510
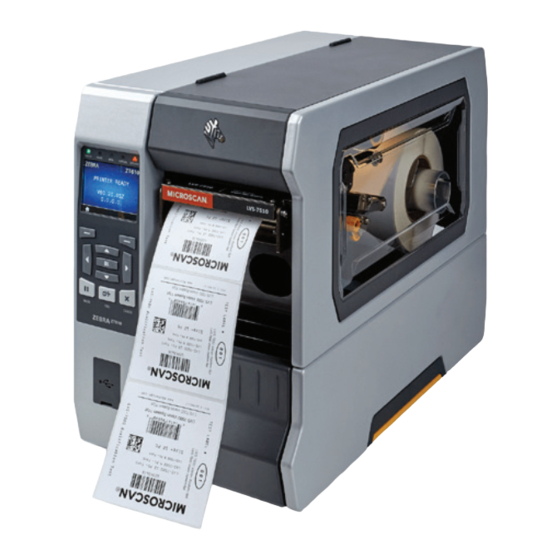
- Page 1 ® 7510 Integrated System Installation and Quick Start Guide for Zebra Printers P/N 84-9320003-02 Rev D...
-
Page 2: Technical Support
All rights reserved. The information contained herein is proprietary and is provided solely for the purpose of allowing customers to operate and/or service Omron Microscan-manufactured equipment and is not to be released, reproduced, or used for any other purpose without written permission of Omron Microscan. -
Page 3: Table Of Contents
LVS-7510 Integrated System Installation and Quick Start Guide for Zebra Printers Table of Contents Safety Instructions ......................... 4 Important Information ........................4 Step 1: Inspect System Components ................... 5 Step 2: Connect the Cables......................6 Step 3: Install and Mount the Light Tower ................... 9 Step 4: Printer / Media Setup ...................... -
Page 4: Safety Instructions
To avoid damaging the system, turn off and unplug the system before cleaning. If the system ever needs repair, consult Omron Microscan or your Omron Microscan Distributor. Important Information Due to continual product improvements, the product you receive may differ from the content outlined in this guide. -
Page 5: Step 1: Inspect System Components
Open the shipping boxes containing the LVS-7510 Integrated System and carefully remove the contents. Verify the items listed below are included with your system and that each item is clean and in proper condition. Contact your Omron Microscan representative if any items are missing or damaged in transit. ... -
Page 6: Step 2: Connect The Cables
LVS-7510 Integrated System Installation and Quick Start Guide for Zebra Printers Step 2: Connect the Cables Items Needed: Computer Zebra printer Power supply AC Line Cord USB cable Instructions: 1. Connect the power supply cable to the back of the printer. WARNING: Do not use the 24-volt power supply that is included in the light tower package. - Page 7 LVS-7510 Integrated System Installation and Quick Start Guide for Zebra Printers 2. Connect one end of the AC power cord to the power supply box. 3. Connect the other end of the AC power cord to a power outlet (110-120 AC). 4.
- Page 8 LVS-7510 Integrated System Installation and Quick Start Guide for Zebra Printers 7. The 15-pin DB connector (connector shown below) is attached to the light tower. Connect the other end of the connector to the printer. For the Peel and Present option, connect the other 9-pin DB connector cable from the light tower to the mating DB connector on the back of the printer, as shown here.
-
Page 9: Step 3: Install And Mount The Light Tower
LVS-7510 Integrated System Installation and Quick Start Guide for Zebra Printers Step 3: Install and Mount the Light Tower The steps below explain how to connect and mount the light tower interface unit using two screws (8-32 or M4 size – customer-supplied). You may follow the steps below using the customer-supplied screws, or choose a different mounting solution such as using velcro or magnets to affix the light tower to the desired location. - Page 10 LVS-7510 Integrated System Installation and Quick Start Guide for Zebra Printers 4. Plug one end of the USB cable into the light tower USB connector and the other end into the computer’s USB port. Cables are color-coded in blue. 5. Light tower installation is complete. Proceed to the next section. LVS-7510 Integrated System Installation and Quick Start Guide for Zebra Printers Page 10 of 16...
-
Page 11: General Settings
LVS-7510 Integrated System Installation and Quick Start Guide for Zebra Printers Step 4: Printer / Media Setup General Settings All printer settings required for optimal LVS-7510 function are factory preset. In the case of a printer reset, however, the following settings are required for correct operation of the unit. Applicator Settings To control the start/stop of the print process to handle defective labels and enable peel and present operation, the applicator port on the printer must be configured as defined here:... - Page 12 LVS-7510 Integrated System Installation and Quick Start Guide for Zebra Printers For Base Version (Non-PNP Option) 1. Set up the printer in rewind mode using the printer GUI. 2. Follow the printer manual for other printer settings relevant to your specific print job and label type, including a media/ribbon calibration.
- Page 13 LVS-7510 Integrated System Installation and Quick Start Guide for Zebra Printers b. With the internal rewinder: Loosen the rewind bar using the thumbscrew on the side of the mount and follow the process shown below. LVS-7510 Integrated System Installation and Quick Start Guide for Zebra Printers Page 13 of 16...
- Page 14 LVS-7510 Integrated System Installation and Quick Start Guide for Zebra Printers For Peel and Present Option 1. Set up the printer in tear-off mode using the printer GUI. Set the tear-off to 90. (This may need to be adjusted later to achieve optimum peel performance.) 2.
-
Page 15: Step 4: Printer / Media Setup
LVS-7510 Integrated System Installation and Quick Start Guide for Zebra Printers Step 5: Log On to LVS-7510 Integrated System Software 1. Log on to the LVS-7510 Integrated System software by double-clicking the “LVS-7510” icon located on the computer desktop. 2. The “Welcome” screen appears. 3. -
Page 16: Appendix A: Lvs-7510 Integrated System Preventive Maintenance
If you have any questions or concerns about the performance of the LVS-7510 Integrated System, please call your local Omron Microscan distributor or Omron Microscan technical support: +1-800-762-1149 | +1-425-203-4841 | helpdesk@microscan.com LVS-7510 Integrated System Installation and Quick Start Guide for Zebra Printers...
Need help?
Do you have a question about the LVS 7510 and is the answer not in the manual?
Questions and answers