Advertisement
Quick Links
Advertisement

Summary of Contents for EASTERN INFO-COM iDRS-5000
- Page 1 OPERATION MANUAL [iDRS-5000] EASTERN INFO-COM INC. http://www.easterninfo.com - 1 -...
-
Page 2: Fcc Notice
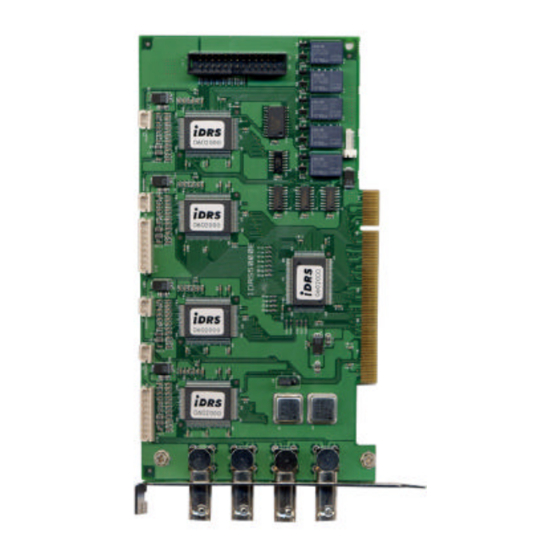
FCC NOTICE THIS DEVICE COMPLIES WITH PART 15 OF THE FCC FULES. OPERATION IS SUBJECT TO THE FOLLOWING TWO CONDITION: (1) THIS DEVICE MAY NOT CAUSE HARMFUL INTERFERENCE, AND (2) THIS DEVICE MUST ACCEPT ANY INTERFERENCE RECEIVED, INCLUDING INTERFERENCE THAT MAY CAUSE UNDERSIRED OPERATION. - Page 3 1. iDRS-5000 Board Manual 1. Video Channel : 4CH, 8CH 2. Record Fream - Display : 100/120(fps) - Recording : 100/120(fps) 3. Sensor/Alarm -DI : 8EA -DO: 4EA 4. Recording Resolution : 320 x 240 5. Board Minute explanation - 3 -...
- Page 4 ① DIO Cable Link Connector ② Watch dog Cable Link Connector ③ Video Channel 1~4 Connector ④ Video Channel 5~8 Connector ⑤ NTSC/PAL Select Connector ⑥ Video Channel 1~4 BNC Connector 7. Notice . - When in using ③,④ you need some ‘guide fins’, made by Eastern Info Com 8.
- Page 5 Digital DIO Pin Configuration Pin # COLOR ο Sensor 1 BLACK ο ο Sensor 2 BROWN ο ο Sensor 3 ο ο ο ο Sensor 4 ORANGE ο ο Sensor 5 YELLOW ο ο Sensor 6 GREEN ο ο...
- Page 6 2. Power On 1. To check your camera image, You should turn on cameras, monitor, sensor, etc, before you turn on iDRS-5000. Turn on iDRS-5000. [POWER] lamp will light on, disk check(red LED) blinks then WINDOWS 98 starts. After booting main screen will appear as follows 3.
- Page 7 [System Shutdown] If you click this icon, confirmation message will appear as follows. If you select [OK] system will be shut down and automatically power OFF. Single-Screeen All-Channel Display. Rotational Display Quad(4)-screen Rotational 10) [Motion Tracer] Enlarge a screen in which the motion is detected. [Set up] Change iDRS-3000 set up configurations.
- Page 8 3. Set up change ( [Camera set up] ▶ Put each camera name for OSD(On-Screen Display) zone. ▶ Set up each camera. Input camera number Click to select camera to iDRS CARD number change camera name ▶ If you click system will automatically detect connected camera.
- Page 9 [Schedule ] ▶ Set up each group. Total 10 groups are available (programmable) Select group. - Set the days of the week. - Connect cameras, motion detectors(software sensor), (external) sensor and D/O. ▶ If you want to record specific time, please designate [START TIME], [END TIME]. 00:00 to 00:00 means whole day(24 hours) recording.] ▶...
- Page 10 (Separate frame rate for each camera is available.) ▶ Designate motion-detected recording Frame Rate. (Separate frame rate for each camera is available.) ▶When sensor recording designate camera FRAME. (Separate frame rate for each camera is available.) ▶[Switch Speed] : Adjust interval for rotational display model. ▶[Motion Delay] : Keep on recording after motion detection is finished, during indicated time.
-
Page 11: Image Search
[Password] ▶ Set up password, to prevent other person than operator from changing setup. ▶ If you set up new password click [APPLY] to use new password. ▶ Please do not forget password. (Set up change is impossible) [Close Set up] : Back to main screen. 4. - Page 12 [Date select] : Recorded date is checked with red mark automatically. Click date to search. ※ Previous Month - Next month If there is no recorded data in other month(s) month selection buttons are inactivated. High speed Playback To first cut of To last cut of recorded screen recorded screen...
- Page 13 BACK-UP 1 cut, now seen in monitor by JPEG file in Floppy disk. [Print] Print out present image. Stop the image to print and click. Selected screen is printed by printer.(Continuous print is available for 30 cuts) Time stamp (YYYY/MM/DD HH:MM:SS) will automatically be included. Assigning cut name and printing is available, click [set up] to set up printer driver PRINT OUT 1 cut from present image without name.
Need help?
Do you have a question about the iDRS-5000 and is the answer not in the manual?
Questions and answers