Table of Contents
Advertisement
Advertisement
Table of Contents

Related Manuals for Elite EAF-1880D


Summary of Contents for Elite EAF-1880D
-
Page 2: Important Safeguards
IMPORTANT SAFEGUARDS SHORT CORD PURPOSE AND POLARIZED PLUG WARNING INTRODUCTION PARTS IDENTIFICATION HOW TO USE THE CONTROL PANEL PREPARING YOUR AIR FRYER FOR USE HOW TO USE YOUR AIR FRYER CLEANING & MAINTENANCE COOKING TIME CHART HINTS & TIPS TROUBLESHOOTING WARRANTY &... - Page 3 When using electrical appliances, basic safety precautions should always be followed, including the following: Air Fryer. Read all instructions before using your Elite Platinum Danger Never immerse the power cord, plug or housing in water or under the tap. Make sure no liquid enters the appliance to prevent electric shock or short-circuit.
- Page 4 Caution 27. After use, turn off power to the appliance then unplug from the wall outlet. 28. Unplug the appliance from outlet when it is not in use or before cleaning. Allow it to cool down first before cleaning. 29. Do not use any accessories that have not been provided with the appliance. 30.
- Page 5 Digital Air Fryer course healthier without oil. We hope you enjoy your new Elite Platinum start cooking healthier today! 1. Frying Basket 2. Drawer Pan 3.
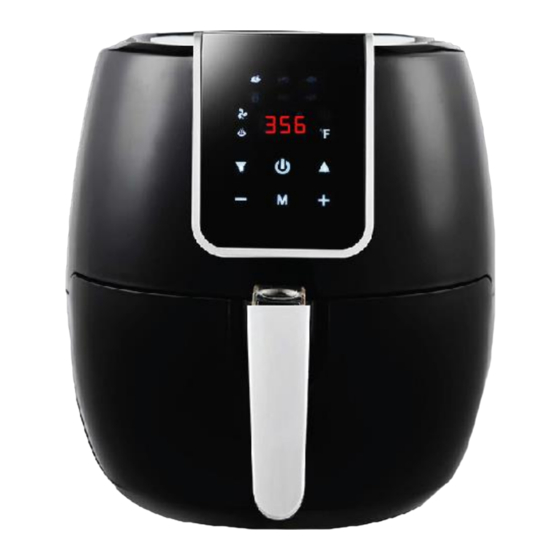
- Page 6 POWER/START BUTTON: Press and hold 3 seconds to power on unit. *Tap once to START/STOP cooking. TEMPERATURE INCREASE BUTTON: Press to increase the temperature setting by 9-degree increments up to 392°F (hold for rapid increase). TEMPERATURE DECREASE BUTTON: Press to decrease the temperature setting by 9-degree increments down to 140°F (hold for rapid decrease).
- Page 7 Carefully pull out the Drawer Pan (2) from the Main Fryer Base by pulling forward on the basket handle (3). Remove the Basket (1) from the Drawer Pan (2), push the Protective Cover (3), and press down on the Basket Release Button (4) and lift up the basket (see Figure 3). Place ingredients into Basket (1).
-
Page 8: Default Temperature
HOW TO SELECT A QUICK MENU FUNCTION: QUICK MENU CHART DEFAULT DEFAULT MENU TEMPERATURE COOK TIME ----- DEFAULT 392°F 20 min FRIES 392°F 20 min RIBS 374°F 15 min STEAK 392°F 8 min POULTRY 392°F 22 min SHRIMP 329°F 10 min FISH 374°F 10 min... - Page 9 DURING THE COOKING/FRYING PROCESS: Once you tap the START Button, the Timer will begin counting down and begin the cooking process. When the air fryer is working, the Fan and Heating icon will illuminate. NOTE: Any excess oil from food will collect at the bottom of the Pan (2). Some recipes require stirring/mixing/flipping the contents mid-way through cooking (see Cooking Time Chart on page 12).
- Page 10 Digital Air Fryer should be cleaned thoroughly after every use. Make sure the Power cord (9) is disconnected from the electrical outlet and that the appliance has cooled down before attempting to clean. The Drawer Pan (2), Basket (1) and the inside of the appliance have a nonstick coating. Do not use metal utensils or abrasive cleaning materials on them, as this can damage the non-stick coating.
- Page 11 The chart on this page helps you to program basic times and temperatures for common foods. Please note that all of the information below is for your reference only and can be adjusted according to the user’s preference. They are approximations only as foods differ in size and density so cooking times and temperatures cannot be guaranteed.
-
Page 12: Home-Made French Fries
TIPS Smaller cuts of food usually require a slightly shorter cooking time than larger foods. A larger amount of food only requires a slightly longer cooking time and a smaller amount of food only requires a slightly shorter cooking time. Stirring or shaking smaller foods mid-way through the cooking process will improve the end result and can help cook more evenly. - Page 13 Problem Possible cause Solution Plug the power cord (15) into an The airfryer does The appliance is not electrical not work. plugged in. outlet. You did not press and hold the POWER button for 3 seconds Contact customer service at The appliance is defective.
-
Page 14: Maxi-Matic, Usa
LIMITED WARRANTY* ONE (1) YEAR WARRANTY IS ONLY VALID WITH A DATED PROOF OF PURCHASE PLEASE DO NOT RETURN TO STORE OF PURCHASE. If you have any problems with this unit, contact Customer Service for support. Your small kitchen appliance is warranted to the original purchaser to be free from any manufacturing defects under normal use and conditions for one (1) year, cord excluded. -
Page 15: Return Instructions
RETURN INSTRUCTIONS RETURNS: Any return of defective merchandise to the manufacturer must be processed accordingly by first contacting customer service (info@maxi-matic.com) to obtain an RA # (Return Authorization Number). We will not accept any returns of merchandise without an applicable RA #. IMPORTANT RETURN INSTRUCTIONS.
Need help?
Do you have a question about the EAF-1880D and is the answer not in the manual?
Questions and answers