Table of Contents
Advertisement
Quick Links
Advertisement
Table of Contents

Related Manuals for Pelican GW400


Summary of Contents for Pelican GW400
-
Page 1: Getting Started
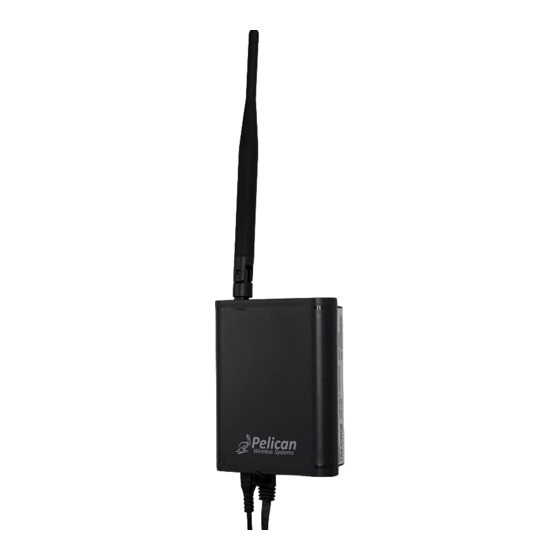
STEPS TOWARDS YOUR NEW PELICAN WEB APP GW400 Serial No: XXX-XXXX STEP ONE: INSTALL GATEWAY Start by installing a Pelican Wireless Extended Range Gateway (GW400). Write down the GW400’s Serial Number which is found on the side of the device. SERIAL NO:... -
Page 2: Network Requirements
Gateway will establish outbound connections using 3 ports. They are: UDP/514 – This port is for diagnostic and troubleshooting information TCP/9742 – This port will be used from time to time to verify which Pelican Server it should use for it’s primary data connection. - Page 3 STEP THREE: GO TO WWW.PELICANWIRELESS.COM Create your new Pelican Web App by going to: www.pelicanwireless.com Once you are on the Pelican Wireless Home Page, select NEW SITE SETUP on the web page’s menu bar; as seen below: HOME PRODUCTS...
- Page 4 STEP FOUR: CREATE A NEW PELICAN WEB APP The Pelican Site Wizard will guide you through each question for creating a new Pelican Web App; as seen below: NOTE: Administrator Email Address should be the email address for whomever will be intitially configuring...
- Page 5 first time logging into your Pelican Web App. STEP SEVEN: FIRST TIME LOGGING INTO YOUR PELICAN WEB APP Your Pelican Web App can be accessed on any of our recommended browsers from any Internet enabled device. 1) Input Email Address...
- Page 6 STEP EIGHT: CREATE A UNIQUE PASSWORD The password you create will be used to log into your new Pelican Web App. 1) Create a NEW password. 2) Re-Type NEW password. 3) Press Submit FORGOT PASSWORD If you forget your password, simply press the Forgot Password button next tme you are prompted to login to your web app.
-
Page 7: Wireless Systems
GUIDE 1 FINISHED. Pelican Wireless Systems 2655 Collier Canyon Road Livermore, CA 94550 Phone: 888-512-0490 eMail: sales@pelicanwireless.com support@pelicanwireless.com Web: www.pelicanwireless.com © All Rights Reserved. Pelican Wireless Systems, LLC.
Need help?
Do you have a question about the GW400 and is the answer not in the manual?
Questions and answers