Advertisement
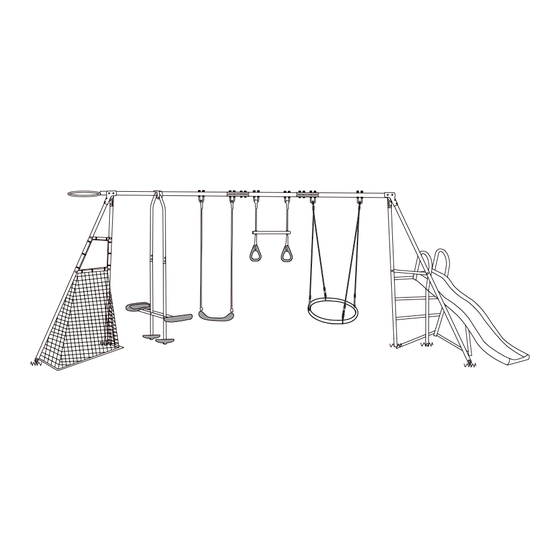
7 Station Swing Set
WARNING: To ensure your safety, please do not attempt to assemble this swing set without reading this
instruction manual carefully. Failure to comply with this warning may result in injury and/or property damage.
• Prior to assembly, this swing set includes small parts/accessories that are not suitable for children under 3 years
of age as they may cause a choking hazard.
• This swing set should be assembled by 2 adults.
• Only use this swing set on a soft, flat level surface.
• This swing set has a maximum user weight of 34kg per unit/seat. Only one child per seat at any time.
• The total weight on the swing set at any time must not exceed 204kg.
• This swing set is suitable for users aged 3-9 years.
• This swing set is designed for outdoor domestic use only, it is not intended for commercial use in play centres,
nurseries etc.
For parts and service enquiries, please contact Action Spares on 1800 465 070 or e-mail service@actionspares.com.au
S002004
Instruction Manual
Advertisement

Related Manuals for Action S002004

Summary of Contents for Action S002004
- Page 1 7 Station Swing Set S002004 Instruction Manual WARNING: To ensure your safety, please do not attempt to assemble this swing set without reading this instruction manual carefully. Failure to comply with this warning may result in injury and/or property damage.
-
Page 2: Table Of Contents
Contents Important Safety Information Swing Parts List Slide Parts List Assembly Instructions Warranty S002004 7 Station Swing Set... -
Page 3: Important Safety Information
9. Do not install this product over concrete, asphalt or any other hard surface. 10. Do not orientate the swing set directly towards the sun. 11. There should be at least 2m of space surrounding the swing set from any structure of obstruction such as a fence, garage, house, wall, overhanging branches, laundry lines, electrical wires, etc. 12. S wings must not exceed and angle of 60 degrees from the ground. S002004 7 Station Swing Set... - Page 4 23. D o not walk close to, in front of or behind the swing set when in use as moving units can cause serious injury. 24. D o not wear apparel such as hats with straps, helmets, scarves, garments with pull strings or any other item of loose clothing while using the swing set as children can get trapped and may be unable to free themselves causing serious injury. 25. D o not twist swing ropes or wrap them over the top bar. 26. D o not slide head first down the slide, walk up the slide or jump/climb off the slide. S002004 7 Station Swing Set...
-
Page 5: Swing Parts List
Nest Swing Rope (x2) Short Bracket (x4) Clamps (x2) Nest Swing Fabric (x1) Nest Swing Metal Frame With Foam Padding (x4) Long Bracket (x2) (x14) Fabric (x1) Thin Plastic Spacer (x4) Thick Plastic Spacer (x4) S002004 7 Station Swing Set... -
Page 6: Slide Parts List
3rd Ladder Rung (x1) Bottom Ladder Rung (x1) Ladder Leg (x1) Ladder Handle (x2) Ladder Handle (x1) Lower Support Tube (x2) Upper Slide (x1) Ladder Handle (x1) Lower Slide (x1) Upper Support Tube (x2) M6 Bolt 40mm (x2) S002004 7 Station Swing Set... -
Page 7: Assembly Instructions
Frame, Swing, Trapeze & Netball Ring Assembly Note: Attach the swing rope to the U-bolt (S1) before connecting the U-bolt (S1) to the top bar. Ensure that at least 3 threas from M8 U-bolt (S1) protude from the top. S002004 7 Station Swing Set... - Page 8 Warning: The knots on the swings are integral to the safety of the swing Please ensure thet are tight and that the swing is in POSITION 1 as shown in the diagram above. There should be no slack in the rope allowing a loop to form below the swing. S002004 7 Station Swing Set...
- Page 9 Nest Swing Assembly Insert the Metal Tube (11) into the fabric of the Nest Swing (41). Join the metal tubes together and then fasten them by using the bolt at the end of the Rope (43). (See above). Repeat this for the other side, and then the Nest Swing becomes two semicircles (See below). Press Press Semicircle Lay the two semicircles on the ground, join the two part tubes together, and then press it down so that two parts are joined together as a circle. Semicircle Press Press Finished S002004 7 Station Swing Set...
- Page 10 Assembly Instructions (cont) Step 2 Soccer Goal Net Assembly Thread the soccer goal net (17) through the metal tubes (42, 6, 37 and 38) and connect metal tube (42) and (6) by using the bolt (F2) and the bolt (G3) for the metal tube (42) and (37) with (42) and (38). Connect the metal tube (37) & (38) as above. S002004 7 Station Swing Set...
- Page 11 Assembly Instructions (cont) Step 3 Glider Assembly Assemble seats (12) and attach to seat tubes (10) before tightening bolts (G4). S002004 7 Station Swing Set...
- Page 12 Assembly Instructions (cont) Step 4 Slide Assembly One connector (34) for both sides One connector (34) for both sides Bracket Assembly Top of slide The M6 Bolt 35mm (F3) for support strap (29 and 31) only need to be finger tight. S002004 7 Station Swing Set...
- Page 13 Assembly Instructions (cont) Assembly of the Bracket onto the Slide S002004 7 Station Swing Set...
- Page 14 Assembly Instructions (cont) Step 5 Slide Assembly continued Note: Top Ladder Rung (19) is to be fitted behind Ladder Handle (26 and 28) and Plain Bototm Leg B (18). S002004 7 Station Swing Set...
- Page 15 Assembly Instructions (cont) Please do not overtighten nuts and bolts. Use hand tools only. Do not use power tools. This can weaken the connection points. Please ensure that Top Ladder Rung (19) is fitted behind both Ladder Handles (26 and 28) and on the rear of the Bottom Leg (18). Please see the below image for correct assembly. Correct Assembly Please note that the Top Ladder Rung (19) is behind the Ladder Handles (26 and 28) supporting the slide. Incorrect Assembly Please note that the Top Ladder Rung (19) is in front of the Ladder Handles (26 and 28) and not supporting the slide. Please assemble Chute Side Stay Bar (20) last. Leave the bolts loose until the slide is assembled to the ladder frame, to make construction easier. Then tighten firmly. S002004 7 Station Swing Set...
- Page 16 However if the ground is soft and the peg can easily be pulled out by hand once installed, concreting is essential. Contact our service centre for more information. Once assembly is completed, carefully check equipment. In the unlikely event that you do find any problems, please contact us. DO NOT allow children to use this product until the problem has been corrected. S002004 7 Station Swing Set...
- Page 17 Warranty Information Congratulations on your purchase! This Action 7 Station Swing Set is warranted to be free from defects in material and workmanship under normal use and service conditions for a period of 12 months from the date of purchase of this article. Evidence of unfair usage or incorrect adjustment by the owner will void this promise. Our goods come with guarantees that cannot be excluded under the Australian Consumer Law. You are entitled to a replacement or refund for a major failure and for compensation for any other reasonably foreseeable loss or damage. You are also entitled to have the goods repaired or replaced if the goods...
-
Page 18: Warranty
SERVICE CENTRE Contact details and hours of operation. Freecall 1800 465 070 9:00am – 4:30pm Monday to Friday (excluding Public Holidays) 9:00am – 3:00pm Saturday This product is warranted and distributed by: Action Sports of 48B Egerton St, Silverwater NSW, 2128 Phone: (02) 8799 3500 © 2017 Action Sports Equipment Pty Ltd. S002004 7 Station Swing Set...
Need help?
Do you have a question about the S002004 and is the answer not in the manual?
Questions and answers