
Subscribe to Our Youtube Channel
Related Manuals for SIGNIFY Smart DJ Speaker

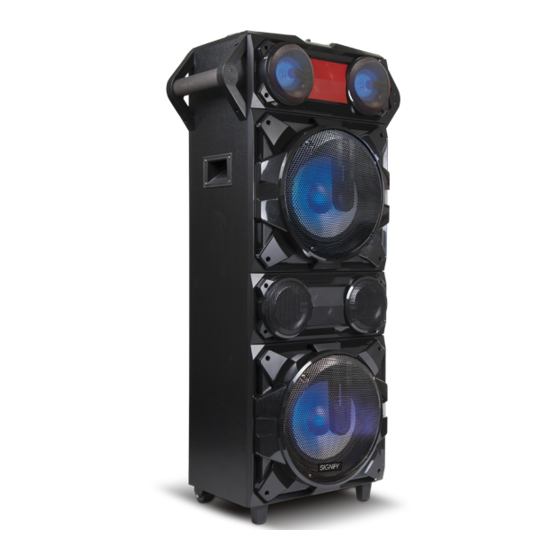
Summary of Contents for SIGNIFY Smart DJ Speaker
- Page 1 YEAR WARRANTY SMART SPEAKER Instruction Manual EA0944 AFTER SALES SUPPORT service@unclebills.com.au 1300 777 137 MODEL: EA0944 PRODUCT CODE: 59080 12/2017...
-
Page 2: Table Of Contents
Contents Welcome Warranty Details General Information and Safety Instructions Product Overview Control Panel Rear Panel Remote Control Audio Modes and Unique Features Buttons and Controls Before First Use Operating Instructions Using the Audio Modes AUX Mode FM Radio Mode Bluetooth Mode ®... -
Page 3: Welcome
Welcome Congratulations on choosing to buy a Signify product. ® All products brought to you by Signify are manufactured to the highest standards of performance ® and safety, and, as part of our philosophy of customer service and satisfaction, are backed by our comprehensive 1 Year Warranty. -
Page 4: Warranty Details
Smart DJ Speaker Warranty Details Our goods come with guarantees that cannot be excluded under the Australian Consumer Law. You are entitled to a replacement or refund for a major failure and for compensation for any other reasonably foreseeable loss or damage. You are also entitled to have the goods repaired or replaced if the goods fail to be of acceptable quality and the failure does not amount to a major failure. -
Page 5: General Information And Safety Instructions
If it is damaged, please contact the After Sales Support Line for further advice. 5. When the Smart DJ Speaker is not in use, switch it off and unplug from the power outlet. To unplug, grip the adaptor and pull from the power outlet. Never pull by the cord. - Page 6 11. Do not expose the Smart DJ Speaker to water, rain moisture, liquids or dust. Do not store or use the Smart DJ Speaker in high moisture environments. Moisture can damage and cause corrosion to the speaker cone and other internal components.
- Page 7 24. Never operate the Smart DJ Speaker in temperatures exceeding 50°C (122°F). 25. Store in a dry, cool place away from heat. If the Smart DJ Speaker is to be stored for the prolonged periods ensure that the Smart DJ Speaker is not stored in areas that could potentially reach or exceed 50°C (122°F).
-
Page 8: Product Overview
Product Overview Control Panel REC/PLAY PLAY Control Panel Parts List 1. USB-A Input 14. MUTE Button 2. DJ Dial (Source A - DJ Sound Effects) 15. VOL Dial (Master Volume) 3. DJ AUTO Button (Source A - USB Mode) 16. USB-B Input 4. -
Page 9: Rear Panel
Product Overview (cont.) Rear Panel POWER AUDIO OUT Rear Panel Parts List 1. FM Antenna Input 2. POWER Switch (On/Off) 3. AUDIO OUT 4. AUX-A Input 5. AUX-B Input service@unclebills.com.au AFTER SALES SUPPORT MODEL: EA0944 PRODUCT CODE: 59080 12/2017 1300 777 137... -
Page 10: Remote Control
Button (Source B - Replay) Button (Source B - Stop) NOTE: Please always ensure the remote control is pointed towards the front top of the Smart DJ Speaker. service@unclebills.com.au AFTER SALES SUPPORT MODEL: EA0944 PRODUCT CODE: 59080 12/2017 1300 777 137... -
Page 11: Audio Modes And Unique Features
USB Mode The Smart DJ Speaker includes two USB inputs which allow MP3 and WMA files to be loaded on to a USB flash drive and played back through the Smart DJ Speaker (see page 22 for detailed instructions). NOTE: Only audio files in MP3 or WMA format can be played successfully on the Smart DJ Speaker. -
Page 12: Buttons And Controls
BUTTON TO POWER ON', indicating that the Smart DJ Speaker is in standby mode. To turn the Smart DJ Speaker off, press the POWER switch on the rear panel to the OFF position. Unplug the power cord from the power outlet and carefully unplug the power cord from the Smart DJ Speaker. -
Page 13: Microphone Input
MIC VOL dial clockwise and to decrease the volume, turn the MIC VOL dial anticlockwise. Bass Button Use the BASS button to control the bass output of the Smart DJ Speaker. To increase the bass output, press the BASS button once, press again to turn off. Mode Button Use the M button to select between the different playback modes: USB/Bluetooth ®... -
Page 14: Stop Button
(see page 25 for detailed instructions). VOL Dial Use the VOL dial to control the master volume of the Smart DJ Speaker. To increase the volume, turn the VOL dial clockwise and to decrease the volume, turn the VOL dial anticlockwise. - Page 15 Product Overview (cont.) Playback Controls There are two sets of playback controls on the top control panel the Smart DJ Speaker. The playback controls on the left side control Source A and the playback controls on the right side control Source B.
-
Page 16: Before First Use
Smart DJ Speaker when not in use. NOTE: The Smart DJ Speaker is large and heavy (as is its packaging), we suggest that two people assist in removing the Smart DJ Speaker from its packaging and locating it on a flat, level surface. - Page 17 Attaching the Handles Included with your Smart DJ Speaker is 1 x Allen key (Fig. 1) and 10 x screws (Fig. 2). Use these parts to attach the handles (Fig. 3) to the main body of the Smart DJ Speaker by following the steps below.
-
Page 18: Operating Instructions
Using the Audio Modes The Smart DJ Speaker enables users to play two audio sources at the same time, so you can play music, mix music sources and add DJ effects using the DJ auto/DJ effect features. You can also... -
Page 19: Aux Mode
2. Plug the auxiliary cable (included) into the auxiliary input (AUX-A or AUX-B) on the back of the Smart DJ Speaker. Plug the other end of the auxiliary cable into the desired media device such as a smart phone, tablet, computer or other AUX compatible device. -
Page 20: Bluetooth ® Mode
Smart ® DJ Speaker, you will not be able to pair a new device to the Smart DJ Speaker. You will need to turn off the Bluetooth connection on the last connected device in order to connect a new device. -
Page 21: Disconnecting The Bluetooth Connection
“Signify Smart DJ” and ® the display screen on the Smart DJ Speaker will read "BT Audio". This will mean that the tracks on the Bluetooth enabled device can now be streamed through the Smart DJ Speaker immediately. -
Page 22: Usb Mode
Operating Instructions (cont.) USB Mode The Smart DJ Speaker features 2 USB inputs which enable MP3 files, or WMA files to be loaded on to a USB drive and played back through the Smart DJ Speaker. In order to play MP3/WMA files on the Smart DJ Speaker, first load them onto a compatible USB drive. -
Page 23: Usb Recording
NOTE: Ensure the USB flash drive is properly formated to FAT16/FAT32 file system before recording. 1. Firstly, ensure the Smart DJ Speaker is turned on and insert a USB flash drive into USB-A input (left side of the Smart DJ Speaker). -
Page 24: Sound Adjustment
Operating Instructions (cont.) To playback the recorded files, either load the USB flash drive back into the Smart DJ Speaker itself and follow regular playback instructions (see page 22 for detailed instructions), or load the USB flash drive into a PC and search for the newly created folder called "EXT_REC". All recorded files will be located in this folder. -
Page 25: Sound Effects
Two microphone inputs are included on the top control panel to enhance the fun and enjoyment while using your Smart DJ Speaker. • To use a microphone (not included) with the Smart DJ Speaker, firstly turn the MIC VOL dial anticlockwise to turn the volume down. •... - Page 26 Operating Instructions (cont.) DJ Effect Press the DJ EFFECT button to manually apply DJ effects for Source A modes (USB-A, AUX-A, Bluetooth and FM radio modes only). ® 1. Press the DJ EFFECT button to select one of the six different DJ effects. The DJ EFFECT button will illuminate blue and the display screen will read 'EFFECT 01-06'.
-
Page 27: Using The Party Lights
® at the same time. 1. To get started, play music from Source A (left side of the Smart DJ Speaker). Simply connect your USB flash drive or audio device to the USB-A/AUX-A, connect via Bluetooth or tune into a FM ®... -
Page 28: Troubleshooting
5 to 6 seconds before it enters standby mode. This is normal. • Make sure the Smart DJ Speaker is out of standby mode. Press the button on the top control panel, the top control panel will illuminate blue indicating the Smart DJ Speaker is ready for use. - Page 29 Ensure the last mobile phone or Bluetooth device has been ® Bluetooth ® disconnected from the Smart DJ Speaker. If they are in the range, the speaker will pick up the last connection as default (see page 21 for detailed instructions). • Turn off the Bluetooth function, and turn back on again.
- Page 30 Ensure the FM antenna cable has been connected correctly. The auto- function will not stop search function can not stop automatically if the FM antenna cable is automatically. not correctly connected to the back of the Smart DJ Speaker. service@unclebills.com.au AFTER SALES SUPPORT MODEL: EA0944 PRODUCT CODE: 59080 12/2017...
-
Page 31: Repair And Refurbished Goods Or Parts Notice
Smart DJ Speaker Repair and Refurbished Goods or Parts Notice Unfortunately, from time to time, faulty products are manufactured which need to be returned to the Supplier for repair. Please be aware that if your product is capable of retaining user-generated data (such as files stored... -
Page 32: Other Useful Information
Regularly check all fastenings to ensure that they are properly tightened. Storage When the Smart DJ Speaker is not in use, disconnect it from the power source and store in a cool, dry and well ventilated location out of direct sunlight. Ensure that it is not subject to humidity. -
Page 33: Trademarks
These brands are not associated with this product and are not related to Uncle Bill's Australia Pty Ltd. The Smart DJ Speaker has been fully tested and meets all requirements as set out by the below testing standards: AS/NZS 60065...
Need help?
Do you have a question about the Smart DJ Speaker and is the answer not in the manual?
Questions and answers