
Related Manuals for Westinghouse QB025

Summary of Contents for Westinghouse QB025
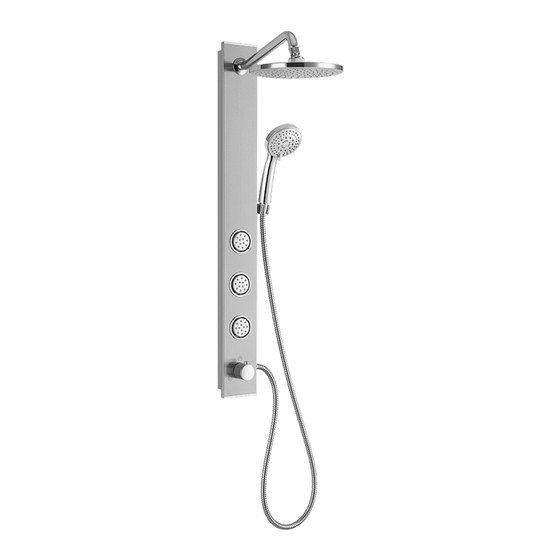
- Page 1 ULTIMATE RAIN & MASSAGE SHOWER SPA DELUXE DE LUXE SPA-DOUCHE À MASSAGE ET À EFFET DE PLUIE OWNER’S MANUAL MANUEL DE L’UTILISATEUR # QB025...
-
Page 2: Table Of Contents
2 . This unit might not be suitable for installation with some fiberglass or acrylic showers. 3 . This product will connect with your current shower valve . There is no need to take out your current valve or change it . Fig . 1 QB025... -
Page 3: Warranty
Warranty ONE YEAR LIMITED WARRANTY A thorough inspection must be made before installation and any damage must be promptly reported . We will not be liable for failures or damage that could have been discovered or avoided by proper inspection and testing prior to installation . Conglom Kitchen &... -
Page 4: Pre-Installation
Pre-Installation TOOLS/MATERIALS REQUIRED (NOT SUPPLIED) Measuring tape Carpenter’s square Wrenches Electric drill with Phillips screwdriver 1/4 in . (7 mm) Pencil drill bit Safety gloves Safety goggles Level QB025... -
Page 5: Package Contents
Pre-Installation (continued) PACKAGE CONTENTS NOTE: PARTS SHOWN NOT TO SCALE PRE-INSTALLED PARTS DENOTED WITH DASHED LINES Part Description Part Description Part Description Hex key Top cover (pre-installed) AA Wall anchors Thread seal tape Stainless steel cover (pre-installed) BB Bottom bracket Mesh gasket Nut (pre-installed) CC Screws and washers... -
Page 6: Installation
- Check that the rubber washer (U) that is pre-assembled in the shower head (V) is not loose . Fig .3 - Screw the shower head (V) on to the shower arm (T), see Fig . 7 . Fig .7 Fig .4 QB025... - Page 7 Installation (continued) - Align the thread sealed end of the long brass connector (E) NOTE: with the threaded end of the recently removed old shower Make sure that your shower valve is closed at all times from now until the arm .
-
Page 8: Double Sided Tape Method
Fig .13B - Use the bottom bracket (BB) to layout the location of the screw holes as shown in figure 13C. - Poke small holes in the double sided backing tape if needed for easier marking . Fig .13C QB025... -
Page 9: Bottom Bracket Method
Installation (continued) - Connect L-fitting (L) to brass connector assembly using restrictor NOTE: (K), see Fig . 15 . This product can be secured to the wall with or without the use of screws. If you’d like to use wall screws to secure bottom bracket (BB) to the wall, drill three 1/4"... -
Page 10: Shower Stall/Uneven Surfaces
- Remove the paper backing from the aluminum covers (DD) then stick them on the gap from the panel to the wall . - Stick the aluminum covers (DD) in place, see Fig . 19 . Fig .18 Fig .19 QB025... -
Page 11: Operation
Operation To use the new shower spa first turn on and adjust the temperature Existing Existing shower shower on the existing shower valve then redirect the water to your new valve valve shower spa using the diverter as shown in figure 20. Diverter Tub spout Use the selector switch, Fig . -
Page 12: Service Parts
QHB120 Middle and bottom jet QHB125 Rubber washer (1/2") QHB104 AA Wall anchors QHB102 Top cover QHB121 BB Bottom bracket QHB103 Stainless steel cover QHB122 CC Screws and washers QHB100 QHB123 DD Aluminum plate cover QHB116 Shower arm QHB126 QB025... -
Page 13: Consignes De Sécurité
Table des matières OWNER’S MANUAL . . . . . . . . . . . . . . . . . . . . . . . . . . . 2 Installation Installation de la pomme de douche . -
Page 14: Garantie
Avant d’appeler, veuillez-vous assurer d’avoir en main : - Le numéro de modèle ou une description; - La preuve d’achat; - Les détails concernant le défaut et/ou le numéro de la pièce de rechange; - Le nom et l’adresse du propriétaire et/ou de l’installateur. QB025... -
Page 15: Préinstallation
Préinstallation OUTILS/MATÉRIAUX REQUIS (NON INCLUS) Équerre de Ruban à mesurer Clé charpentier Perceuse électrique Tournevis Phillips avec foret de 1/4 po Crayon (7 mm) Gants de sécurité Lunettes de sécurité Niveau CONGLOMKB .COM Veuillez écrire à l’adresse cs@conglomkb.com ou composer le 1 877 333-0098 pour obtenir de l’aide . -
Page 16: Contenu De L'emballage
Douche téléphone Clapet de non-retour (préinstallé) Écrou Restricteur Tuyau Raccord en L (préinstallé) Support de la douche téléphone (préinstallé) Raccord en L (préinstallé) Jet de corps supérieur (préinstallé) Rondelle en caoutchouc (1/2 po) Jet de corps central et inférieur (préinstallé) QB025... -
Page 17: Installation
Installation Ce produit est conçu pour être raccordé à votre installation de - Insérez le bras de douche (T) dans la colonne de douche (S) et fixez-le à l’aide de l’écrou (R), voir fig. 5. plomberie existante . Votre robinet de douche, votre inverseur ou votre bec inverseur pour baignoire sera utilisé... - Page 18 Nettoyez le mur autour de l’assemblage du connecteur en Préinstallé dans la pièce E laiton à l’aide d’un chiffon sec. Retirez la pellicule de papier de l’adhésif double face situé sur le support de fixation en acier Fig .9 inoxydable (H) . QB025...
-
Page 19: Méthode Avec Ruban Adhésif (Double Face)
Installation (suite) - Placez le support de fixation en acier inoxydable (H) sur l’assemblage du connecteur en laiton et collez-le bien droit sur le mur . - À l’aide d’un niveau, assurez-vous que les deux bras du support sont alignés horizontalement avant de continuer. Ajustez la position, au besoin. -
Page 20: Méthode Avec Support Inférieur
(BB) situé sur le support inférieur et fixez le support au mur en l’alignant d’abord sur les trous dessinés préalablement, puis en le pressant fermement contre le mur de 5 à 10 secondes, comme le montre la figure 14B. Pressez fermement Fig .16 Fig .14B QB025... -
Page 21: Douche Modulaire/Mur Inégal
Installation (suite) INSTALLATION FINALE - Installez le couvercle supérieur (P) et le couvercle en acier inoxydable (Q) sur la colonne de douche (S), voir fig. 17. - Vérifiez si le clapet de non-retour (X) est préinstallé dans la douche téléphone (W). Fixez le long tuyau de douche flexible (Y) à la colonne de douche (S) et à... -
Page 22: Fonctionnement
- Utilisez un savon liquide, un produit d’entretien ménager général ou un mélange doux de vinaigre et d’eau pour un nettoyage courant. - N’utilisez jamais de nettoyants abrasifs, car ils risqueraient d’égratigner le fini. QB025... -
Page 23: Pièces De Rechange
Pièces de rechange S’il vous manque des pièces ou si vous avez besoin de pièces de rechange, veuillez communiquer avec notre équipe de service à la clientèle à l’adresse cs@conglomkb.com ou au 1 877 333-0098, entre 8 h 30 et 17 h (HNE), du lundi au vendredi. Précisez les pièces dont vous avez besoin et gardez les numéros de pièce à... - Page 24 Imported by / Importé par : St-Laurent, Québec, H4S 2C3 1-877-333-0098 | cs@conglomkb.com (service available in English and French, Monday - Friday from 8:30 am - 5:00 pm EST) (service disponible en anglais et français, du lundi au vendredi, 8h30 à 17h, H.N.E.) www.conglomkb.com Made in China / Fabriqué...
Need help?
Do you have a question about the QB025 and is the answer not in the manual?
Questions and answers