
Summary of Contents for hf sensor MOIST 350 B
- Page 1 MOIST 350 B Operation Manual hf sensor GmbH Weißenfelser Straße 67 D-04229 Leipzig phone: +49.341.49726-0 fax: +49.341.49726-22 email: sales@hf-sensor.de http://www.hf-sensor.de...
-
Page 2: Table Of Contents
Content Construction Basic equipment and accessories supplied Interconnection sockets Keyboard layout Initial operation Power supply Power up Download to personal computer Menu tree Moist 350 Handling Screen elements Menu items Technical data Measurements with the meter Basics of Dielectric Moisture Measurements Microwave Moisture Measurements MOIST-Method and it’s special features Applications... -
Page 3: Construction
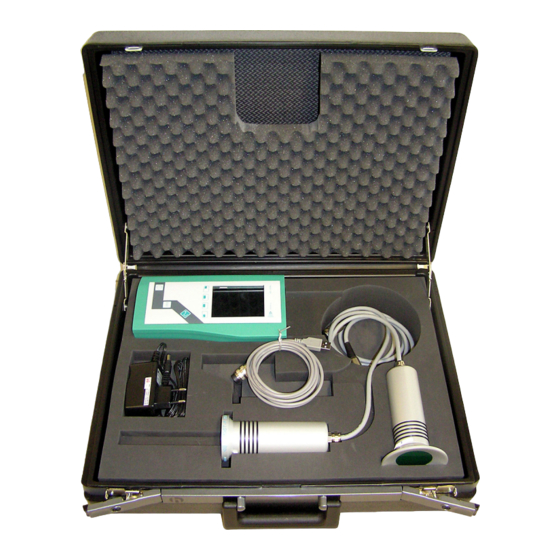
The handheld microwave moisture meter MOIST 350 B was designed for non- destructive moisture measurements in various building materials. In its basic configuration it consists of a microcontroller based handheld with colour display and sensing heads. More moisture probes, a RH humidity probe, a penetration applicator MOIST-ENDO and software MOISTANALYZE are available optionally. - Page 4 the RH humidity probe power supply (with battery charging circuitry integrated in the handheld) carrying case penetration applicator MOIST-ENDO M...
- Page 5 the sensing head MOIST-R2M V2 (with penetration depth up to 7 cm into the material) the sensing head MOIST-DM V2 (with penetration depth up to 11 cm into the material) the sensing head MOIST-SM (with penetration depth up to 80 cm into the material)
- Page 6 Telescopic lengthening MOIST TELE1 for measurements with MOIST microwave probes at floors or ceilings software MOISTANALYZE for data transfer and graphical visualisation (including interface cable)
-
Page 7: Interconnection Sockets
Interconnection sockets At the upper side of the handheld is the socket for the sensing heads (7 pins). Sensing head socket Figure 1: MOIST 350 upper front side The serial interface socket USB (4 pins), is located at the left side of the handheld. USB [U] At its lower front side the meter has a socket for connecting the external power supply. -
Page 8: Keyboard Layout
Warning: The included accumulator is not designated to be changed by the end user. If the accumulator can not be charged anymore (after app. 1000 cycles) you have to send the handheld to hf sensor. Keyboard layout <ON/OFF>-Button: Turns the device on/off. -
Page 9: Initial Operation
Initial operation Power supply The device is designed to be used with the enclosed power supply as well as the included accumulator for independent operation. Please turn off the device before you plug in the power supply. The charge indicator is calibrated for the original accumulator. The use of other types of accumulator can destroy the device but at least causes wrong information about the charge state. -
Page 10: Download To Personal Computer
Mostly no sensor head is connected or the head has been changed during the on-state of the device. A reset of the handheld (turn off and on) will relieve the failure. The handheld will be turned on by pressing the button <ON/OFF>. Depending on the mode the main menu will be displayed or the screen for download to PC. -
Page 11: Menu Tree Moist 350
Menu tree Moist 350 Single Array Measure Select material Show measurement value Delete Value Graphic Measurement Measure array Statistics Show Auto measurement From value indicating calibration range curve Colour profile Manually Edit note Grid … Select Measurement array / Layer Measurement Select material array / Layer …... -
Page 12: Handling
Handling Screen elements 4.1.1 Status bar (upper end) The status bar shows important information about the state of the device, e. g. the accu state. In mains operation the accumulator symbol changes to a mains plug. On the right side you can see the selected measurement array (M) and the selected layer (L). - Page 13 4.2.1.1 Measure (single array) If you choose this item you can see a list of the available materials in the installed sensor head. After the selection of the material the measurement screen opens. Pushing <ENTER> starts the measurement and displays the result. If you have selected multiple measurement cycles to calculate a mean value, you have to press <ENTER>...
- Page 14 4.2.2 Menu item measurement array When selecting this item you can record measurement values in measurement arrays. Measurement arrays are spreadsheets of measurement values, where the values are recorded straight in columns from top to bottom and column-wise from left to right.
- Page 15 4.2.2.1 Measure (measurement array) In this menu you can measure within the previously created and selected measurement array. Pushing the button <ENTER> starts the measurement. Depending on the value in preferences item “average” the end value will be displayed only after repeatedly pushing the <ENTER>-Button.
- Page 16 2. Graphic Here, the measurement points are graphically visualized as grid humidity graphics. Press repeatedly any key (except the <ON/OFF> or <ESCAPE> button) and the statistical parameters of the measuring array are displayed in the bottom of the screen. The <ESCAPE> button returns to the menu item Show measurement array. The statistic parameters are displayed only when the "Grid"...
- Page 17 The borders are displayed on the bottom of the screen after loading the graphic. (Menu item Graphic) The Symbols Auto From calibration curve Manually represent the selected indicating range. The borders are displayed only when the "Grid" is enabled. 5. Colour profile A colour profile for the display of a measurement array in "false colours”...
- Page 18 4.2.2.4 Select (Measuring field) Select a measuring field and then the layer to display the results as a graphic. 4.2.2.5 New (Measuring field) To measure an object, a measurement field have be created with at least one layer. In this menu a measuring field with an associated layer can be created. A existing measuring field can also be supplemented by a additional layer here.
- Page 19 4.2.2.6 Delete (measurement array) After a safety check you can erase one separate measurement array with all its belonging layers. Other measurement arrays or the single array are left unchanged. Attention: Measuring arrays that were deleted from the device, can not be recovered!
- Page 20 4.2.3 Menu item Preferences All chosen preferences are stored non volatile. Averaging ... Set Date Keyboardbeep Device off after Brightness Display off after Escape Figure 10 – Menu item preferences 4.2.3.1 Averaging (setting) Depending on the material it is sometimes useful to determine an arithmetic mean. In this setting you can choose how many single cycles are needed to determine one value.
- Page 21 4.2.3.3 Keyboard beep (set) You can set the keyboard beep on or off. 4.2.3.4 Device off after To expand the operation time you can set the time before the whole device is shut down automatically. The possible value ranges from 1 minute to 5 minutes. If you choose “Off” the device can only be shut down by using the button <ON/OFF>.
- Page 22 4.2.4 Menu item delete all Selecting this menu item will erase all data (measurement arrays, single arrays). This operation can take a view seconds and is displayed by a progress bar. 4.2.5 Menu item info This menu item shows the failure state from the handheld/sensorhead and the software version.
-
Page 23: Technical Data
Technical data Microcontroller based handheld Moist 350 B with 3,5“ colour display Power supply: 4 x 1,2V (AA - NiMH-accu) or mains operation with power supply Please turn off the device before plugging in the power supply. Capacity of accu: 2.000 mAh... -
Page 24: Measurements With The Meter
Measurements with the meter The basic configuration of the MOIST 350 consists of the handheld and the sensing heads MOIST-PM V2 and MOIST-R1M V2(see title). For doing measurements some special features of the microwave method have to be kept in mind, which are described in the following chapter. Basics of Dielectric Moisture Measurements The microwave method is a dielectric moisture measurement method. -
Page 25: Microwave Moisture Measurements
Microwave Moisture Measurements When the frequency is rising (in the microwave region) the polarization of the water molecule becomes more and more difficult because of internal binding forces (the water molecule „swims“ in the water and is bound to the other molecules). The microwave field causes an internal friction in the material, which can also be called dielectric loss. -
Page 26: Moist-Method And It's Special Features
To transform the advantages of microwave moisture measurements described in the previous chapter in a useful format, hf sensor developed two sensing heads, which are only to be put onto the material: MOIST-R1M V2 as a surface sensing head and MOIST-PM V2 as volume sensing head. - Page 27 Moisture measurement with the surface sensing head MOIST-R1M V2 is also possible in objects with lower thickness. Before doing such a measurement hf sensor must be consulted, because usually for such measurements special arrangements must be used. < 1 cm...
- Page 28 In principle moisture measurement with the surface sensing head MOIST-R1M V2 is also possible when the distance to lateral bounds of the test object is lower. Before doing such a measurement hf sensor must be consulted, because usually for such measurements special arrangements must be used.
- Page 29 Surface Roughness and Tipping Because of the higher penetration depth the influence of surface roughness is not as high as for the surface sensing head MOIST-R1M V2. For measurements at surfaces with ledges or holes deeper than 5 mm average values must be generated from single measurements.
- Page 30 Minimum Distance from lateral bounds The microwave field of the volume sensing head MOIST-PM V2 has significant lateral extent. Therefore a minimum distance from lateral bounds must be kept to avoid distortions of the measurement. Simplified the interaction volume can be considered as a cylinder of a radius of about 10 ...
- Page 31 Material specific calibration and moisture index The sensing heads MOIST-PM V2 and MOIST-R1M V2 are material specific calibrated. The calibration curves were generated in the moisture laboratory of hf sensor very carefully. At the moment calibrations are available for these materials: - Brickwork new (density 1.6 ...
-
Page 32: Applications
Applications Material types: Wood Building Materials Walls, Brickwork Moisture Range: 0% < F < 80% (wet base, material specific) 0% < F < 400% (dry base, material specific) Accuracy: 0,5% ... 2% achievable, material specific Penetration Depth: MOIST-PM V2 up to 30 cm, material specific MOIST-R1M V2 up to 3 cm, material specific Temperature Range: 0 ... -
Page 33: Scope Of Delivery
MOIST-SM for moisture measurement in deep material zones the humidity probe MOIST-RH software MOISTANALYZE for data transfer and graphical visualisation (including interface cable) MOIST 350 B and the software MOISTANALYZE be offered as a package. -
Page 34: Safety Instructions
Charging of the NiMH-Accumulators must only happen in the MOIST 350 handheld. Charging in common charging devices is strictly prohibited. Hf sensor will not give any warranties for damages caused by the use of other batteries or accumulators. Interchanging of accumulators only by authorized personnel. -
Page 35: Installation Instruction For Usb-Driver Unit
Windows xP USB-cable has to be coupled with the measuring device MOIST 350 B and later on connected with the PC via USB-cable/USB-interface switching-on of measuring device MOIST 350 B... - Page 36 Betriebssystem Windows XP The USB-driver can be found on the installation-CD MOISTANALYZE: The CD will be browsed until a driver found will be recommended for installation:...
- Page 37 Betriebssystem Windows XP Quit the Windows assistant after successful installation: Start Software MOISTANALYZE Daten auslesen By using the software MOISTANALYZE version 3.2 data will be transmitted from the PC by selecting the right interfaces (virtual COM-Port >= 9):...
Need help?
Do you have a question about the MOIST 350 B and is the answer not in the manual?
Questions and answers