
Summary of Contents for Amoonsky Technology AMS-SC358
-
Page 1: User Manual
LED Video Splicer Processor & AMS-SC358 User Manual LED Video Processor 户手册 User’s Manual... -
Page 2: Safety Instructions
Safety Instructions This symbol prompts the user, the device user manual has important operating and maintenance instructions. This symbol warns the user of the equipment inside the enclosure exposed to hazardous voltages, there is the risk of electric shock. Note Read the manual•... - Page 3 Trademarks VGA and XGA are registered trademarks of IBM Corporation. VESA is a trademark of the Video Electronics Standards Association. HDMI logo and High-Definition Multimedia Interface (High-Definition Multimedia Digital Interface) are HDMI Licensing LLC. Trademarks.
- Page 4 Introduction This manual contains information about how to use, install and configuration the LED video splicer & processor, in addition, also relates to knowledge LED video processor and LED video systems. If Use the LED video processor , please read this manual carefully. About LED Video Splicing Processor The LED splicing processor has three powerful video processing cores, multi-graphics multi-input smart splicing processor, which can be widely used in performing arts activities, command and control...
-
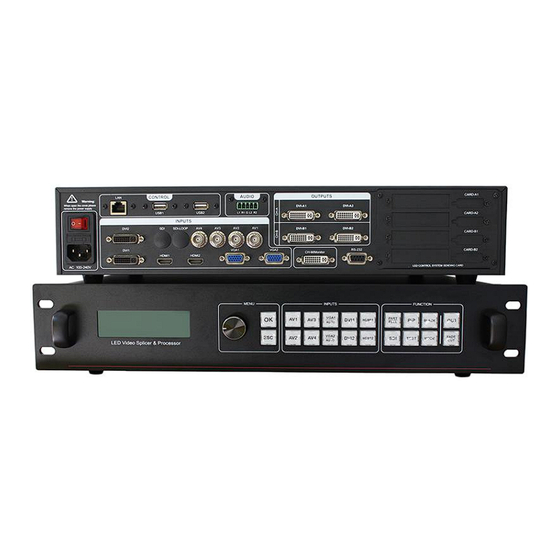
Page 5: Rear Panel
Panel Rear panel Video input connector : ● AV1, AV2, AV3, AV4 -- Composite video input, BNC connector, support PAL、PAL-M/N、 NTSC、SECAM. ●DVI1, DVI2 – DVI video input. DVI-I/DVI-D connector. support VESA standard video format. ●HDMI1, HDMI2 – HDMI video input. HDMI-A connector. support HDMI1.3 / VESA standard. ●VGA1, VGA2 –... -
Page 6: Front Panel
Front panel LCD display — display the parameters and user settings. Operating button — operate the menu system. ● OK “confirm” ● ESC “exit” or “back” ● Knob press down “OK”, turn right ”+” turn left ”-” adjust the parameters on menu. INPUTS —... - Page 7 FUNCTION — including display mode, black output, preset, pip function and switch type. ● PART/FULL – part screen display function, set the parameters in SPLICE menu. ● PIP – enable/disable the PIP function, set the parameters in PIP menu. ● BLACK – output black/freeze screen, select the output in the FUNC menu. ●...
-
Page 8: Menu System
Menu System 1. Default menu LCD will display the input source, output resolution of each channel and other parameters when the processor startup. Input: HDMI 1080p Model:Full Monitor: 1024x768/60 Bright:50 Output A:1024x768/60 PIP : CV1 Output B:1024x768/60 2. Main menu Main menu display the option of every operation, all the functions could be set in the menu, press “OK”... -
Page 9: Output Resolution
Configuration 1. Output resolution The default output resolution of the processor is 1920x1080/60Hz, user need to set the output resolution according to the display, this is the first setup of using the processor. Step 1: select a output resolution which large then the display from the menu, Main menu: “OUTPUT”... - Page 10 When the indicator light on current switching is fade-in/fade-out, light of is seamless switching. The time of fade-in/fade-out could be set in the menu “FUNCTION” → “Fade Time”→“0.5s ~ 5s”. 3. Black and Freeze configuration The processor could output black screen and freeze the screen, this two functions use one button “BLACK”...
-
Page 11: Factory Reset
② Use the correction function in menu: select VGA1/2 input enter main menu. Main menu: “SYSTEM” → “VGA Setting” → “Auto Adjust” User could set the parameters manually. Main menu: “SYSTEM” → “VGA Setting” → “H Position” → “V Position” →... - Page 12 e application of splicing The processor support large splicing output, the maximum output resolution is 7680x640/60Hz or 4608x1152/60Hz, support 5.30 megapixel user-defined resolution output, frame synchronization. Support bisection splicing, unequal splicing and part display function. Hints:Before set the splicing parameters,please make sure the output resolution of A and B is configured.
- Page 13 up-down Sub menu Output A Output B Splice Pattern Equal Equal Horizontal Units Parameters Vertical Units Position...
-
Page 14: Unequal Splicing
2. Unequal splicing Sub menu Output A Output B Splice Pattern Unequal Unequal Horizontal Total 1536 1280 Vertical Total Parameters Horizontal Start Vertical Start... - Page 15 -----Splicing Wizard---- The purpose of this function is to set the parameters quickly and easily. For example: Main menu: “SPLICE” → “Splice Wizards” → “OK” Splice Wizard >>> OUTPUT SPLICE V-Wall-Sync Splice A >>> SYSTEM PICTURE FUNCTION Splice B >>> Please set output A size Please set output B size Horizontal width:...
- Page 16 3. Part/Full display Part/Full display is based on the splicing function, it could display part of screen for example the user just need to display the red part as follow. Set the parameters in the menu then use the “PART” button on the front panel to enable or disable this function.
-
Page 17: Pip Function
PIP function 1. Picture in Picture Picture in picture could display two different input source in the same screen. That means in the normal displaying of the main input, inserted one or more compressed sub-screen in order to monitor other input. When working in picture-in-picture mode, the user needs to provide at least two signal input, and make appropriate settings for PIP. - Page 18 (3) The PIP function doesn’t work between the same type signal, please check the following table which show the conflict. Main Input A V 1 VGA1 VGA2 DVI1 DVI2 HDMI1 HDMI2 √ × × × √ √ √ √ √ √...
Need help?
Do you have a question about the AMS-SC358 and is the answer not in the manual?
Questions and answers