Table of Contents
Advertisement
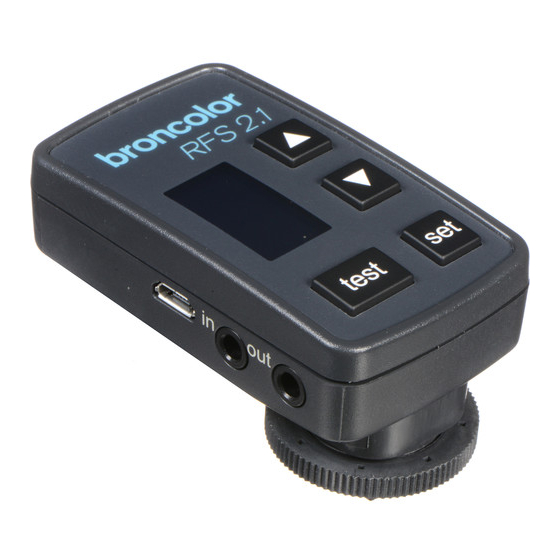
scOpe OF delivery
1
3
2
1 Case
2 lithium button cell
Li-Mn CR2450 (560 mAh, 3 V)
3 Display
4 USB socket
5 Sync in
6 Sync out
2
10
4
5
7
8
6
7 "test" key
8 Base plate (only with receiver kit)
9 "set" key (to set lamp channel and studio channel)
10 Keys " ", " " (to regulate the flash energy and for
adjustment of the lamp channel and studio address)
11 Sync cable for flash unit mini to mini (only with receiver kit)
12 Sync cable for camera
11
12
9
Advertisement
Table of Contents

Subscribe to Our Youtube Channel
Related Manuals for Broncolor RFS 2


Summary of Contents for Broncolor RFS 2
-
Page 1: Scope Of Delivery
scOpe OF delivery 1 Case 7 "test" key 2 lithium button cell 8 Base plate (only with receiver kit) Li-Mn CR2450 (560 mAh, 3 V) 9 "set" key (to set lamp channel and studio channel) 3 Display 10 Keys " ", " " (to regulate the flash energy and for 4 USB socket adjustment of the lamp channel and studio address) 5 Sync in... - Page 2 13 Rechargeable battery pack for receiver operation (incl. rechargable batteries) 14 Power supply device (only with receiver kit) 15 Charge cable (for use in car) (only with receiver kit) 16 USB cable (only with receiver kit)
- Page 3 We are very pleased you have chosen a broncolor Radio Frequency System RFS 2.1 unit, which is a high-quality product in every respect. If used properly, it will render you many years of good service. Please read the information contained in these operating instructions carefully.
- Page 4 1. OperatiOn as transmitter Or receiver The transceiver can be operated in two modes. The unit is always in trans- mitting mode when used in battery operation. The transceiver functions as transmitter. If the transceiver is supplied with energy through the provided power supply unit via the USB-port, the device switches over automatically to receiving mode.
- Page 5 > RFS 2.1 as transmitter on the camera > RFS 2.1 as receiver at the power packs / monolights without internal RFS 2 or RFS 2.1 radio frequency system > RFS 2 or RFS 2.1 as internal radio frequency system integrated in the power...
- Page 6 To enable several RFS 2 or RFS 2.1 devices to communicate with each other, they must all be set at the same studio address. RFS 2 and RFS 2.1 devices with the same studio address can be simultaneously remote controlled. Thus, thanks to the various studio addresses, several RFS 2 and RFS 2.1 groups of...
- Page 7 USB socket on the side of the device. The device will automatically switch to the receiver mode. Connect the sync cable with the "out" jack of the RFS 2.1 transceiver and the sync jack on the flash unit.
- Page 8 To set the studio address, please proceed as follows: (the RFS 2.1 transceiver must be in "ST" mode. Should "LP" mode be selected, change to mode "ST" by pressing "set" for longer) 1.) Press the "set" key briefly until the display blinks "ST" and shows the studio number.
- Page 9 Overview of key assignment: Operation Function executed test Press key briefly Triggers a test flash test Press key for longer Switches modelling light on or off test + set Press keys for longer than 4 s Resets the unit Press key for longer Toggles between studio selection and lamp selection Press key briefly...
- Page 10 comments (If the display does not illuminate, the unit must first be woken up by pressing "set" briefly.) If there is no action within 3 s, menu is exited again. (If the display does not illuminate, the unit must first be woken up by pressing "set" briefly.) Depending on status of unit Depending on status of unit...
- Page 11 To set the lamp address, proceed as follows: (the RFS 2.1 Transceiver must be in "LP" mode. Should the "ST" mode be selected, please change to mode "LP" by pressing "set" for longer) 1.) Press the "set" key briefly until the display blinks "LP" and shows the lamp number.
- Page 12 The RFS 2.1 transceiver allows you to change the power outlet of all RFS 2 or RFS 2.1 flash units that are set to the same studio address (in "ST" mode), and to change the output of individual lamp channels (in "LP" mode). The output can be adjusted in 1/10 and whole f-stops.
- Page 13 mode "lp" Briefly press the key " ": The lamp channel indicated increases its total output by 1/10 f-stop Briefly press the key " ": The lamp channel indicated reduces its total output by 1/10 f-stop Long press of the key " ": The lamp channel indicated increases its total output by 1 f-stop Long press of the key "...
- Page 14 6. cOmpatibility system compatible with comments RFS 2.1 RFS 2.1 On units with RFS 2, individual lamp and RFS 2 modelling light settings are not possible RFS 2 RFS 2 Only RFS 2 functions are available RFS 2.1 (individual lamp and modelling light settings are not possible) No compatibility with RFS 2 or RFS 2.1.
- Page 15 transceiver technical data Studio address setting range 1 – 99 Lamp address setting range 1 – 40 Radio frequency channels (automatically regulated) Frequency 2.4 GHz Transmission time (transmitter to receiver) 0.425 ms Diaphragm shutter speed up to 1/1500 s Focal-plane shutter speed up to 1/320 s Flash triggering possible via: >...
- Page 16 Sync voltage in the event of problems and undefined communication malfunctions bet- ween rFs 2.1 devices, the cause may be strong frequency interference. in such cases, make sure the devices are not within the range of baby phones, video bridges, microwave ovens, cordless dect telephones, Wlan routers or bluetooth devices, or use a different studio channel.
Need help?
Do you have a question about the RFS 2 and is the answer not in the manual?
Questions and answers