Table of Contents
Advertisement
Advertisement
Table of Contents

Related Manuals for Topdon Ultrascan OBDCAN PLUS

Summary of Contents for Topdon Ultrascan OBDCAN PLUS
- Page 1 Ultrascan OBDCAN PLUS...
-
Page 3: Table Of Contents
2.3 Location of the Data Link Connector(DLC) 2.4 OBDII Readiness Monitors 2.5 OBDII Monitor Readiness Status 2.6 OBDII Definitions 3. Using the Scan Tool 3.1 Tool Description-Ultrascan OBDCAN PLUS 3.2 Specifications 3.3 Package List 3.4 Setup 3.5 Review 3.6 DTC Lookup 3.7 About... -
Page 4: Safety Precautions And Warnings
1. Safety Precautions and Warnings To prevent personal injury or damage to vehicles and/or the scan tool, please read this user’ s manual first carefully and observe the following safety precautions at a minimum whenever working on a vehicle: Always perform automotive testing in a safe environment. Do not attempt to operate or observe the tool while driving a vehicle. -
Page 5: Diagnostic Trouble Codes(Dtcs)
and the desire to improve the On-Board Diagnostic system increased, a new generation of On-Board Diagnostic system was developed. This second generation of On-Board Diagnostic regulations is called “OBDII”. The OBDII system is designed to monitor emission control systems and key engine components by performing either continuous or periodic tests of specific components and vehicle conditions. -
Page 6: Location Of The Data Link Connector(Dlc
2.3 Location of the Data Link Connector(DLC) The DLC (Data Link Connector or Diagnostic Link Connector) is the standardized 16-cavity connector where diagnostic code readers interface with the vehicle’ s on-board computer. The DLC is usually located 12 inches from the center of the instrument panel (dash), under or around the driver’... -
Page 7: Obdii Readiness Monitors
2.4 OBDII Readiness Monitors An important part of a vehicle’ s OBDII system is the Readiness Monitors, which are indicators used to find out if all of the emissions components have been evaluated by the OBDII system. They are running periodic tests on specific system and components to ensure that they are performing within allowable limits. -
Page 8: Obdii Monitor Readiness Status
6. Secondary air – Reduces exhaust emissions. 7. Heated Catalyst – Brings Catalyst to correct operating temperature. 8. A/C system – Monitors system for Freon leaks. 2.5 OBDII Monitor Readiness Status OBDII system must indicate whether or not the vehicle’ s PCM’ s monitoring has completed testing on each emission component. -
Page 9: Obdii Definitions
2.6 OBDII Definitions Powertrain Control Module – the OBDII terminology for the on-board computer that controls the engine and drive train. Malfunction Indicator Light (MIL) – Malfunction Indicator Light (Service Engine Soon, Check Engine) is a term used for the light on the instrument panel. It is to alert the driver and/or the repair technician that there is a problem with one or more of vehicle’... -
Page 10: Using The Scan Tool
Freeze Frame Data and may include important engine parame- ters such as engine RPM, vehicle speed, air flow, engine load, fuel pressure, fuel trim value, engine coolant temperature, ignition timing advance, or closed loop status. 3. Using the Scan Tool 3.1 Tool Description - Ultrascan OBDCAN PLUS... -
Page 11: Specifications
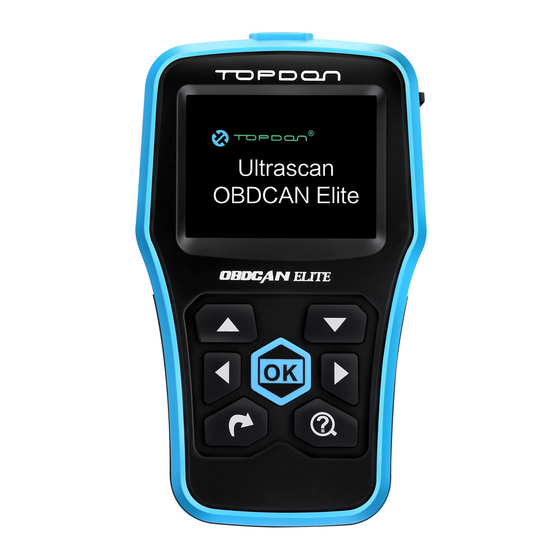
1 OBD-16 Connector: Connects the handset to the vehicle’ s Data Link Connector (DLC). 2 USB Port /TF Card Slot Cover 3 USB Port: To connect on PC to update the firmware. 4 NULL 5 LCD Display: Indicates test results. 6 OK Button: Confirms a seclection (or action)from a menu list. - Page 12 3.41 Language In the Setup menu, use the UP/DOWN scroll button to select the preferred language, press OK button to confirm. 3.42 Unit of Measure 1) Use the UP/DOWN scroll button to select Unit of Measure, and press the OK button. 2) From the Unit of the Measure Menu ,use the UP/DOWN scroll button to select Unit of Measure.
-
Page 13: Review
3.43 Record It is used to turn on/off the record mode. Once it is set as “ON”an red solid circle appears and than the tool will record the DTCs Datastream and freeze frame data. 3.44 Beeper Use the UP/DOWN scroll button to select the Beeper,and press OK button. -
Page 14: Dtc Lookup
1) Review DTC This option is used to review the recorded DTC. 2) Review Datastream This option is used to review the recorded datastream. 3) Review Freeze Frame This option is used to review the recorded freeze frame data. 4) Delete DTC data This option is used to delete the recorded DTC data. -
Page 15: About
1) Form the Main Menu, use UP/DOWN scroll button to select the DTC Lookup,and press OK. 2) Press / to move the highlight bar to different position; 3) Press ▼/▲to alter the value; 4) Press OK button to retrieve the definitions of the DTC. 3.7 About 1) Form the Main Menu, use UP/DOWN scroll button to select the About,and press OK. -
Page 16: Obdii/Eobd Diagnostics
4. OBDII/EOBD Diagnostics CAUTION:Don’ t connect or disconnect any test equipment with ignition on or engine running. 1) Turn the ignition off. 2) Locate the vehicle’ s 16-pin Data Link Connector(DLC). 3) Plug the scan tool cable connector into the vehicle’ s DLC. 4) Turn the ignition on. -
Page 17: Read Codes
4.1 Read Codes Current DTCs: Request for DTC related to emissions. Pending DTCs:Requests the current or final completion of the discharge cycle for the relevant DTC. Permanent DTCs:Request a permanent DTC related to emissions. 1) From the Diagnostic Menu, use UP/DOWN scroll button to select Read Codes,and press OK button. -
Page 18: Erase Codes
4.2 Erase Codes Notes: This function is performed with key on engine off. Do not start the engine. Before performing this function, make sure to retrieve and record the trouble code. After clearing, you should retrieve trouble codes once more or turn ignition on the retrieve codes again. -
Page 19: I/M Readiness
4.3 I/M Readiness I/M is the abbreviation of Inspection and Maintenance, legislat- ed by the Government to meet federal clean – air standards. I/M Readiness indicate whether or not the various emissions-related systems on the vehicle are operating properly and are ready for inspection and maintenance testing. - Page 20 2) From the Data Stream Menu,use UP/DOWN scroll button to select the“View All Items”,and press OK button. It will display all the Data Stream information. 3) From the Data Stream Menu,use UP/DOWN scroll button to select ”View Graphic Items”,and press OK button. Select a data press OK button to see the graphic information.
-
Page 21: Freeze Frame
4) Press to return to Diagnostic Menu. 4.5 Freeze Frame When an emission – related fault occurs, certain vehicle conditions are recorded by on – board computer. This information is referred to as freeze frame data. Freeze Data is a snapshot of the operating conditions at the time of an emission- related fault. -
Page 22: O2 Sensor Test/On - Board Monitoring/Evap System Test
4.6 O Sensor Test/On - Board Monitoring/Evap System Test 1) From the Diagnostic Menu , use UP/DOWN scroll button to select the O2 Sensor Test/On – Board Monitoring/Evap System Test, and press OK button. 2) Press to return to Diagnostic Menu. 4.7 Vehicle Information Select “Vehicle information”... -
Page 23: Update
1) The sole responsibility of OBDCAN PLUS under the Warranty is limited to either the repair or, at the option of Topdon, replacement of the code reader at no charge with Proof of Purchase. The sales receipt... -
Page 24: Service Procedures
6.2 Service Procedures If you have any questions, please contact our local store, distribu- tor or visit our website at www.topdon.com. If it becomes necessary to return the code reader for repair, contact our local distributor for more information. - Page 25 All Rights Reserved www.topdon.com...
Need help?
Do you have a question about the Ultrascan OBDCAN PLUS and is the answer not in the manual?
Questions and answers