
Summary of Contents for myCam VPG-OAP1080KIT
- Page 1 WIRELESS Funk-Kamera-Set Installation and Operating Instructions Model: VPG-OAP1080KIT Version 2.0 PLEASE READ THESE INSTRUCTIONS CAREFULLY BEFORE USING THIS PRODUCT AND KEEP THIS MANUAL FOR FUTURE REFERENCE.
- Page 2 Damages caused by non-compliance with this operating manual will void the warranty! We will not assume any liability for damages to items or persons caused by improper handling or non- compliance with the safety notices! Any warranty claim will be null and void in such cases. 1.
- Page 3 This equipment has been tested and found to comply with limits for a Class B digital device, pursuant to Part 15 of the FCC rules and ETSI(EN) 300328. These limits are designed to provide reasonable protection against harmful interference in residential installations. This equipment generates, uses, and can radiate radio frequency energy, and if not installed and used in accordance with the instructions, may cause harmful interference to radio communications.
- Page 4 The HDNVR which can receive video and audio data from Hight Definition Digital Wireless Cameras (supports up to 4 cameras), and is able to store received data to the HDD. You are able to view the data in real-time, or at later time. Remotely have live-view via mobile device(s) with Internet connection.
- Page 5 The state of High Definition Wireless Digital Video Recorder is capable of deliver high quality video to your smart-mobile device(s), which would require higher internet bandwidth. Due to your local internet environment condition, your mobile device(s) may display black-screen or temporary disconnect to the HDNVR.
- Page 6 *Digital Wireless Outdoor IR Digital Wireless Receiver *Camera / Receiver Camera Console *Camera Stand Screw Pack Camera / Receiver Adaptor Camera power adapter-5V/1.5A For Camera HDNVR power adapter- 12V/2A Ethernet Cable *For Networking: - DHCP enabled router - 1.5Mbps or above upload bandwidth (both home and mobile device) - iPhone 5 / Mini iPad 2 or above - Android 1.9GHz Guard core or above...
- Page 7 Power Indicator Indicate Power On/Off Status Wireless Indicator Indicate Wireless Connect Status Antenna Transmit/Receive Digital Wireless Audio/Video Data Reset Button Reset System Memory Card Slot Memory Card Insert Location Power Jack DC 12V Adaptor...
- Page 8 Power Button Power On/Off Enternet Jack Connect to Internet router USB Port Connect to external USB HDD, USD Flash disk, external SSD drive, and USB mouse/wireless mouse Please connect your external HDD before power on the Digital Wireless Receiver Console(apply to external HDD version only).
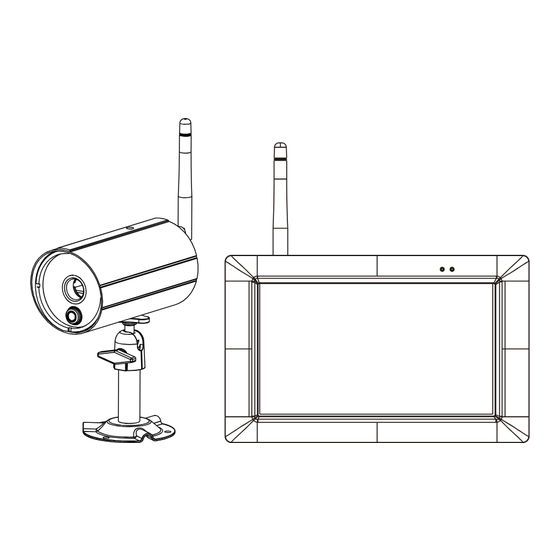
- Page 9 Power Indicator Indicate Power On/Off Status Wireless Indicator Indicate the monitor and cameras are connected Lens Capture Image Passive Infrared sensor for detecting heat emission from biomass (human, animals, etc.) IR LEDs Night View Antenna Transmit/Receive Digital Wireless Audio/Video Data Camera Stand Fasten Camera to Wall, Ceiling and/or Flat Surface SMA Connector...
- Page 10 Keep active locations in the camera’s field of view. The camera has a 90-degree viewing angle. The best area for motion detection is 3 to 5 meters from the camera position. Avoid false triggers, please note this device is equipped with a PIR Motion Sensor that detecting temperature changes in the area in front of the device;...
- Page 11 1. Locate a suitable location to mount the camera. 2. Secure the camera stand to a stable surface, celling or wall using the three screws. 3. Loosen the thumb screw of the camera stand and secure the camera body to the bracket. Make sure the camera is in an upright position (relative to your viewing environment).
- Page 12 4. Screw the antenna into rear of the camera. 5. Connect the supplied power adaptor to the camera and the power source. The RED LED will light up which indicate the camera is ready for setup. Please refer to page 17 for pairing camera.
- Page 13 1.Insert the memory card and/or connect HDD device to USB port. It supports up yo 128GB memory card to store security video clip or copy/backup a video clip from HDD. For long term recording video, we suggested that you connect an external HDD which supperts up to 2TB. a.
- Page 14 2. Twist on the antenna to the LEFT side of the console. 3. Connect the Ethernet cable from the BACK of the console to your router. In order to having live- view video from your HDNVR anywhere in the world on your 4G/Wi-Fi enable smart devices. You will need to connect HDNVR to the home router with an Ethernet cable.
- Page 15 This function allows you to change the camera views are displayed on-screen in Live View mode. During LIVE VIEW in QUAD DISPLAY mode,tap any channel or screen for full screen display. * The red "V" sign shows which channel is currently selected. The camera audio will be displayed. Tap one channel Live-view full screen Tap again to return...
- Page 16 The HDNVR system is controlled through mouse operation or touch screen. Tap on the Arrow icon, it brings up menu options that allow you change the settings on the monitor and camera. Display Menu/ Display/Fold up Menu Exit Quick Select Menu Fold up Menu Enter Main Menu Enter System Setting...
- Page 17 This section allows you control the various actions and options that are availableon your HDNVR. Tap screen or left-click the mouse. Tap or right-click the mouse to return live view. Main Menu Camera Setup • Camera Pairing • Camera Activation CAMERA SETUP •...
-
Page 18: Camera Pairing
This section allows you to add the camera, if you have purchased addition cameras or change original camera channel. Also you can enable/disable each camera connected to the receiver. For better performance, you can setup the camera's resolution and video quality individually. 1. - Page 19 The HDVR system supports High and Normal resolution: • Normal resolution setting provides better frame rate RESOLUTION and optimized for mobile device display. Select quality of video image: • High quality for better video display quality, the system will lower the display frame rate as QUALITY compensation.
- Page 20 This function allows you setup recording schedule. Select one or all cameras then setup the time section and recording type (By default all cameras are selected). The system offers 2 types of recording, including time schedule and motion. • Make sure the memory card is inserted into the SD Card slot before recording video. •...
-
Page 21: Camera Select
Setup the recording schedule for any or all cameras: • Select camera 1, 2, 3 or 4 to setup record method, date and time period individually. CAMERA SELECT • Select camera all to setup, recording for all cameras connecting to the system. Setup the recording method: •... - Page 22 This function allows you setup the motion sensitivity for each camera. You have the selection of low, medium and high. 1. Select one camera that you would like to setup. 2. Choose motion sensitivity range. Motion Detection Sensitivity Enter Camera Select Motion detection via hardware PIR sensor on camera only.
- Page 23 This section allows you to setup the motion area for each camera. By default, the entire view of the camera has been enabled to detect motion. You can click the checkbox to disable.Select the camera for MOTION AREA setup by clicking on camera 1, 2, 3 or 4. Tap on the grid to remote. The check sing where motion detection is no needed.
-
Page 24: Motion Alarm
motion trigger event: • 30 seconds • 60 seconds • 120 seconds MOTION RECORD PERIOD Note: REC Time may be extended if the motion continues. upon MOTION ALARM motion trigger event: • Off • 5 seconds • 10 seconds CAMERA DISCONNECTION when the cameras disconnected: •... - Page 25 This function allows you to search and play previously recorded videos that are stored on your hard drive. 1. Tap main menu icon to access event list screen. Main Menu Event List 2. Tap one or more camera(s) that you would like to display for playback. 3.
-
Page 26: Event Indicator
EVENT PERIOD left/right arrow SEARCH to change search period. of the camera selected within the search period via date highlight. • Camera 1 CAMEAR SEARCH • Camera 2 • Camera 3 • Camera 4 • All Cameras Left click on the date highlighted to see list of available recorded EVENT INDICATOR EVENT RECORD... - Page 27 This function allows you to setup the system, including date setup, language, display, and power saving. Main Menu System Setup YEAR/MONTH/DATE/HOUR/ MINUTES. When done setting, tap the return icon or use the mouse to save and exit. This section allows you to setup the system language. After system language be selected, all the system settings, including push setting will be restored into factory default.
- Page 28 This section allows you to activate/deactivate the following icons on screen display: • Signal Strength Indicator • Time Stamp This section allows you to setup display mode during system idle. You can select Quad or Smart Quad screen display, and the time setup for auto-scan. This section allows you to setup power saving mode.
- Page 29 This section allows you to managemernt your storage. You can formate or overwrite your HDD or memory card. Main Menu Storage Status Stroage Setup Select Storage Device for Recording 1. Tap Network setup to access your security code. 2. Enter a new security code. 3.
- Page 30 Setup Network Connection and Security Code (remote access): • obtain and enter the IP information provided by your local ISP. • DHCP – if you are using dynamic IP address, simply select DHCP and there is no need to enter any additional IP address information.
- Page 31 The HDNVR system allows you to remotely access the live video from your iPhone, iPad or Android mobile device. 1. Download and install the "WDVR Cam" app from Google play or the App Store. Then launch the app. Andrio For iOS For Android Before start adding a new system, you need to change the reciver’s default password.
- Page 32 3. Tap the "scan QR code" to scan code located on the rear of the monitor. You can also enter ID directly. Then give the device a new name. Eenter the password as same as your receiver. Then...
-
Page 33: Device List
The Home screen in the WDVR app provides easy access to all of your devices settings. Andriod Device List Live View Tap the “New” icon to add new device Tap the "MORE" icon, the more setting menu will display on screen Tap to return to device list Playback the recorded video Tap to Select one channel you would like to remote recording video... - Page 34 Tap to ddd new device/device list. Tap to enter the remote setting. Tap to access Tap to access event list for video playback. Tap to starting recording video. Tap again to stop recording. Tap to connect/disconnect the device. Tap the icon to save a snapshot of your smartphone or tablet.
- Page 35 You can access the app menu to control your device. Camera Setup Recorder Setup System Setup Storage Setup System Info Push Nitifcation...
- Page 36 You can modify or delete the device from this section. 1. Tap the device you would like to edit. Then the menu will display on screen. 2. Tap "Modify" the change the default password. 3. Enter new password. xxxxxxxx xxxxxxxxxxxxxxx 1.
- Page 37 3. Enter user name 4. Tap ”OK” when you're done. 1. Tap the icon 3. Enter user name 4. Tap ”Save” when you're done.
- Page 38 You can access your device to playback the event video.The recorded video will store to the HDD or SD card. To select one storage you would ilke to playback video as well as choose one of the channel. 1. Choose either the HDD device or SD Card for video playback 2.
- Page 39 This section allows you to remotely record a video clip. Choose the one channel you would like to record. The clip video is saved to your storage(HDD device or SD card). Andriod...
- Page 40 This section allows you to control your device, including camera setup, record schedule, system 1. Tap to pair a new camera. 2. Press the pair button at the back of the camera. 3. The camera GREEN LED will light up which indicate the camera is now paired. You can choose to active/disactive the camera.
- Page 41 You can access and change the recording schedule for one or all cameras as well as enabling a schedule when holiday taken.The app offers 2 recording type, including time schedule and motion detection. 1. Tap one or all cameras that you would like to setup 2.
- Page 42 This section allows you can change the motion sensitivity for each camera. Regarding motion detection range, please refer to page 24. 1. Select one camera that you would like to edit. 2. Select motion sensitivity. Andriod...
- Page 43 This function can be used to obscure all or part of your image for privacy. By default, the entire view of the camera has been enabled to detect motion. 1. Select a camera that you would like to edit. 2. Click the checkbox to enable where motion detection is no needed. Andriod...
- Page 44 storage. Motion alarm function allows you to adjust the time duration between each alert. This function allows you to setup the time duration between each alert. Andriod...
- Page 45 This section allows you to setup the system, including date, language, and display setting. If the date and time is not correct, click the calendar icon to select the correct date. Andriod Select a language you would like the system menus. After you reset the language, all the system settings will be restored into factory default.
- Page 46 You can enable/disenable setup signal indicator, and add recording time on video. Andriod You can setup display mode during system idle. To select Quad or Smart Quad screen display, and the time setup for auto-scan. Andriod...
- Page 47 This section allows you to setup power saving mode. There are 3 options you can setup • Enter Power Saving mode after system idle for 5 minutes • Enter Power Saving mode after system idle for 10 minutes • Screen always on (deactivate Power Saving) It suggested that you enable the power saving function.
- Page 48 The recording files will save to the storage you choose. Also you can select you would like to Andriod Andriod...
- Page 49 or at work. 3. Enter user name. 4. Tap ”OK” when you're done. 1. Tap the icon 3. Enter user name, 4. Tap ”Save” when you're done.
- Page 50 This function allows you to setup interval time of the push. There are four options you can select how long you’ll receive the push. Your smart phone will receive the push immediately after first triggered. After that the camera will send the push according to interval time you setup. To avoid receiving the push frequency.
- Page 51 From list section, you can see which smart devices currently receive push from the system. The app allows max 8 devices to receive the push. You may remove all devices from the push list by resetting the language. The system setting will go back to factory default after language reseted. All information such as password and push setting will be removed.
- Page 52 •No Power supply to camera •The camera is not paired with monitor or signal disconnected •Service out of range "No Signal" or "No Video" high gain antenna to improve the range. Please contact the store from which you made the purchase. •Signal has been blocked.
- Page 53 •Record schedule does not setup properly •Storage media not ready Receiver cannot record appendix. •HDNVR is not connected to internet properly may use some numbers of UDP ports assigned by your home router for network transmission. Please make sure these ports are opened.
- Page 54 Transmission Power <20dBm Frequency Range 2403-2478Mhz Compression Format H.264 Video Resolution Viewing Options Full Screen/QUAD/Smart-QUAD Storage Media External USB HDD (not included); SSD compatible (not included) Memory card slot (up to 128GB; for footage backup only; memory card not included) Motion Detection PIR On/Off setting for each camera Record Mode...
- Page 55 USB HDD Silicon Power 2.5” USB 3.0 500GB Transcend storejet 2.5” USB 3.0 500GB Toshiba 593400-A 2.5” USB 2.0 500GB WD Elements Elements portable 2.5” USB 3.0 Seagate STBX1000301 2.5” USB 3.0 WD Elements WDBUZG0010BBK 2.5” USB 3.0 ADATA HV610 2.5”...
- Page 56 11 hours 11 hours 22 hours 22 hours 16GB 45 hours 45 hours 32GB 92 hours 92 hours 500GB 60 days 120 days 3 hours 3 hours 6 hours 6 hours 16GB 11 hours 11 hours 32GB 23 hours 23 hours 500GB 15 days 30 days...
- Page 57 www.i-videotechnik.com i-Alarmsysteme GmbH, Technologiestraße 4, 2722 Weikersdorf, AUSTRIA i-Alarmsysteme GmbH, An der Horst 10a, 40885 Ragingen, GERMANY i-Alarmsysteme GmbH, Schlachthofstrasse 19, 8406 Winterrthur, SWITZERLAND www.i-alarmsysteme.com...
Need help?
Do you have a question about the VPG-OAP1080KIT and is the answer not in the manual?
Questions and answers