Table of Contents
Advertisement
Operator's Manual
JetMounter™ JM63 Fuzion XD
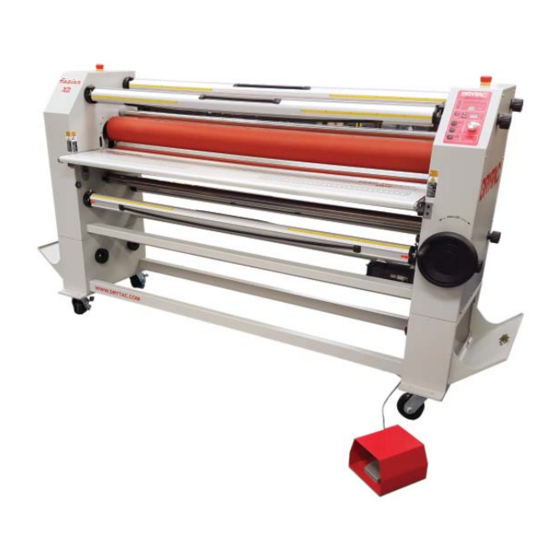
The JM63 Fuzion XD is a heavy-duty, wide-format roller laminator with a heat assist top roller. Excellent for
laminating vehicle wraps, creating window decals and mounting graphics to substrates, it is ideal for shops
wanting to add roll-to-roll laminating capabilities at a lower price point. Standard features include heavy-
duty metal construction, large diameter non-stick silicone rollers, variable speed control, fold down front
table, built-in fl ip open storage compartments, top and bottom auto-grip supply shafts with brake tension
control on operator side, top auto-grip take-up shafts with adjustable clutch speed, single mechanical
height/pressure adjustment, interchangeable 110V or 220V electrical confi guration, and photocell safety
protection.
WWW.DRYTAC.COM
USA 800.280.6013
CANADA 800.353.2883
Advertisement
Table of Contents

Related Manuals for Drytac JetMounter JM63 Fuzion XD


Summary of Contents for Drytac JetMounter JM63 Fuzion XD
- Page 1 fl ip open storage compartments, top and bottom auto-grip supply shafts with brake tension control on operator side, top auto-grip take-up shafts with adjustable clutch speed, single mechanical height/pressure adjustment, interchangeable 110V or 220V electrical confi guration, and photocell safety protection. WWW.DRYTAC.COM USA 800.280.6013 CANADA 800.353.2883...
-
Page 2: Table Of Contents
Using a Leader Board ..............................19 Carrier Boards and Preparing Mounting Board ......................19 Care & Maintenance ..............................20 Roller Alignment Instructions ............................ 21 JetMounter JM63 Fuzion XD Operation Sequence ....................23 JetMounter JM63 Fuzion XD Schematic ........................24 WWW.DRYTAC.COM USA 800.280.6013... -
Page 3: Overview
Operator’s Manual Overview Thank you for purchasing a Drytac JetMounter™ JM63 Fuzion XD. The information contained in this Operator’s ® Manual will explain the basic methods of mounting and laminating with this easy-to-use roller laminator. JM63 FUZION XD Technical Specifi cations Max Laminating Width 63”... -
Page 4: Warranty
(3) months. Return your warranty card to Drytac as soon as possible. By doing so, we will be able to more effi ciently address your concerns in the unlikely event that you encounter an issue. You will fi nd a section in the Operator’s Manual for recording this important information and for noting any future parts or service requests. -
Page 5: Registration Information
COMPANY NAME: ADDRESS: CITY, STATE, ZIP: SERIAL #: PURCHASE DATE: WARRANTY CARD RETURN DATE: CANADA Drytac Corporation Drytac Canada, Inc. 5601 Eastport Boulevard 105 Nuggett Court Richmond, VA 23231 Brampton, Ontario L6T 5A9 +1 800-280-6013 +1 800-353-2883 +1 804-222-3094 +1 905-660-1748 customerservice@drytac.com... -
Page 6: Important Safety Information
Operator’s Manual Important Safety Information Before operating the JetMounter™ JM63 Fuzion XD for the fi rst time, read and understand the following safety-related information. Failure to follow these procedures may result in serious personal injury and/or damage to the equipment and materials being used. - Page 7 Operator’s Manual Important Safety Information The JetMounter™ JM63 Fuzion XD performs mounting and laminating applications by using two rollers to apply uniform pressure to mounting adhesives and overlaminating fi lms. The point where the rollers touch these materials is called the “Nip”. This area creates a potential pinch hazard for fi...
-
Page 8: Safety Features
If any malfunction occurs, stop using the machine immediately and contact the Drytac Technical Services department. The JM63 Fuzion XD has electric eyes or photocells installed in front of the Nip area for safety. When interrupted, they will stop the rollers immediately, a photocell status LED on the Control Panel will light up, and a buzzer will sound as a warning to indicate that an object is breaking the photocell circuit. -
Page 9: Setup Procedures
“tripped”, note it on the receiving paperwork. Report any damage to the shipping company immediately and contact the Drytac Customer Service department if replacement parts are needed. If there is no apparent damage, proceed with unpacking. -
Page 10: Parts Identifi Cation
Operator’s Manual Setup Procedures Parts Identifi cation Equipment Parts Take-ups & Unwinds Rollers & Idlers Operator Controls Top Front Take-up Top Heat Assist Roller Control Panel Top Rear Unwind/Supply G Bottom Cold Roller (behind table) Print Guide Bottom Front Unwind/Supply Top Idler Infeed Table Bottom Rear Take-up... - Page 11 Operator’s Manual Setup Procedures Parts Identifi cation cont. Control Panel: A panel located on the upper angled surface of the right end case used to control and monitor various functions of the machine. Power Button: A button located in the lower left corner of the Control Panel that when pressed activates power to the machine.
- Page 12 For best results, set the pressure to 20% or 40%. Drytac’s unique lift mechanism design allows for evenly controlled pressure over the entire contact area. To prevent excessive pressure, premature failure of the machine, or damage to materials during processing, maximum spring compression is restricted.
-
Page 13: Setting Roller Pressure
Paper travel greater than 0.12” (3mm) per 16’ (5m) of paper (within the 20-60% pressure range) requires adjustment in order to correct the deviance. Contact the Drytac Technical Services department for assistance before attempting to make any adjustments. -
Page 14: Adjusting Supply And Take-Up Shaft Tensions
Operator’s Manual Setup Procedures Adjusting Supply and Take-up Shaft Tensions The JM63 Fuzion XD is equipped with a Take-up Shaft on the front of the machine that winds up the release liner from the roll of adhesive or laminate during processing. Both the Take-up Shaft and Supply Shafts are equipped with Brakes, which are important to adjust so that there is even tension on the adhesive or laminate during processing. -
Page 15: Mounting Applications
Operator’s Manual Mounting Applications Selecting Mounting Board and Adhesive Selecting the proper mounting board/substrate is very important. Common materials that can be used are: • Foam board - FomeCor , GatorBoard , HartBoard , etc. ® ® ® • Illustration board •... -
Page 16: Mounting Graphics To Pre-Coated Boards
Operator’s Manual Mounting Applications Pre-Coating Mounting Board cont. 4. Lay the Leader Board on top of the exposed adhesive on the work table. Push the Leader Board and adhesive into the Nip area (where the rollers make contact). When pushing the Leader Board into the adhesive, make sure it is parallel to the rollers. - Page 17 Operator’s Manual Mounting Applications Mounting Graphics to Pre-Coated Boards cont. 5. Square the mounting board with the tacked graphic against the edge of the Leader Board and drape the graphic over the top roller. 6. Run the mounting board/adhesive/graphic image through the rollers while simultaneously pulling the release liner away from and off of the board.
-
Page 18: Laminating Applications
Select an appropriate pressure sensitive overlaminating fi lm for the surface of the graphic image based on aesthetics and the conditions under which it will be displayed. Drytac offers a wide variety of fi lms to match your specifi c output and application. -
Page 19: Laminating Single Mounted Image
Operator’s Manual Laminating Applications Laminating Single Unmounted Image cont. 5. Lift up the remainder of the overlaminating fi lm (which is still protected by the release liner) and slide the graphic image face underneath it. Stop before it makes contact with the exposed part of the adhesive. It is important to keep the fi... -
Page 20: Laminating Multiple Mounted Images
Operator’s Manual Laminating Applications Laminating Single Mounted Image cont. 5. Insert the Leader Board with the overlaminating fi lm tacked to it into the Nip area. Advance the Leader Board and the fi lm through the Nip area until the upper roller securely pinches the fi lm. The trailing edge of the Leader Board should be at the pinch point of the rollers. -
Page 21: Using A Leader Board
Operator’s Manual Laminating Applications Laminating Multiple Mounted Images cont. 5. Position the fi rst mounted graphic image to be laminated against the back of the Leader Board. Check for proper alignment and feed through the rollers of the machine. Feed one graphic image in after another, as needed. -
Page 22: Care & Maintenance
Operator’s Manual Care & Maintenance CAUTION: Unplug the equipment before performing any service or maintenance. • Depending on the frequency of machine use, schedule maintenance intervals monthly or semi-annually. It is recommended that maintenance be performed at least every six months. •... -
Page 23: Roller Alignment Instructions
Operator’s Manual Roller Alignment Instructions Prior to shipment, the JM63 Fuzion XD is carefully inspected. Inspection includes making sure the roller alignment is calibrated and tested for paper travel at 20-60% pressure. Paper deviation of less than 0.12” (3mm) for 20’ (6m) of travel (maximum standard) is likely to increase above 60% pressure due to roller defl... - Page 24 Operator’s Manual Roller Alignment Instructions 6. Ensure the spring washer stacks are loose. With the rollers apart, push up on the spring washer bolts to verify there is 0.04-0.08” (1-2mm) of free play in the spring stacks at the top of the bolts. If not, loosen the two 10mm nuts at the bottom of each bolt and adjust using a 5mm Allen wrench.
-
Page 25: Jetmounter Jm63 Fuzion Xd Operation Sequence
Operator’s Manual JetMounter™ JM63 Fuzion XD Operation Sequence Photocell Clear and Emergency Stop Mode Photocell Blocked Table Switch Activated No Switches Activated Button Pressed To operate in Turn the On/Off Switch on When the photocell is When the table is lowered, When the Emergency Stop Standard Mode the back of the left end... -
Page 26: Jetmounter Jm63 Fuzion Xd Schematic
Operator’s Manual JetMounter™ JM63 Fuzion XD Schematic...
Need help?
Do you have a question about the JetMounter JM63 Fuzion XD and is the answer not in the manual?
Questions and answers
Good day, we have DryTac JM63, i need to replace the rubber on the top rear unwind\supply roller, wondering if you sell them Thanks Mike