Table of Contents
Advertisement
This is a Quick Start Guide Only. It is Important that you read the
Instructions fully for Safety and Correct operation of your product. Failure to
do so may result in Damage or Personal Injury.
1
Ensuring there are no creases or folds, wrap
the Heated Throw around your body or drape
over your legs.
Ensure the Controller is on the outside of the
Throw. DO NOT COVER the controller
Ensure the detachable plug on the Throw is
fully inserted and locked.
Allow cables to hand freely. DO NOT BEND,
KINK, TRAP or PINCH the cables.
DO NOT Sleep while using this product.
DO NOT use this product as an electric under
or over blanket.
DO NOT use in bed.
3
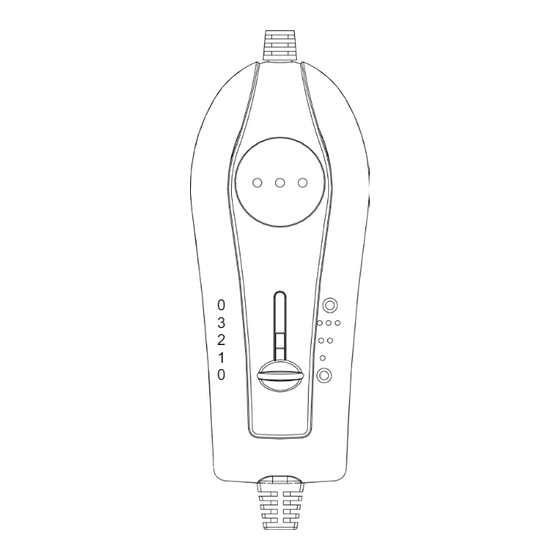
0
3
2
1
0
DO NOT COVER CONTROLLER
When using the Throw, some people may be susceptible to a tingling sensation when alone or
when touching someone else using the Throw.
This "Tingling" feeling is known as an "electric field effect" and is occasionally known to happen
across all makes and brands of Throws. It is caused by the current flowing through the element
creating an Electromagnetic Field (EMF). Some people are more susceptible to feeling this EMF
tingling sensation than others. This is no cause for concern and is in no way an electric shock.
Quick Start Guide - Heated Throw
Heat Settings
0 = Off
1 = Low Heat
2 = Medium Heat
3 = High Heat
0 = Off
DO NOT Sleep while
using this product.
DO NOT use on heat
setting 3 continuously.
Turn down to setting 2
or 1 when warm enough
Controller will turn of
automatically after
approx. 3 hours.
2
Fully unravel the cables and Insert Plug into
Power Point and switch on.
4
Do not leave unattended when switched on.
Turn the heat setting to position "O" (off) then
Turn power off and Unplug at the wall.
Always Unplug when not in use
Store in dry place when finished.
Refer to "Recommended Cleaning
Instructions" section for directions on
cleaning the product.
Advertisement
Table of Contents
Troubleshooting

Summary of Contents for Onix T624W100DA2b
- Page 1 Quick Start Guide - Heated Throw This is a Quick Start Guide Only. It is Important that you read the Instructions fully for Safety and Correct operation of your product. Failure to do so may result in Damage or Personal Injury. Ensuring there are no creases or folds, wrap the Heated Throw around your body or drape Fully unravel the cables and Insert Plug into...
- Page 2 Page 2 of 16 Rev 1...
- Page 3 Heated Throw INSTRUCTIONS 3 Hour Auto Off Model Number T624W100DA2b Note: The specifications and/or components of this product are subject to change without prior notice Page 3 of 16 Rev 1...
- Page 4 Page 4 of 16 Rev 1...
-
Page 5: Table Of Contents
IMPORTANT SAFEGUARDS ............... 6 Connecting the Controller ..............8 Overheat Protection ................8 Using The Controller ................9 Auto Off......................10 Pre Heat ....................... 10 Using Your Heated Throw ..............10 Recommended Cleaning Instructions ..........11 Treatment For Localised Soiling ............... 11 Hand Washing (Recommended) .............. -
Page 6: Important Safeguards
Thank you for purchasing our Heated Throw. Each unit is manufactured to ensure safety and reliability. Before using for the first time, please read the instruction manual carefully and keep it for future reference. 1 IMPORTANT SAFEGUARDS • Before connecting and switching on the Heated Throw, ensure that the voltage indicated on the rating label corresponds to the mains voltage in your home. - Page 7 • The flexible supply cord and controller must, as far as practicable, be kept outside of the Heated Throw. Do Not Cover the Controller. • Do not switch the power on if the Heated Throw is wet or in a folded state. •...
-
Page 8: Connecting The Controller
3 Connecting the Controller Ensure Power is Off and the Plug is Removed from the Wall Socket • To fit the controller plug, simply hold the socket with one hand and push the controller plug all the way until the locking tab locates over the lug on top of the controller plug. -
Page 9: Using The Controller
5 Using The Controller • Use your Heated Throw with Detachable Controller Model MC-111A3 Only. • Do not use any other controller. Heat Level LED Indicators 0 = Off 1 = Low Heat 2 = Medium Heat 3 = High Heat (For preheating only) 0 = Off Temperature Select Slide... -
Page 10: Auto Off
5.1 Auto Off This controller is fitted with a 3 hour Count Down Auto Off Timer which starts to countdown from when your heat setting has been selected, and will switch power off to the elements after approximately 3 hours. (+/- 15 Minutes) Note: Once a heat setting has been selected and the controller is powered ON, the countdown timer will not be affected by adjusting heat level. -
Page 11: Recommended Cleaning Instructions
IMPORTANT: DO NOT Cover The Controller At Any Time. The Heated Throw must not be used in Bed or while sleeping. TURN OFF AND UNPLUG WHEN NOT IN USE Store in dry place when finished. MISUSE AND FAILURE TO FOLLOW THESE INSTRUCTIONS MAY TRIGGER THE OVERHEAT PROTECTION SYSTEM AND RENDER THE HEATED THROW PERMANENTLY INOPERATIVE. -
Page 12: Hand Washing (Recommended)
• Lightly compress the treated area between two towels to absorb excess water. • Refer to the section “Drying” for drying instructions DO NOT WRING OR SPIN DRY THE HEATED THROW. DRIP DRY ONLY. • The connections to the Heated Throw must be kept free of moisture. 7.2 Hand Washing (Recommended) Detach and Remove the Controller before Cleaning the Throw. -
Page 13: Servicing Your Heated Throw And Controller
8 Servicing Your Heated Throw and Controller NOTE: There are no user serviceable parts in this Heated Throw or controller. • The Heated Throw should be examined frequently for signs of wear, either of the Heated Throw Fabric, controller or flexible cord. If wear is visible or if any abnormality or defect in operation in the Heated Throw is observed, discontinue use immediately and consult a qualified and registered person for service. -
Page 14: Troubleshooting Table
10.1 Troubleshooting Table Problem Cause Remedy Slide the knob to setting 1, 2 or 3. The corresponding The Temperature Slide Knob is in the “O” position front display Lights should illuminate. No Power to Controller / No Heat Level The Power Plug may not be plugged in to the power Ensure the power plug is inserted into the power Indicator Lights point and switched on. -
Page 15: Warranty
11 Warranty WHAT’S COVERED? 5.2 Our goods come with guarantees that cannot be excluded under Australian Consumer Law. You 1.1 H.E. Group Pty Ltd (“us” “we” or “our”) are entitled to a replacement or refund for a major warrants this good for a full replacement or failure and compensation for any other reasonably refund for a period of twelve months from the foreseeable loss or damage. - Page 16 Page 16 of 16 Rev 1...
Need help?
Do you have a question about the T624W100DA2b and is the answer not in the manual?
Questions and answers