
Related Manuals for GEMAR Lumitec BEAM 330 IP54


Summary of Contents for GEMAR Lumitec BEAM 330 IP54
-
Page 1: User Manual
BEAM 330 IP54 USER MANUAL CODE TP112266 Weight 20KG Color 8000K Temperature Power 470W Consumption... -
Page 2: Table Of Contents
CONTENT Statement : ..........................3 1.Brief Introduction ......................... 3 2.Dimension ..........................3 3.Components Info ........................4 4.Safety and Warning Info ...................... 5 5.DMX512 Connection ......................7 6.Package Info .......................... 8 7.AC Input Power ........................8 8. Lamp Info ..........................9 9.Color and Gobo Wheels Info .................... -
Page 3: Statement
6facet column which can controlled separately or synchronously .Aside of the linear dimmer and adjustable strobe functions ,the light is also equipped with the software fan speed cooling monitoring system.With these super features , BEAM 330 IP54 are widely welcomed by TV ,DISCO ,Ballroom ,Nightclub ,and other indoor and outdoor big events . 2.Dimension... -
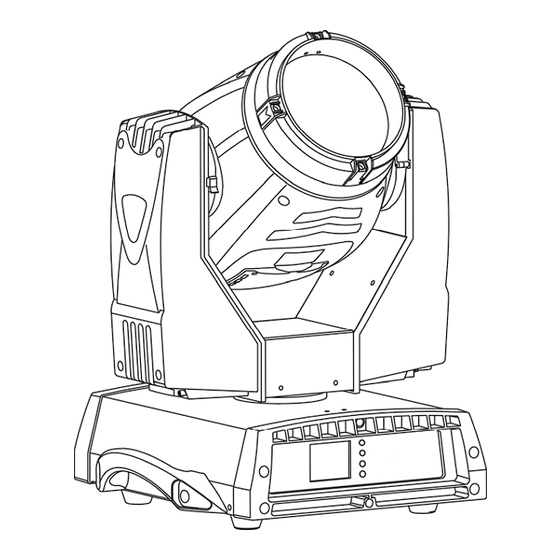
Page 4: Components Info
3. Components Info 01 — Lens 02 — Body 03 — Arm 04 — Base... -
Page 5: Safety And Warning Info
05 — Power Switch Attached components info above for your better understanding of the BEAM 330 IP54 4.Safety and Warning Info This device is only suitable for professional purpose .When you receive the light, Check if it is broken caused by delivery .If it’s broken ,contact the local dealer or factory as soon as possible . - Page 6 secure .Let the pulley below the working place when installing or removing the device . 4.4 Anti UV Staring at the casting beam is definitely forbidden . Do not use the device without lens or covers . Change the lens and covers if them broken . 4.5Prevention of electric shock Only qualified electricians can connect the electric power .
-
Page 7: Dmx512 Connection
Safety chain Omega bridge 5.DMX512 Connection DMX512 cable must use the professional shielded twisted pair cable.The standard loudspeaker cable is not reliable to control the long-range data. 24AWG cable is suitable for more than 300 meters long-distance signal transmission and must add the DMX 512 signal amplifier. -
Page 8: Package Info
Controller 6.Package Info BEAM 330 IP54 are packed in 1in1 or 2in1 flight case or carton with accessories inside . Accessories accompanied with one light Item Quantity Manual Safety chain Omega clamp DMX cable Power wire 7.AC Input Power BEAM 330 IP54 input voltage ,power consumption ,and fuse standard... -
Page 9: Lamp Info
Color and Gobo Wheels Info BEAM 330 IP54 is equipped with 14 colors plus open ,pure color ,excellent effect . BEAM 330 IP54 is equipped with 16fixed gobos plus open .Better effects with 16 facet prism . 10.Display Panel... -
Page 10: Lcd Menu
Function Touch Screen Display Touch screen display:Display the data information and control operation DMX Address SYSTEM INFO FEATURES SETTING MANUAL AUTOMATIC MODE CALIBRATIONS LAMP SETTING LANGUAGE SETTING 180°REVERSE DISPLAY AVAILABLE Function Key : 1: Return function 2: Up/Digit increase/Next function 3: Down/Digit decrease/Last function 4: Mode choosing/Confirm function 11.LCD Menu... - Page 11 << DMX Address to address 1 < address up 1-512 > address down >> to address 512 √ save and back × back Power On Times Power On Number Fixture times Lamp On Times Lamp On Number Holder Control Versions Pan/Tilt Control Display System ZOOM Status...
- Page 12 > address down >> to address 600 √ save and back × back Pan Reverse √ save and back × back Tilt Reverse √ save and back × back √ save and back Default Load Default Settings Set? × back 16 CH Mode 17 CH Mode Channel Mode...
- Page 13 back RESET Lamp Pan/Tilt Speed MANUAL Color Functions Prism 2 Prism 2 Rotations Page up Page down √ save and back × back Auto Mode 1 Built-in program Auto Mode 2 NULL Auto Mode 3 NULL Auto Mode 4 NULL √...
-
Page 14: Chanel Function Description
DISPLAY AVAILABLE 12.Chanel function description Channel function description Chanel Mode 1 Mode 2 Mode 3 Mode 4 Language English English English English Color Color Color Color Shutter Shutter Shutter Shutter Dimmer Dimmer Dimmer Dimmer Static Gobo Static Gobo Static Gobo Static Gobo Prism 1 Prism 1... -
Page 15: Channel Data
Pan/Tilt Speed Pan/Tilt Speed RESET Color Functions Lamp control Pan/Tilt Speed Color Functions 13.Channel Data Mode 1 Mode 2 Mode 3 Mode 4 DMX Value Details Description 0 - 4 Open 5 - 8 Open + Color 1 9 - 12 Color 1 13 - 17 Color 1 + Color 2... - Page 16 120 - 123 Color 14 124 - 127 Color 14+ Open Color rotation (clockwise) 128 - 187 fast ->slow 188 - 195 Rotation Halt Color rotation 196 - 255 (anticlockwise) slow ->fast 0 - 1 Close 2 - 7 Open 8 - 63 Strobe ,Slow ->Fast 64 - 71...
- Page 17 60 - 63 Gobo15 64 - 67 Gobo16 Clockwise rotation 68 - 112 Fast ->Slow 113 - 114 Halt 115 - 159 Anticlockwise Slow ->Fast 160 - 166 Gobo2 shake ,Slow ->Fast 167 - 172 Gobo3 shake ,Slow ->Fast 173 - 179 Gobo4 shake ,Slow ->Fast 180 - 185 Gobo5 shake ,Slow ->Fast...
-
Page 18: Drive Board Illustration
0 - 255 Linear dimmer 0-100% 0 - 255 Linear focus 0-100% 0 - 255 X 0°-> 540° 0 - 255 X Fine tune 2° >117° 0 - 255 Y 0°-> 270° 0 - 255 Y Fine tune 2° >117° 0 - 149 Empty 150 - 159... -
Page 20: Lamp Changing Method
Lamp Changing Method ① Theory Rotate lock pieces 90°before open the bulb Press the bulb to make it leave the fixed position then tilt it out.(When you take out the bulb you need to rotate it to the right Angle to avoid the metal collision,... -
Page 21: Body Covers Disassembling Method
② Changing method ①open the lid ②remove the fan ③remove the lamp Body Covers Disassembling Method ①open both side axle covers ②remove head cover ③remove body cover... -
Page 22: Base Part Info And Installation
Base part Info and Installation ①open basement plastic cover Power board ② loosen screws and draw boards unit out ③open boards unit cover 24Vpower supply Ignitor ① open basement plastic cover ②loosen screws and draw power supply unit out ... -
Page 23: Belt Changing Method
X Belt Changing Method Screw M4Hexagon X belt ①.②open the arm covers ③remove the center cover ④remove the y belt ⑤remove the side screws ⑥unplug the wire connector ⑦remove the light arm and body ⑧remove the hexagon screws ⑨remove the beam units ⑩change x belt... -
Page 24: Attention Items
Attention Items ①.Check the light seal situation and make sure it’s not damaged before operating it . ②.The device can be installed normally and upside-down, ③.The device is only up to IP 54 waterproof standard without fully sealing structure ,therefore do not immerse it into water .Any damage caused by the incorrect operation won’t be covered by warranty . - Page 25 Check the fan if running normal or get dusty. ⑦.The light can not be started Check if power supply is normal and make sure switch on the device. Import 13 Rue Alfred Kastler – ZI F-67850 HERRLISHEIM Tel : +33 3.88.96.80.90 / Fax : +33 3.88.96.48.46 Email : info@gemarlumitec.fr...
Need help?
Do you have a question about the BEAM 330 IP54 and is the answer not in the manual?
Questions and answers