
Summary of Contents for Megavoice Envoy Elite
- Page 1 FM Radio Recording LED Flashlight Speed Control Everything you need to know to get the most from your MegaVoice Envoy E Series audio player. Envoy E Series User Guide 20171215-40.docx Page 1 of 64...
- Page 2 Table of Contents Table of Contents................................2 Table of Figures................................4 Glossary of terms ................................5 Overview ..................................6 Audio Programming Requirements ..........................6 Hardware Requirements ............................6 Software Requirements ............................. 6 Getting to know the exterior of the E Series ......................... 7 Audio Playback................................
- Page 3 Setting the bookmark .............................. 55 Resetting the bookmark to the beginning ....................... 55 Charging and communication modes .......................... 56 Warnings and advisories .............................. 57 MegaVoice limited warranty ............................58 Technical ..................................60 Specifications ................................60 Contact for Support ..............................60 Keypad button cross reference ..........................
- Page 4 Table of Figures Figure 1: A Four level folder structure ..........................9 Figure 2: A Three level folder structure......................... 10 Figure 3: A Two level folder structure ........................... 11 Figure 4: A One level folder structure ........................... 12 Figure 5: Basic navigation and function buttons ......................13 Figure 6: Language and Section control buttons ......................
-
Page 5: Glossary Of Terms
Short press A quick press and release, a “click”. “Smart Loading System” Software from MegaVoice used to program players with audio. SLS cable A special USB data cable (available only from MegaVoice) used for programming MegaVoice players. The player memory can only be accessed using these cables. -
Page 6: Overview
Overview The Envoy E Series – the newest line from MegaVoice comprised of four models of advanced solar digital audio players: Elite, Equip, Echo and Ember. Cost effective and smaller than the average smartphone, the Envoy E Series is lightweight and perhaps one of the most powerful teaching and training tools available. -
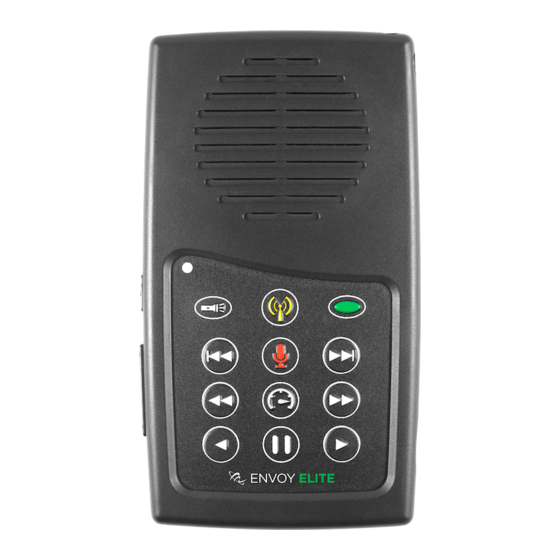
Page 7: Getting To Know The Exterior Of The E Series
Getting to know the exterior of the E Series Power button. When the player is off, press for 2 seconds to turn the player on (it will beep once). It will return to the mode it was last in. Press the button again for 2 seconds to turn the player off (it will beep twice). -
Page 8: Audio Playback
All audio files must be in MP3, WAV or WMA format. Any other file types will be considered “unsupported”. The MegaVoice firmware is “forgiving” of unsupported file types encountered during playback to the extent that it will automatically skip up to 20 consecutive unrecognized files and continue with the next “good”... -
Page 9: Figure 1: A Four Level Folder Structure
4 levels: Languages, Sections, Books, Chapters Within your audio project folder must be at least one, and up to two, Language folders. For microSD, there may be up to 8 Language folders. Within each Language folder must be at least one (and up to 20) Section folders. ... -
Page 10: Figure 2: A Three Level Folder Structure
3 levels: Sections, Books, Chapters Within your audio project folder must be at least one (and up to 20) Section folders. Within each Section folder must be at least one (and up to 999) Book folders. There must not be any audio files. ... -
Page 11: Figure 3: A Two Level Folder Structure
2 levels: Books, Chapters Within your audio project folder must be at least one (and up to 999) Book folders. There must not be any audio files. Within each Book folder must be at least one (and up to 999) audio files (chapters). ... -
Page 12: Figure 4: A One Level Folder Structure
1 level: Chapters only Within your audio project folder must be at least one (and up to 999) audio files (chapters). There must not be any other files or folders. The audio files may be named with free-form text only. ... -
Page 13: The Keypad
Languages. Let’s get to know the Envoy Elite keypad and how the navigation buttons correlate to the supported folder structures. Also noted are the different function buttons. The keypads of the Equip, Echo and Ember models are the same except for the absence of the buttons controlling the functions that are not included in that particular model. -
Page 14: Navigation Button Specifics
Navigation button specifics Initially, the player will start in audio playback mode. From any other mode, a long press on the Green Language button will put the player in audio playback mode. The following diagrams address navigation while in audio playback mode, associating folders and files within the valid structures to specific buttons. -
Page 15: Figure 8: Chapter Control Buttons
Each Book may contain one or more “Chapters”. The buttons control reverse/forward navigation through the Chapters. Figure 8: Chapter control buttons A short press on one of these buttons will scroll to the previous/next Chapter in the current Book. When the first/last Chapter in the current Book is reached, a short press will navigate to the last/first Chapter in the previous/next Book. -
Page 16: Example: Applying Structure Rules To Your Audio
Audio files (which are usually “Chapters”) are grouped into “Books”, Books are grouped into “Sections” and Sections can be grouped into “Languages”. A typical Bible in a specific language from the MegaVoice Audio Library is divided into 3 Sections in the following way: ... -
Page 17: The Audio Project Folder
The Audio Project Folder Let’s use the following example. We have sets of Audio Bibles in different Languages, but the structure is such that all the audio files for each Bible are together in a single folder. The individual audio files are named such that they are easily recognizable and they also sort in the order in which they should be played but that is the extent of the organization. - Page 18 Java is not installed, will redirect you to the web site to download and install Java. So let’s create a “working” folder within our Audio Bibles folder and call it MegaVoice. From this point on, we will refer to that folder as the Audio Project Folder.
- Page 19 Since we want to load two full language New Testament Bibles to our player, we want to end up with the following 4-level structure: Audio Project Folder Language Folder 1 (named “001-Language-English”) Section Folder 1 (named “001-Section-Matthew-Mark”) ...
-
Page 20: The Language Folders
The Language Folders Let’s create the two Language folders in the MegaVoice folder. The first must have a prefix of “001” with optional descriptive text. In previous player versions, the folder names could only be 3-digit numbers, creating lots of duplicate names throughout the audio message and making identification difficult. -
Page 21: The Section Folders
The Section Folders In this simplified example, we have only 6 Books of the New Testament: Matthew, Mark, 1 Corinthians, 2 Corinthians, Jude and Revelation. We could either group the books into Sections within a Language folder (4 levels), or place all of the Books together within Section folders levels). - Page 22 Alternatively, we could wait until the first Language folder is complete and manually create them when working on the second Language folder. When done with this step, we should have the following folder structure in the MegaVoice audio folder: Once our Section folders are created, let’s move corresponding audio files to their respective Section folder. In the first Language folder, “001-Language-English”, move all the Chapter (MP3) files for Matthew and Mark to...
-
Page 23: The Book Folders And Chapter Files
The Book Folders and Chapter Files Now we will create “Book” folders in each of the three Section folders. We’ll begin with the first Language folder “001-Language-English”. This entire process will be repeated for the “002-Language-Spanish” folder later. Open the first Section folder, “001-Section-Matthew-Mark”. Since Matthew is the first Book, create a folder named “001-Matthew”. - Page 24 Now we will move the Chapter files to their respective “Book” folders. Highlight the Chapter files for Matthew (3 of them in our example) and move them to the “001-Matthew” folder. Highlight the Chapter files for Mark (3 of them) and move them to the “002-Mark” folder. Envoy E Series User Guide 20171215-40.docx Page 24 of 64...
- Page 25 Let’s repeat the above process for the next Section, “002-Section-1-and-2-Cor”. Because 1 Corinthians is the first Book in this Section, create folder “001-1-Corinthians”. And create “002-2-Corinthians” for the second Book. Envoy E Series User Guide 20171215-40.docx Page 25 of 64...
- Page 26 Again we will move the Chapter files to their respective “Book” folders. Highlight the Chapter files for 1 Corinthians (3 of them in our example) and move them to the “001-1-Corinthians” folder. Highlight the Chapter files for 2 Corinthians (3 of them) and move them to the “002-2-Corinthians” folder. Envoy E Series User Guide 20171215-40.docx Page 26 of 64...
- Page 27 And finally, repeat the process for the third Section, “003-Section-Jude-Rev”. Open the folder and create a Book folder for Jude, “001-Jude” and create a folder for Revelation, “002-Revelation”. Let’s move the Chapter files to their respective “Book” folders for Section 3. Highlight the (only) Chapter file for Jude and move it to the “001-Jude”...
-
Page 28: The Second Language Folder
The Second Language Folder Once you have completed all the Section and Book folders in the “001-Language-English” folder, repeat the process for the “002-Language-Spanish” folder following the steps outlined earlier. Envoy E Series User Guide 20171215-40.docx Page 28 of 64... -
Page 29: Verifying The Final Folder Structure
Let’s verify what we have so far in our example. Using names that were a combination of a 3-digit sequence number and a meaningful name should make this easy. Start with the MegaVoice audio project folder and click on each folder to verify the contents. -
Page 30: Loading Audio Files To The Envoy E Series
You may program multiple players at a time, using either multiple USB ports on your PC/Mac or by using a USB expansion HUB. MegaVoice recommends using USB 2.0 (or higher) powered HUBs, each directly connected to the computer (not daisy-chained), and with up to 7 players connected per HUB. -
Page 31: Loading The Audio Using Sabercopy
In this example, we will program 2 MegaVoice Envoy S players with a small message from our audio library. 1. Connect the players to the computer using the proper SLS cable. SaberCopy usually detects players automatically when they are connected and disconnected. - Page 32 5. The screen image below shows the Project dialog. It consists of 6 tabs, each containing various settings for the project. The first tab, “Files in Project”, is mandatory and is always the first to be displayed. 6. In this example, we want to use the message folder “B1100_cm_samburu” in our “Test Messages” folder. 7.
- Page 33 10. Next, click on the “Output Options” tab (circled in red). You will get a screen similar to that below. 11. The first time this screen is displayed after starting the application, these are settings initially shown as suggested default values. On most of the project tabs, SaberCopy will suggest values from the last project opened as defaults.
-
Page 34: Figure 11: Sabercopy Copy And Check Options
You can, however, change it to one of the available choices, but we strongly recommend first consulting MegaVoice technical support for optimum settings. 17. Under “Test and Copy Options”, we want to execute the “read/write test before copying”. - Page 35 20. At this point, the main screen should look like the example below. 21. Now we need to set the “source” of the copy for each player. When all the players connected are being loaded from the same source, the easiest thing to do is to click on the “Attach All” button in the project (circled in blue).
- Page 36 26. When you use “Copy All”, you will get a single pop-up confirmation dialog listing all of the assigned players warning that the current content will be deleted. If this is OK, click “Yes” to continue; otherwise, you can click “No” (don’t delete anything but continue the copy), or “Cancel”. When using the individual “Copy”...
-
Page 37: Listen To The Message
Listen to the message After disconnecting each player, you can listen to the message by holding down the power button on the left side of the player for about 2 seconds until the LED lights up (in yellow). The player will beep once, the LED will change to green and your message should begin to play automatically. -
Page 38: Fm Radio (Elite And Equip Models Only)
FM Radio (Elite and Equip models only) Using the FM radio The Elite and Equip models of the E Series provide an FM radio receiver. Details on how to turn the radio on, navigate station frequency and use the preset station buttons are all described in the diagram below. To turn the radio off, either change to audio playback mode (a long press on the Language button ) or turn the player completely off. -
Page 39: Programming The Presets Using The Configuration File
Programming the presets using the configuration file MegaVoice provides a way to configure the radio preset buttons. This is done via a simple text configuration file named “FMSET.txt”. The file can be stored in the onboard memory in one of two places: within a hidden volume* on the player or as a single file in the “root”... -
Page 40: Configuration File Examples
Configuration file examples 1. S:0 915,933,955,985,1047 The buttons are programmable and may be changed by the user Button is pre-programmed to 91.5 MHz Button is pre-programmed to 93.3 MHz Button is pre-programmed to 95.5 MHz Button is pre-programmed to 98.5 MHz ... -
Page 41: Recording (Elite And Echo Models Only)
Recording (Elite and Echo models only) Overview The Elite and Echo models of the E Series provide the ability to make your own recordings. Details on how to initiate recording mode and use the various features while in that mode are described in Figure 14: Recording control buttons. -
Page 42: Recording Controls And Features
Recording controls and features Figure 14: Recording control buttons To switch to Recording mode, press and hold the red A short press begins playback of microphone button until the player beeps. While in this mode, recorded files, starting with the the LED will be red. -
Page 43: Managing The Recording Files
Managing the recording files You can access the recording files on the E Series players by connecting your player to a computer using an SLS USB to micro-USB cable and opening the RECORD folder. If you recorded to a microSD card, you can also access the contents of the card while loaded in the card reader of the player. -
Page 44: Tips For Recording On The E Series
2. Noise may be picked up when the unit is placed near an AC power source, a fluorescent lamp or a mobile phone during recording or playback. 3. Choose someone that has a good voice for narration. MegaVoice has found that the female voice produces higher quality audio recordings than the male voice. -
Page 45: Distributing Your Recordings On Microsd
Distributing your recordings on microSD Unless you have a very large number of files you wish to distribute, the 1-level structure will probably be sufficient for you to organize your files on the card. That is, only the individual WAV files are present on the card. Remember you have 4 choices for organizing your files. -
Page 46: Speed Control For Audio Playback
Speed control for audio playback All models of the E Series come with the ability to adjust the speed of audio playback. Speed control allows you to slow down or speed up the playback of audio from the onboard memory or microSD cards. Speed Control may also be used for listening to recordings you made but it does not affect the actual recording speed. -
Page 47: The Led Flashlight
The LED flashlight All models of the E Series come with a bright, 4-mode LED flashlight. The flashlight operates independently of the other player functions so it may be used at any time, even when the player is turned off. Figure 17: LED flashlight control A short press on this button will turn the flashlight on in low beam. -
Page 48: The Microsd Card Connector
2 languages (onboard memory) to 10 languages total. MegaVoice has successfully tested cards up to 64GB in size. With the player facing you, insert a card into the reader with the brass contacts showing until it locks in place. -
Page 49: Preparing The Sd Card
You can only access the onboard memory of the Envoy E when connecting it to the computer using a MegaVoice micro-USB SLS cable. If you use a standard micro-USB data cable, you can still access the card reader but the onboard memory will not show. -
Page 50: Using Sabercopy
Using SaberCopy When connecting with an SLS USB cable, the challenge when using the Envoy E to load a microSD card is that both the onboard memory and microSD card reader show as “volumes”. The best way to distinguish the player from the microSD card reader is to connect the player first without a microSD card loaded. -
Page 51: Using The File Explorer
Using the File Explorer If you connect a player using the SLS USB cable with an SD card loaded, both the on-board memory and SD card appear and show as “Volumes”. In the Windows example below, the player is identified as “NO NAME” and the SD card (with no volume name) is identified as “Removable Disk”. -
Page 52: Listen To The Message On The Sd Card
In the Windows example below, there are 4 Section folders, each containing multiple Book folders with each of those containing individual MP3 Chapter files. The folders need to be copied in order beginning with 001, then 002 and so on. If the folders (and their content) are not copied in that order, the E Series may not play back the audio in proper order. -
Page 53: The Lithium Ion Battery
Plug the player into any standard computer USB port using a “USB to micro-USB” cable for about 3 hours or until the LED stops blinking. Any MegaVoice SLS, regular or charge-only cable is sufficient. For solar charging, place the player with the solar panel facing bright sunlight for at least 8 hours. -
Page 54: Resetting Player Default Values
Resetting player default values Your E Series player stores and remembers as default values a number of settings (listed in the chart below). They are used as defaults the next time the player is turned on. You may reset those to their initial values using the steps below: 1. -
Page 55: Audio Playback Bookmark
Audio playback bookmark Setting the bookmark During audio playback, a 2-second press on the pause button will place a bookmark at the current position. The player will beep 3 times to confirm and place the player in pause mode (see Figure 9: Buttons for navigating the Current Chapter, the Pause button). -
Page 56: Charging And Communication Modes
Charging and communication modes When connecting the E Series player to a computer, it can be done in one of two modes: charging or communication. * Changing to computer communication mode is essential to allow programming of the player. Connecting a player to a computer for programming purposes: Connect the player to a computer using a micro-USB SLS cable (for Onboard / microSD programming) or Standard micro-USB Data cable (for microSD programming only). -
Page 57: Warnings And Advisories
Warnings and advisories Make sure to set the volume at the lowest level that can be heard comfortably. Prolonged exposure to loud sound can cause gradual hearing loss. DO NOT expose the player or battery to fire or extreme heat. Stop use if you observe abnormal heat, odor, discoloration, leakage or deformation, especially near battery. -
Page 58: Megavoice Limited Warranty
YOU must provide proof of purchase of said PRODUCT by making available a dated itemized receipt, or invoice, (“PROOF OF PURCHASE”) to be eligible for this WARRANTY. 3. It is YOUR responsibility to return the defective MEGAVOICE PRODUCT to the organization that provided it to YOU (“PROVIDER”) together with a clear description of any alleged defect(s). - Page 59 (7) days after the expiration of the WARRANTY PERIOD. 8. MEGAVOICE’s limit of liability under the WARRANTY is the actual cash value of the PRODUCT at the time YOU return the PRODUCT for repair (e.g., the purchase price of the PRODUCT less a reasonable amount for usage).
-
Page 60: Technical
2.3 ounces (64 grams) Dimensions 4" x 2.25" x 0.5" (10.4 x 5.8 x 1.3 cm) Contact for Support The MegaVoice web site: https://megavoice.com/audio-tools/request-support-for-loading-audio-content-on-audio-bibles/ Recommended (free) utilities by MegaVoice: http://megavoice.com/audio-tools/tools-and-utilities-for-loading-audio-content-on-audio-bibles/ Envoy E Series User Guide 20171215-40.docx Page 60 of 64... -
Page 61: Keypad Button Cross Reference
Keypad button cross reference The following chart shows all keypad (and side) buttons and what occurs when pressed during different modes of player operation. To save space, the following abbreviations are used for repeated terms: SP: Short press, LP: Long press, CP: Continuous press Button Audio Playback Mode FM Radio Mode... - Page 62 Button Audio Playback Mode FM Radio Mode Recording Mode Speed Control Mode LP: Switch to Speed While in playback… LP: reset the playback Control mode LP: Switch to Speed speed to normal and exit Control mode Speed Control SP: scroll to the next SP: switch to the pre- While in playback…...
-
Page 63: Troubleshooting
Troubleshooting Symptom Cause/Solution Player will not turn on Low Battery Make sure the battery is charged per the instructions Player needs to be reset Resetting the player Player turns on but there is no Volume is set to minimum ... -
Page 64: Troubleshooting Continued
Troubleshooting continued… Symptom Cause/Solution Player switches to microSD card microSD card is faulty (even if it could be loaded via computer) but does not play content and/or Format the card, reload and try again. turns off microSD card not properly seated ...
Need help?
Do you have a question about the Envoy Elite and is the answer not in the manual?
Questions and answers