Advertisement
Quick Links
Advertisement

Related Manuals for Flykly Smart Ped

Summary of Contents for Flykly Smart Ped
- Page 1 SMART PED...
- Page 2 Learn how to operate all standard parts and accessories equipment on the Smart Ped. Ensure that anyone who uses the Smart Ped has been fully instructed in the operation of its mechanical and electrical functions. Check our web site www.flykly.com for additional information or contact your...
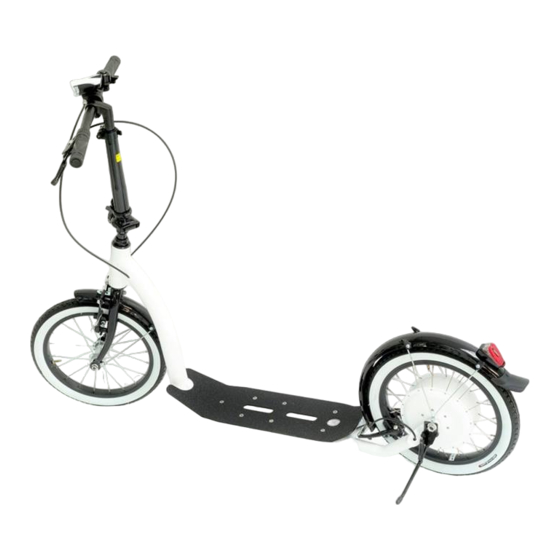
- Page 3 IN THE BOX. YOUR SMART PED. Smart PED 1. Frame 7. Alu board 13. Front brake caliper 2. Rear brake caliper 8. Handlebar 14. Fork 3. Rear wheel 9. Front light 15. Front Mudguard Charger 4. Kickstand 10. Bell 16. Front wheel 5.
-
Page 4: Safety Notes
Save all safety warnings and instructions for future reference. DO NOT open the All in one powertrain (17) of your Smart Ped your- self. The All in one powertrain (17) is maintenance-free and must berepaired only by qualified experts and only with original spare parts. - Page 5 1. SAFETY CHECK BEFORE RIDING YOUR SMART PED 1.1 Fitting your Smart Peds for a safe ride The Smart Ped and its equipment must fit properly the size and skills of the rider to ensure safely and comfortably riding. A vehicle that is too big or too small for the rider is hard to control and could be uncomfortable.
- Page 6 1.3 Position adjustment The brake and shifting levers are positioned on your Smart Ped by the 2.3 Handlebar dealer in order to fit most rider’s requirements. If you buy online, the...
- Page 7 Keep more distance to other vehicles to 3.1 Your Smart Ped brake safety. Check your Smart Ped before using it. Know how to operate all of its parts. 4. SOMETHING IMPORTANT ABOUT YOUR SMART PED 3.2 Your clothing Wear a correctly fitted and fastened approved helmet.
- Page 8 CAUTION: contact your dealer to fit your brakes in case of any doubt. 5. FOLDING YOUR SMART PED If you have a Folding Smart Ped NEVER ride without the Block Pin (19): Lean the smart ped towards you while holding the handlebar. Then lift gently the front wheel and fold the board in half.
- Page 9 5.2 Trolley mode This part applies to the folding model Now you can use your smart ped in trolley mode by pushing it. Please be 1. INITIAL OPERATION careful NOT to pull the Smart Ped. It will not be drivable by pulling it.
- Page 10 The charging time is approximately 3 hours for a complete charge. While the Smart Ped is charging the charger LED must turn RED. When the Smart 2.2 Motor assistance Ped is completely charged, the charger LED turns GREEN (3).
- Page 11 3. APP. APP AND AWAY In order to access all the function of your Smart Ped, you would have to CAUTION: ALWAYS seal the connector on your Smart Ped with the proper connect a smartphone through the bitride app. protection cap before riding. Using the Smart Ped without the protection cap will void the warranty.
- Page 12 5s, iPhone 5c, iPhone 6, iPhone 6+ are also supported. connecting to a factory resetted Smart Ped, you will need to give a name to it! Once your Smart Ped is turned on (see 1.1), you can connect bitride to the 3.4 How much is the bitride app?
- Page 13 Maps to go with the default motor settings (see 4.6) DEVICES In order to use your Smart Ped together with bitride, you need to register it Bikep-3D25 Profile using your bitride app. By registering to bitride you will be able to:...
- Page 14 NOTE: the embedded electronic lock will not prevent thieves from stealing your bike. Please use an additional mechanic lock during prolonged stops. Even if it is possible to use the Smart Ped with out the bitride app, you can access more features if you connect it to a smartphone.
- Page 16 Warning icons let you understand when there is something wrong with your kick. your Smart Ped functioning (see 4.1). If you experience a problem that pre- On the FUN power mode you have an additional parameter: vent you from using your Smart Ped correctly, please contact our custom- Assistance duration: this parameter let you choose how much dis- er care on our website or at info@flykly.it! Icons can appear both yellow...
- Page 17 bitride warning icons: Temperature WARNING This icon appears when the temperature inside the hub reaches a critical level. The system will automatically set the amount of power not to be damaged. Connectivity WARNING This icon appears when there is a connectivity problem with the wheel. Even if the bluetooth is connecting to the bike, it could be possible to get this warning.
- Page 18 Ped, especially the electrical parts, help to maintain your Smart Ped in good condition. Wipe the Smart Ped with wet cloth. Never flush the Smart Ped, the electrical parts could be damaged. Always dry and lubricate your Smart Ped after washing to prevent rust.
-
Page 19: Electrical Components
CAUTION: Every maintenance procedure (even cleaning the Smart Ped) Clean rims and check if they are dented or dimpled. must be done without activating your Smart Ped (see 2.1) On the contrary, Check rims alignment and spokes tension. severe injury may occur. - Page 20 In case of questions concerning transport of the Smart Ped, please refer to The charging procedure will start as soon as the charger is connected both to your Smart Ped and to the mains. While charging, the LED located on the charger is red.
- Page 21 3.2 Battery pack storage conditions are no longer usable, and according to European Guideline 2006/66/EC, Your Smart Ped has to be stored at the right temperature. The battery pack defective or used battery packs/batteries the Smart Ped must be collected life can be maximized by following the rules for a correct storage and han- separately and disposed of in an environmentally correct manner.
Need help?
Do you have a question about the Smart Ped and is the answer not in the manual?
Questions and answers