Advertisement
Table of Contents
- 1 Introduction
- 2 Intended Use
- 3 Examples of Use
- 4 Overview of the FMW Moisture Meter Set
- 5 Optionally Available Components
- 6 Installing the Battery
- 7 Setting up the FMW
- 8 Measuring with the FMW
- 9 Functions
- 10 Calibration Check
- 11 Battery Check
- 12 Specifications
- 13 Index
- 14 Declaration of Conformity
- Download this manual
Advertisement
Table of Contents

Summary of Contents for Brookhuis FMW-B
- Page 1 FMW Moisture Meter Operating instructions Version 4.13 MOISTURE METERS FEUCHTEMESSGERÄTE HUMIDIMÈTRES MEDIDORES DE HUMEDAD MEDIDORES DE HUMIDADE ALAT MENGUKUR KADAR AIR PENGUKUR KADAR AIR FUKTKVOTSMÄTARE KOSTEUSMITTARIT VOCHTMETERS...
- Page 3 Foreword Congratulations on your purchase of the FMW microprocessor-controlled moisture meter. This meter is a Dutch quality product that will allow you to measure the moisture content of various materials without damaging them. These operating instructions contain a number of important directions on how to use and handle the FMW moisture meter.
- Page 4 © 2015 Brookhuis Applied Technologies B.V. All rights reserved. Printed in the Netherlands. ©2015 Brookhuis Applied Technologies BV, PO Box 11, 7500 AA, Enschede, the Netherlands. Telephone +31(0)53 480 3636, Fax +31(0)53 430 3646, info@brookhuis.com, www.brookhuis.com, FMW 4.13. Our products may be subject to alteration.
- Page 6 Index .............................. 15 Declaration of conformity ......................16 ©2015 Brookhuis Applied Technologies BV, PO Box 11, 7500 AA, Enschede, the Netherlands. Telephone +31 (0)53 480 3636, Fax +31 (0)53 430 3646, info@brookhuis.com, www.brookhuis.com, FMW 4.13. Our products may be subject to alteration.
-
Page 7: Introduction
1 Introduction These operating instructions explain how to operate and use the FMW moisture meter. The FMW allows you to measure the moisture content of wood easily and rapidly and without damaging the wood. The FMW can also be used to indicate moisture levels in various construction materials. -
Page 8: Intended Use
The thickness of the material to be measured must be at least 10 mm for both the FMW-T and the FMW-B. ©2015 Brookhuis Applied Technologies BV, PO Box 11, 7500 AA, Enschede, the Netherlands. Telephone +31(0)53 480 3636, Fax +31(0)53 430 3646, info@brookhuis.com, www.brookhuis.com, FMW 4.13. Our products may be subject to alteration. -
Page 9: Examples Of Use
3 Examples of use The FMW can be used in various applications. The table below shows some of these applications. FMW-B FMW-T Measuring moisture in wood Measuring moisture in construction materials... -
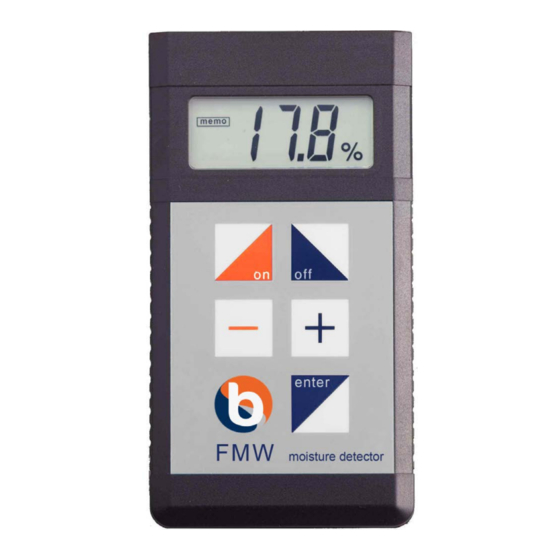
Page 10: Overview Of The Fmw Moisture Meter Set
The components of the FMW are shown in Figure 4-1 below. ©2015 Brookhuis Applied Technologies BV, PO Box 11, 7500 AA, Enschede, the Netherlands. Telephone +31(0)53 480 3636, Fax +31(0)53 430 3646, info@brookhuis.com, www.brookhuis.com, FMW 4.13. Our products may be subject to alteration. -
Page 11: Optionally Available Components
Optionally available components Reference block With the help of the reference block, you can easily find out whether the FMW carries out measurements in accordance with the factory setting. (See Chapter 6.2). Thermo-hygrometer The thermo-hygrometer measures relative air humidity and temperature in order to establish the equilibrium moisture content or the dew point, for example. -
Page 12: Installing The Battery
When removing the battery, hold the attachment clip – not the wires. Use Alkaline batteries only. ©2015 Brookhuis Applied Technologies BV, PO Box 11, 7500 AA, Enschede, the Netherlands. Telephone +31(0)53 480 3636, Fax +31(0)53 430 3646, info@brookhuis.com, www.brookhuis.com, FMW 4.13. Our products may be subject to alteration. -
Page 13: Setting Up The Fmw
Material thickness can be adjusted in steps of 1 mm. Adjust the FMW-T if the thickness of the material is below 20 mm. Adjust the FMW-B if the thickness of the material is below 30 mm. The maximum thickness adjustment applies in all other cases. - Page 14 The meter is now ready to start measuring. ©2015 Brookhuis Applied Technologies BV, PO Box 11, 7500 AA, Enschede, the Netherlands. Telephone +31(0)53 480 3636, Fax +31(0)53 430 3646, info@brookhuis.com, www.brookhuis.com, FMW 4.13. Our products may be subject to alteration.
-
Page 15: Measuring With The Fmw
Measuring with the FMW Make the FMW ready for use as described in Chapter 5.2. Position the sensor surface of the meter on the material. The display will now show (example) In the case of the PH1 setting, press the <MENU> key to proceed to the next measurement. -
Page 16: Functions
Press the <MENU> key to do the next measurement. ©2015 Brookhuis Applied Technologies BV, PO Box 11, 7500 AA, Enschede, the Netherlands. Telephone +31(0)53 480 3636, Fax +31(0)53 430 3646, info@brookhuis.com, www.brookhuis.com, FMW 4.13. Our products may be subject to alteration. -
Page 17: Calibration Check
Place the sensor surface of the meter on the benchmark block. Place the top of the FMW-T and back of the FMW-B in the centre of the benchmark block. Do not place the benchmark block on a metal surface. -
Page 18: Battery Check
Press the <MENU> key to go to the measuring screen. ©2015 Brookhuis Applied Technologies BV, PO Box 11, 7500 AA, Enschede, the Netherlands. Telephone +31(0)53 480 3636, Fax +31(0)53 430 3646, info@brookhuis.com, www.brookhuis.com, FMW 4.13. Our products may be subject to alteration. - Page 19 The display will now flash (for example) The settings can not be changed when the pin code setting is switched on. The display will now show...
-
Page 20: Specifications
Dimensions 160 x 85 x 30 mm Weight 260 grams (including battery) ©2015 Brookhuis Applied Technologies BV, PO Box 11, 7500 AA, Enschede, the Netherlands. Telephone +31(0)53 480 3636, Fax +31(0)53 430 3646, info@brookhuis.com, www.brookhuis.com, FMW 4.13. Our products may be subject to alteration. -
Page 21: Index
Index 9 Volt block battery ......... 6 FMW components ........... 4 Battery check ...........12 Accessing the serial number ......12 Intended use of the FMW ......2 Accessing the version number ....12 Construction materials ........1 Optionally available components ....5 Setting the thickness ........ -
Page 22: Declaration Of Conformity
Enschede, March 11th, 2015 Brookhuis Applied Technologies BV M.C.M. Elbers ©2015 Brookhuis Applied Technologies BV, PO Box 11, 7500 AA, Enschede, the Netherlands. Telephone +31(0)53 480 3636, Fax +31(0)53 430 3646, info@brookhuis.com, www.brookhuis.com, FMW 4.13. Our products may be subject to alteration.
Need help?
Do you have a question about the FMW-B and is the answer not in the manual?
Questions and answers