Table of Contents
Advertisement
Quick Links
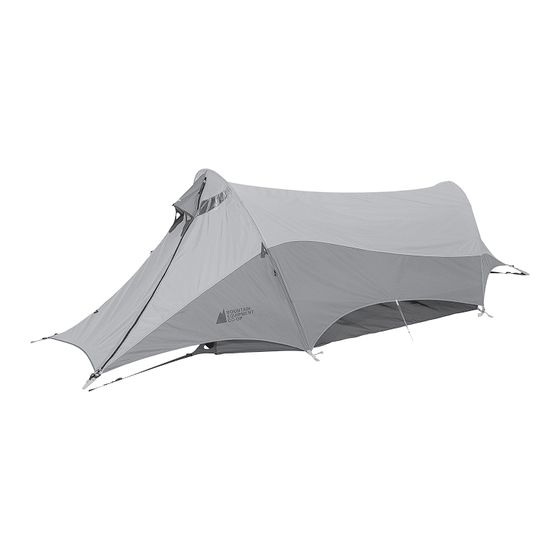
HUMMINGBIRD 2
This booklet tells you how to prepare, assemble, and maintain your
new tent; please keep it for future reference. Set up your tent at
home before your fi rst trip; this will allow you to inspect it for any
manufacturing defects, check that all parts are present, and learn the
assembly procedure with minimal stress on the tent and on you.
Your Hummingbird 2
tent package includes:
Tent body
Tent fl y
2 aluminum poles
Tent pegs and two nylon guylines
Aluminum pole repair sleeve
Tent sack and pole sack
0.64m
2.25m
HUMMINGBIRD 2
Height inside .940m
1
Advertisement
Table of Contents

Related Manuals for Mec HUMMINGBIRD 2


Summary of Contents for Mec HUMMINGBIRD 2
- Page 1 fi rst trip; this will allow you to inspect it for any manufacturing defects, check that all parts are present, and learn the assembly procedure with minimal stress on the tent and on you. Your Hummingbird 2 tent package includes: Tent body Tent fl...
- Page 2 fl oor to prevent water pooling between the fl oor and the ground sheet. Another light and convenient option is MEC’s custom-made, coated nylon Footprint. In winter conditions, we recommend digging out a platform with surrounding walls.
- Page 3 SET-UP A note about shock-corded poles Shockcord (bungee cord) is meant to keep pole sections in the proper order—not as an automatic assembly mechanism for poles. Do not hold one section while whipping the rest of the pole back and forth, or toss the poles into the air;...
- Page 4 Rigging for bad weather The Hummingbird 2 has a number of guyline attachment points so you can rig it increasingly securely in response to actual or anticipated winds. Two guylines are supplied with the tent. Carry additional guylines if you anticipate using the tent in bad weather.
- Page 5 Customizing the door arrangement There is a peg loop on either side of the vestibule door zipper where it reaches the ground; by staking out one loop or the other, you can make the door centre-opening or side-opening to adapt it to the prevailing wind or local landscape features.
- Page 6 Disassembling the Tent The most important consideration in taking down a tent is not to stress the poles and fabrics. First, disconnect guylines and release the tension from the tent. Next, release all the poles. If your tent has pole sleeves, push the poles out of the sleeves instead of pulling them out.
- Page 7 Food in Tents Mop up spills promptly with water. Many foods, particularly acidic ones like fruit or juices, can weaken synthetic fabrics over time. In any case it is best to eat and store food away from a tent to avoid attracting animals. Cleaning Clean the tent by hand while it is set up, using a sponge, a mild non- detergent soap, and warm water.
- Page 8 Be careful not to damage the tent fabrics when removing the damaged pole. Replacing a Broken Pole Section The MEC Grip-Tip pole tips are press-fi tted into place. Carefully tug out the pole end tip nearest to the broken section. Being mindful of how to retie it later, untie the end tip.
Need help?
Do you have a question about the HUMMINGBIRD 2 and is the answer not in the manual?
Questions and answers