Table of Contents
Advertisement
Quick Links
Advertisement
Table of Contents

Related Manuals for PLDT Home TELPAD EC7

Summary of Contents for PLDT Home TELPAD EC7
- Page 2 Table of Contents 1 GETTING STARTED ..............................................1 1.1 About Your TELPAD ...............................................2 2 TELPAD INTRODUCTION ............................................3 2.1 Getting to Know Your TELPAD ........................................4 ............................................7 2.3 Installation ................................................1 0 ..........................
- Page 3 Table of Contents ............................................2 0 3.6.1 Locking the Screen 3.6.2 Unlocking the Screen ............................................2 0 ..........................................21 3.6.3 Setting up a Screen Lock ........................................21 3.6.4 Setting a Screen Timeout Period 3.7 Inputting Text ................................................. 2 2 ..........................
- Page 4 Table of Contents ........................................3 6 3.16.1 Opening Bluetooth Settings ........................................3 6 3.16.2 Turning Bluetooth ON or OFF ..................................36 3.16.3 Changing the Bluetooth Name of Your Tablet 3.16.4 Connecting to Bluetooth Devices ......................................37 ..........................
- Page 5 Table of Contents 4.1.6 Memo ..................................................7 2 ........................................73 4.1.7 Importing/Exporting Contacts ............................................7 3 4.1.8 Changing Ringtones 4.2 Contacts ..................................................74 .............................................74 4.2.1 Opening Contacts .............................................74 4.2.2 Creating a Contact ..........................
-
Page 6: Getting Started
1 GETTING STARTED... -
Page 7: About Your Telpad
1.1 About Your TELPAD to basic communication services, but also brings to your home a world of productivity and entertainment. The TELPAD is powered by Android, the world’s leader in smartphone technology. With its stunning 7 inch touch- screen display, built-in camera, Wi-Fi, and access to hundreds of thousands of free and paid Android Apps, the... -
Page 8: Telpad Introduction
2 TELPAD INTRODUCTION... -
Page 9: Getting To Know Your Telpad
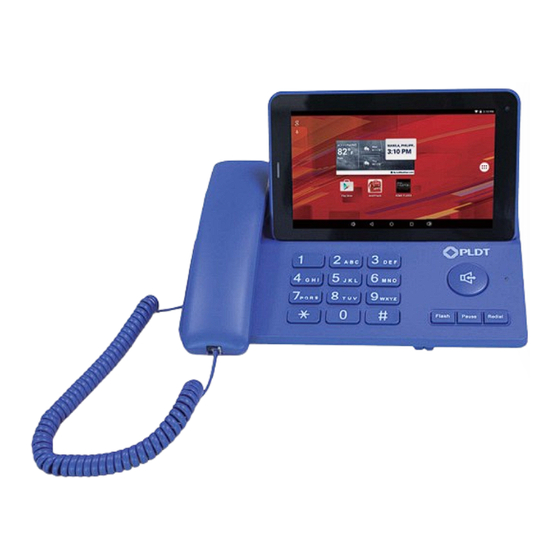
2.1 Getting to Know Your TELPAD 1. Microphone (Tablet) 2. Micro USB Port 3. Mini HDMI Port 4. Headset Jack 5. Power Adapter Jack 6. Volume Button 7. Power Button 8. Front Camera 9. LCD Display 10. Tablet Receiver(for phone calls) 11. - Page 10 18. Handset 19. Speaker(Phone Set) 20. Handfree key 21. Redial Key 22. Pause Key 23. Flash Key 24. Numeric Keypad 25. Ringtones Volume 26. Direct Current Input Jack 27. Landline Jack 28. Extension Cord Jack 29. Phone Cord Jack...
- Page 11 Accessories USB Charger HDMI Converter USB Power Cable DC2.5 USB Data Cable Coiled Phone Cord Phone Line USB Power Cable DC4.0 Battery...
- Page 12 GENERAL SPECIFICATIONS AND DISPLAY DIMENSION 192 mm x 120 mm x 11 mm DISPLAY AND RESOLUTION 7 Inch (1024 x 600) 250 nits SYSTEM SOFTWARE Android 5.1.1 AIR INTERFACE Wi-Fi - 802.11b/g/n MULTI-TOUCH PANEL Capacitive 5-Points-Touch PRIMARY KEYPAD 3 Standard Soft Keys: Home, Back, Recent Applications DISPLAY COLOR DEPTH 24-bit CONNECTIVITY...
- Page 13 HANDSET PSTN Support (POTS) RJ9 (4P4C) SPEAKER Built-in MICROPHONE Built-in SMART DIALER Call Hold Speed Dial PSTN Speaker Volume Adjustment COMMUNICATION AND ORGANIZER Protocols: SMTP, POP3 and IMAP4 EMAIL Supports Exchange Calendar, Contacts synchronous...
- Page 14 MEDIA PERFORMANCE VIDEO DECODING AVI, 3GP, FLV, MP4, MOV AUDIO DECODING MP3, WMA, AAC, AMR, FLAC, OGG, WAV, MID PICTURE FORMATS BMP, PNG, JPEG, GIF STREAMING MEDIA RTSP/HTTP, Support Download play, Progressive play BATTERY AND POWER TABLET BATTERY STD Lithium-Ion Polymer battery, 3500 mAh rechargeable DOCK BATTERY STD Lithium-Ion Polymer battery, 1000 mAh rechargeable POWER ADAPTER...
-
Page 15: Basic Installation
2.3 Installation 2.3.1 Basic Installation dock. line 1 Extension cord jack USB charger DC power adapter telephone jack... -
Page 16: Installing The Dock Battery
2.3.2 Installing the Dock Battery 1. Removing the back cover 2. Installing the battery To install the battery,refer to the following To remove the back cover, refer to the following 2.3.3 Docking and Undocking the Tablet To install the tablet on to the dock, refer to the To remove the tablet from the dock, do as... -
Page 17: Tablet Functions
3 TABLET FUNCTIONS... -
Page 18: Turning The Tablet On Or Off
3.1 Turning the Tablet ON or OFF 3.1.1 Turning the Tablet ON Before you turn on your tablet, ensure that the battery is correctly installed or the Tablet is properly connected to thepower supply. To turn on your tablet, press the Power key. 3.1.2 Turning the Tablet OFF 1. -
Page 19: Charging The Battery
3.2 Charging the Battery 3.2.1 Charging the Tablet Battery The Tablet is powered by a rechargeable Li-ion battery. There are three ways to charge the Tablet: 1. Connect Tablet's DC port with a suitable adaptor to charge on a socket. 2. -
Page 20: Working With The Keys
3.3 Working with the Keys 3.3.1 Using the Physical Keys Power Press shortly to lock/unlock the screen. Volume Up/Down When the Tablet is ringing, press any of the volume buttons if you want to mute the ringer. On the Home screen, press to increase or decrease the ringtone volume, or set the Tablet to silent mode. When using other applications, press to control the volume of music, spoken directions, and other audio sounds. - Page 21 Navigation Touch to open a list of thumbnail images displaying recently operated apps. Touch the thumbnail image of the app to open it. Increase sound Decrease sound Press to increase sound press to decrease sound...
-
Page 22: Using The Touchscreen
3.4 Using the Touchscreen Touch By touching an item, you can select the item or launch it. For example: Touch the on-screen keyboard to insert text and/or characters. Touch an application icon to launch it. Touch and Hold Touching and holding items will activate them. For example: Touch and hold an application/widget to move it. -
Page 23: Home Screen
3.5 Home Screen The Home screen is the starting point in using the Tablet. Touch the Home key to display the Home screen. You can customize the Home screen with various wallpapers and create shortcuts for items you want to easily access. 3.5.1 Getting to Know the Home Screen 1. -
Page 24: Extending Home Screen
Main display area: This area displays application shortcuts, widgets, and other items that can be easily accessed by touching them. Google Search: Touch to search using Google, or touch the microphone to search using your commands. Weather & Clock Widgets: The weather widget invforms you of the time, date, and weather in your location. It can be customized based on your preference. -
Page 25: Locking And Unlocking The Screen
3.5.3 Customizing the Home Screen To change your wallpaper: 1. Touch and hold the blank space on home screen, "WALLPAPERS" shortcut icon will pop up, click the icon, wall- setting. 2. Choose one picture from gallery, touch the menu on top right corner, click "Set picture as", and choose "Wallpaper"... -
Page 26: Setting Up A Screen Lock
If you have not set a screen lock, the screen will just turn back on when you press the power button. If you have set up a screen lock, you will be asked to input the relevant unlocking pattern, number, or password to unlock it. -
Page 27: Inputting Text
3.7 Inputting Text applications. 3.7.1 Entering Text Using the On-screen Keyboard To switch the input method, touch the icon located at the lower right corner of the keyboard. The following section takes the Android™ keyboard as an example. When you are typing, the characters you are entering will appear in a line above the keyboard, along with some suggestions for the word you are typing. -
Page 28: Cutting Or Copying Text 2
(ABC) to switch back. Touch and hold almost any of the number and symbol keys to open an array of additional symbols. To edit the text you have entered, touch to move the cursor to the location where you want to add or delete text. The cursor is a vertical bar that designates where the text you type or paste is inserted. - Page 29 2. Touch the location where you want to paste the text. A tab will show up. 3. Touch the tab and the Paste option will show up. 4. Touch Paste.
-
Page 30: Opening And Switching Applications
3.8 Opening and Switching Applications To open an application, touch the shortcut on the Home screen, or go to the Applications screen by touching the Application button on the Home screen . To open and switch to a recently used application, touch the key at the bottom of the touchscreen. -
Page 31: Accessing The Tablet's Settings
3.9 Accessing the Tablet’s Settings To access the Settings to view or change your wireless and cellular networks, sound and display, location and secu- rity, applications, language and keyboard, date and time, and other settings: 1. Click and scroll down the top of the Home screen, and touch the Settings icon. 2. -
Page 32: Language & Input Method & Account Setting
3.10 Language & Input Method & Account Setting 3.10.1 Language Setting 1. Open “Settings”. 2. Click “Language & input”. 3. Click “Language” and select language from the scrolling list. 3.10.2 Input Method Setting 1.Open “Settings”. 2.Click “Language & Input Method”. 3.You can touch “Current Keyboard”, then click “CHOOSE KEYBOARDS”... -
Page 33: Setting The Date And Time
3.11 Setting the Date and Time 3.11.1 To Automatically Set Date and Time: 1. Open the Settings list. 2. Touch Date & time. 3. Check the box for Automatic date & time. 4. Touch Select time zone, then scroll down and select the correct time zone from the list. 5. -
Page 34: Installing Or Removing The Micro Sd Card
3.12 Installing or Removing the Micro SD Card Remove the microSD card by gently pushing the card further into the slot, and then release it. The card will eject from the slot, and can be removed. -
Page 35: Connecting To Or Disconnecting From Computer Using Usb
3.13 Connecting to or Disconnecting from Computer Using USB Connecting the Tablet to a computer using USB cable: 1. Use the appropriate USB cable (micro USB connector) to connect the Tablet to a USB port on your computer. age or microSD card storage and the computer. To disconnect the Tablet from the computer safely and to avoid any loss of information, follow the computer... - Page 36 operating system’s instructions to disconnect USB devices, and additionally follow the steps below: 1. Open the Status Bar by scrolling down the top of the screen.
-
Page 37: Connecting The Tablet To A Tv
3.14 Connecting the Tablet to a TV Interface (HDMI) cable. The HDMI cable is an optional accessory that’s not included with your Telpad. When purchasing an HDMI cable, please check the connector type of the cable. You may purchase and use any Standard HDMI Cable Version 1.0 ~ 1.4, but HDMI cable version 1.4 is the most apt cable to use for 3D functions. -
Page 38: Wireless Network
3.15 Wireless Network The tablet is able to connect to various wireless networks and devices. Including Wi-Fi data networks, and Blue- tooth devices such as headsets for voice and data transmission. Wi-Fi is a wireless networking technology. Wi-Fi technology can provide wireless Internet connection over distanc- es of up to 100 meters, however the connectivity of the Wi-Fi depends on the Wi-Fi router, and the surrounding environment in which it operates. -
Page 39: Connecting To A Wi-Fi Network 3
3.15.3 Connecting to a Wi-Fi Network When the Wi-Fi is turned on, the device searches for available networks accessible within range. Find and tap "Wi-Fi" in"Settings" or "Status Bar", the available Wi-Fi around will display on the screen. Tap the one you want to use. -
Page 40: Forgetting A Wi-Fi Network
Wi-Fi network. Security: Select the security scheme in the menu that opens. Password: Enter any required security credentials. 3.15.6 Forgetting a Wi-Fi Network Tap Settings > Wi-Fi. Touch the network name you want to remove from the Wi-Fi networks list. Touch Forget in the menu that opens. -
Page 41: Bluetooth 3
3.16 Bluetooth Bluetooth is a wireless communications technology for exchanging information over short distances. The obstacles such as walls or other electronic devices. 3.16.1 Opening Bluetooth Settings Touch and open the Settings from the Home screen or Applications screen. Touch Wireless & networks, and touch Bluetooth settings. 3.16.2 Turning Bluetooth ON or OFF Open the Settings. -
Page 42: Connecting To Bluetooth Devices
Touch Rename tablet in the options given. Type the new name in the window prompted. 3.16.4 Connecting to Bluetooth Devices Pairing with a Bluetooth device Search for a Bluetooth device, pair with it, and exchange information between devices. Open the Settings Under Wireless &... -
Page 43: Google Services
3.17 Google Services 3.17.1 Creating a Google Account your device, you will be asked to sign in using your Google account. Make sure the Tablet is connected to a network to sign in or create a Google account. If you already have a Google account, simply enter your information and sign in. -
Page 44: Using Play Store 3
3.17.2 Using Play Store You can access thousands of easily downloadable applications and games for your Tablet via the Google Play Store. 3.17.2.1 Searching for Applications There are several ways to search for applications in the Play Store, through: 1. Featured applications. 2. -
Page 45: Backing Up And Restoring Apps And Settings From A Google Account
3.17.2.3 Uninstalling an Application 1. Go to Play Store, touch the My apps button. 2. Touch the application to uninstall, and then touch Uninstall. 3.17.3 Backing up and Restoring Apps and Settings from a Google Account 1. Access the Settings list from the Home screen or Application screen. 2. -
Page 46: E-Mail 4
3.18 E-MAIL 3.18.1 Opening E-mail Touch E-mail on the Home screen or on the Applications screen to open E-mail. 3.18.2 Adding and Deleting E-mail Accounts 3.18.2.1 Adding an e-mail account set up an e-mail account. If you have an existing e-mail account, you can add this by touching Add account. -
Page 47: Gmail 4
3.18.2.2 Deleting an e-mail account 1. Open Settings Personal Account. 2. Choose e-mail, then touch your e-mail account. 3.Touch the menu on top right corner of the screen, choose "Remove account". 4. Touch "Remove account" to remove it successfully. 3.18.3 Gmail Gmail is an e-mail service provided by Google. - Page 48 5. Type in your phone number to help you access your account in case you forget your password, or choose "Skip" to skip this step. 6. Touch "I AGREE" to accept Google Terms of Service and privacy policies. Your new Gmail account has been successfully created! To remove a Gmail account 1.
-
Page 49: Camera Instructions
3.19 Camera Instructions 1. Find and touch Camera icon in application interface, the default status is taking photo. Touch the camera 2. Touch the menu icon on top right corner, three icons pop up: front/rear camera switcher, pictures grid, time-lapse interval. 3. -
Page 50: Home Care 4
3.20 Home Care Terms of Use The Home Care apps utilize various health related date you enter. Your data are stored and accessed by TELPAD Home Care only and are not transferred to or stored on any servers. The calculated forecasts of Home Care may not be accurate and should not be used to prevent unwanted pregnancy. - Page 51 This section contains a description of Home Care application which is working with ‘Bluetooth Weight scale”. are as follows. Monitored variables: Body Weight (180 kg ~ 5 Kg), Body Fat Rate, Body Water, Bone Mass, Muscle Mass, BMI, BMR and Visceral Fat. 1.
- Page 52 pairing request will appear. Please enter “0000” for PIN number. If the weight scale is not connected to TELPAD, the icon in the scale (not TEL- PAD) will blink. When the connection is established the icon will stop blinking. 4. Please bare your feet on the weight scale ished, the Number in the weight scale will blink.
- Page 53 5. You can see the measured data with graph by pressing the STATISTICS tab. If you press the data point, you can delete the data with your choice. You can change the graph to other variables like bone mass or BMI by pressing the corresponding green graph icon below.
- Page 54 6. Press the “Information” menu in “SETTING” tab, you can see the guideline for the each variable depending on the Age and Sex. This section contains a description of Home Care application which is work- ing with ‘iFever manager” dongle. iFever Manager enables your TELPAD for body temperature measurement.
- Page 55 4. Tap the Start button or volume up hard key to begin temperature measurement. 5. Please move your iFever Manager sensor part to close your (or others) forehead position during three seconds. Measured distance is within 1 cm. 6. Please see the measured value, and tap the save button to store the data. Tap Clear button to clear last meas- ured value if needed.
- Page 56 Appendix 1.Daily Graph No Item Description Last month button Move to previous month Calendar title Display current date Next month button Move to next month No measured data If no measur ed data, will be displayed with pale sky blue Today Today is Green background Selected date...
- Page 57 Item Description Last month button Move to previous Month Calendar title Display current date Next month button Move to next Month Measured range Measured temperature data range Temperature graph Show the measured data with line Temperature delete button Delete selected temperature data Temperature time Show measured time and data Add memo...
- Page 58 Appendix 2. Monthly Graph Item Description tart menstruation First day of menstruation (Marked in Daily graph) Show graph with temperature Graph Made love date (Marked in Daily graph) Made love axis Date for the month Non-Childbearing Indicate non Childbearing period Indicate Childbearing period Childbearing period Indicate Menstrual period...
- Page 59 Appendix 3. Setting ltem Description 1 Version Show software version number & release date Online Manual Check online user manual Sign out Logout for another user login Menstrual cycle can be set up to 20-40 days Menstrual cycle Menstrual period can be set up to 1-7 days Length of menstrual cycle Setting time range for BBT temperature measurements (00:00 ~ 23:59) BBT Time Range...
- Page 60 Appendix 4. Basal body temperature Basal body temperature (BBT) is our lowest temperature during rest, which is usually during the time we're sleeping. This is the reason why BBT should be taken before getting out of bed for accurate fertility charting. Ovulation causes one half to one-degree rise in BBT, so monitoring BBT helps provide information on the best time for conception.
-
Page 61: Dlna Introduction 5
3.21 DLNA 3.21.1 DLNA Introduction The full name of DLNA is DIGITAL LIVING NETWORK ALLIANCE. The purpose is to enjoy your music, photos and videos anywhere anytime. DLNA is initiated by SONY, Intel and Microsoft. It aims at resolving interconnection and interworking of wireless and wired network for personal PC, consumer electronics, mobile devices. -
Page 62: Control Device Discovery And Connection
the network overload. 3.21.3 Control Device Discovery and Connection Our EC7 can support DLNA and you can operate as below: Please use mobile phone as source port and ensure the version of the android must be 2.3 and above(because only version 2.3 of android can support miracast) such as Google device. 1. - Page 63 2. Start Application -Please start “eHomeMediaCenter” in EC7 tablet and click “Settings” to change your device name for easy Figure 3 click settings Figure 4 Change device name Figure 6 apk-iMediaShare interface - Please start “apk-iMediaShare” and the interface Figure 6...
-
Page 64: The Brief Introduction Of Interactions Between Tablet And Mobile Phone 5
3.21.4 The Brief Introduction of Interactions between Tablet and Mobile Phone To push local video, music or photos on your mobile phone to display on tablet. Please refer to picture 6 “GALLERY VIDEOS” 、 “GALLERY PHOTOS” and“MY MUSIC”. For example, click “MY Music”... - Page 65 Figure 9 Open “choose a screen”...
- Page 66 But only EC7 tablet has music voice and your mobile phone can return and operate other function once above Figure 10 Music Playing Interface on mobile phone Figure 11 Music Playing Interface on EC7 tablet To push the live video or music on your mobile phone to display on tablet, please refer to Picture 12 “FREE MOV- IES”...
- Page 67 Figure12 apk-iMediaShare interface...
- Page 68 You no need to login facebook account, click “Login with Facebook” and enter an interface as shown in Figure15 account log in interface...
- Page 69 (Figure17) Figure17 start“STAFF PICKS” Figure18 Playing interface on mobile phone to play on EC7 tablet. (Figure 19)
- Page 70 Figure19 Playing interface on EC7 tablet Remark: tablet can also be shared to your mobile phone. 2 . In order to guarantee the smooth playback of device, please operate above in good environment of network.
- Page 71 Mobile phone can share the music and video on EC7 tablet. Please start “apk-iMediaShare” on mobile phone, and touch “media player” on EC7 tablet's "eHomeMediaCenter" interface. (Figure20) Figure 20 start Media Player Figure 21 start iMediaShare Figure 22...
- Page 72 which you want to play. (Figure 21 and 22) EC7 tablet can share local music, video or pictures to mobile phone. Please start the “Media server” in “eHomeMediaCenter”interface on EC7 tablet when apk-iMediaShare is started on mobile phone.(Figure 23) Figure 23 Start Media server Figure 25)
- Page 73 Figure 24 click top corner “Add Share”F igure 25 click“OK” Figure 26 select top right corner“start Share”...
-
Page 74: The Connection Between Dock Phone And Tablet
4 THE CONNECTION BETWEEN DOCK PHONE AND TABLET... -
Page 75: Voice Services
4.1 Voice Services The touchscreen Dialer can be accessed by touching the Dialer shortcut. The Dialer is automatically launched when the Tablet is placed on the dock. Please take note of the following when using the Dialer: Line 1- Landline Line 2- VoIP (requires network support) 4.1.1 Making a Call When Tablet is on the dock, EC7 supports dialing by tablet and its dock. -
Page 76: Answering A Call 7
4.1.1.4 Switching from handset to speakerphone and vice versa 1. Touch to switch from handset call to speakerphone. 2. To return to using the handset, lift the handset. The call will be continued via handset. Only one of the two modes will be active at a time. 4.1.1.5 Making a call from the Contacts 1. -
Page 77: Selecting Area Code 7
4.1.4 Selecting Area Code When the area you are in has been selected, the phone will automatically recognize the similar area code for all incoming and outgoing calls, and will display the phone number without the area code. You will also be able to directly dial the phone number within the same area. -
Page 78: Importing/Exporting Contacts
4.1.7 Importing/Exporting Contacts Access the Dialer, touch the Contacts tab. Touch the Menu button at the top corner. Touch Import/export in the menu displayed. Select from the list whether you would like to import or export or other actions. 4.1.8 Changing Ringtones Within the Dialer, touch the Phone Setting tab. -
Page 79: Contacts
4.2 Contacts Contacts enables you to save and manage information such as phone numbers, e-mail addresses and chat ad- dresses of your contacts, and provides quick and easy access to communicate with the people you want. 4.2.1 Opening Contacts You can open your contacts by touching Contacts on the Home screen or on the Applications screen. In the contact tab pages, you can touch a contact image to open the contact details screen. -
Page 80: Searching For Contacts
4.2.3 Searching for Contacts 1. Open the Contacts screen. 2. Touch Search. 3. Enter the name of the contact you are searching for. As you type, contacts with matching names appear below the search box. 4. Touch a matching contact in the list to open its Details screen. 4.2.4 Editing Contacts 4.2.4.1 Editing contact details To change or add details for your contacts:... -
Page 81: Basic Troubleshooting For The Telpad
5 BASIC TROUBLESHOOTING FOR THE TELPAD... -
Page 82: Tablet Dialer Cannot Make A Call
5.1 Tablet not Powering up 1. Press Tablet power key and check whether the PLDT Telpad logo appears upon initialization. 2. If the Android™ Tablet doesn’t launch, connect the Tablet to the power supply through the dock. 5.2 No Dial Tone 2. -
Page 83: No Audio Response In The Handset
2. Look at your screen and make sure that the Dialer is set to Line 1; otherwise, touch the Line 1 button. Make sure that the screen shows the message “Telpad is on the dock”. 5.5 No Audio Response in the Handset 1. - Page 84 6 FAQs...
- Page 85 What is a Telpad? The Telpad is a device combining the features of a landline with an Android tablet. Except for the calling functions of the landline phone, the tablet about the Telpad extends the possible usage of the device, such as browsing the internet, from any other landline or desk applications, playing games, and accessing exclusive PLDT content like...
- Page 86 Does the Telpad support 3G? No, it cannot support 3G. No. The Telpad connects to the internet using Wi-Fi and Ethernet. The Telpad will work with any brand of Wi-Fi router that uses 802.11 Can the Telpad directly connect to the b/g/n technologies.
- Page 87 These are applications found in the Android Market. (PLDT is not What are third-party applications? liable for the performance, support, and maintenance of third party applications installed to the device) PLDT will support and maintain the following: PLDT Home screen Which software or applications will Dialer PLDT support? PLDT@Home...
- Page 88 HOW TO USE THE DEVICE To lock the Telpad, click the power button once. When the backlight How would I lock and unlock the Telpad? To unlock the Telpad, click the power button once, touch the lock icon on your screen, and slide to the right. Once the Home screen appears, the Telpad is unlocked.
- Page 89 Some video formats are not supported by the default player. You can Why do some videos not play on the download Flash Player to play videos in formats not supported by the Telpad? Telpad. Yes. Android™ supports multi-tasking and can run multiple applications at Can I run multiple applications at once the same time.
- Page 90 During a call, is it possible to switch from Yes. Simply touch the speaker button (ICON) on the Telpad dialer and put handset mode to speaker phone mode down the handset. To return to using the handset, simply lift the handset. and vice versa? Line1: Landline are the two lines used for?
-
Page 91: Warnings And Precautions
7 WARNINGS AND PRECAUTIONS... - Page 92 Please read the following instructions carefully. Abide by the safety warnings described in order to use the device safely and properly as it is designed for. These instructions apply to the whole device including all the accesso- ries. Basic Requirements Keep the device dry at all times and prevent from any collision with other objects, including during storage, transportations, and using of the device.
- Page 93 Do not place any object (such as a candle or a water container) on the device. If any foreign object or liquid en- contact an authorized service center. getting damaged due to lightning strikes. Never install telephone wiring during an electrical storm. Never touch exposed (insulation broken) telephone wires or terminals unless the telephone line has been dis- connected at the network interface.
- Page 94 For electric plugs, the socket-outlet should be installed near the device and should be easily accessible. Battery and Charger Unplug the charger from the electrical plug and the device when not in use. The battery can be charged and discharged hundreds of times before it eventually wears out. When the standby time and the talk time are shorter than the original time, replace the battery.
- Page 95 regulations or reference instruction supplied with your device. Prevention of Hearing Damage Using a headset at high volume can damage your hearing. To reduce the risk of damage to hearing, lower the headset volume to a safe and comfortable level. Safety of Children Keep the device and its accessories out of the reach of children.
- Page 96 Disposal and Recycling Information This symbol on the device (and any included batteries) indicates that the device (and any included batteries) should not be disposed of as normal household garbage. Do not dispose of your device or batteries as unsorted or proper disposal at the end of its life.
-
Page 97: Personal Information And Data Security
8 PERSONAL INFORMATION AND DATA SECURITY... - Page 98 The use of some functions or third-party applications on your device could result in your personal information and data being lost or becoming accessible to others. Several measures are recommended to help you protect Place your device in a safe area to prevent it from unauthorized use. Set your device screen to lock and create a password or unlock pattern to open it.
-
Page 99: Legal Notice
9 LEGAL NOTICE... - Page 100 Copyright © 2014 by AURA Technology Limited. All rights reserved. No part of this document may be reproduced, distributed, or transmitted in any form or by any means without prior written approval of AURA Technology Limited. For the device explained in this manual may contain copyright software of AURA Technology Limited. and other possible licensors.
- Page 101 the risk of any results caused by the software/application being possibility incompatible with the device. This device runs on Android operating system but there has been appropriate changes made by AURA Technology Limited. Thus this device might not fully support all the functions supported by standard Android operating system.
-
Page 102: Disclaimer Of Warranties
10 DISCLAIMER OF WARRANTIES... - Page 103 The information within this manual are provided “AS IS”, except required by applicable laws, no warranties of any kind; either expressed or implied, including without limitation, the implied warranties of merchantability ual. LIMITATIONS OF LIABILITY In no event shall AURA Technology Limited. be liable for any special, incidental, indirect, or consequential misusage of the device.
-
Page 104: Index
11 INDEX... - Page 105 Application button, 18 FAQ, 79 Applications, 39 Favorites, 72 Area code, 72 Flick, 17 Back, 15 Gmail, 42 Bluetooth, 36 Google Account, 38 Google Services, 38 Call, 70 Camera, 44 Home Screen, 18 Charging, 14 Home Extension, 19 Contacts, 74 Home Customizing, 20 Home Care, 45 Date, 28...
- Page 106 Memo, 72 Mini HDMI Port, 32 Telpad, 2 MicroSD Card, 29 Text, 22 My Apps, 40 Text Entering, 22 Text Copying, 23 Text Cutting, 23 Navigating, 16 Time, 28 Touch, 17 Touch and hold, 17 On-screen dialler, 70 Troubleshooting, 76 On-screen keyboard, 22 TV, 32 Pinch, 17...
- Page 107 Warranty cards NAME: TEL. NO.: ADDRESS: DATE OF PURCHASE: VERSION: SERIAL NO.:...
-
Page 108: User Manual
TELPAD EC7 USER MANUAL AURA Technology Limited Address: RM810, Star House, 3 Salisbury Road, Tsimshatsui, Hong Kong E-mail: Support@auratech.hk for Android™ Android™ is a trademark of Google Inc. Use of this trademark is subject to Google Permissions.
Need help?
Do you have a question about the TELPAD EC7 and is the answer not in the manual?
Questions and answers