Table of Contents
Advertisement
Advertisement
Table of Contents

Summary of Contents for GF Instruments GAMMA Surveyor
- Page 1 User Guide v 1.2...
- Page 2 GAMMA Surveyor...
- Page 3 Measuring Probes..................37 Small Handheld probe................38 2" and 3" Combined Probes ..............40 Borehole Accessories................42 Gamma Surveyor Software ................. 44 Installation of the Software ..............44 Measured Data Download............... 44 Connection of the Instrument to PC............ 44 Start of the Software ................45...
- Page 4 GAMMA Surveyor Data Download and Export of the Files ..........45 File Deleting..................46 Finishing of the Work ................. 46 Output File Format.................. 46 Dose Rate Measurement ..............46 Spectrum & Assay ................46 Technical Specifications ................48...
-
Page 5: Introduction
Gamma Surveyor is a useful tool for searching for radiation sources, dose rate and gamma-ray spectra measurements, determination of concentrations of elements (especially K, eU, eTh) and for other applications in radiation monitoring, geophysical mapping, geological studies, surveys for mining, laboratory analyses of samples etc. -
Page 6: Control Unit
GAMMA Surveyor Control Unit LCD display Battery charger status Power / backlight key Left/Right keys Up/Down keys No key Yes key Numeric keys F-key Minus / decimal point key Battery cover USB (PC) GPS receiver Probes External power... -
Page 7: Power Supply
GAMMA Surveyor Power Supply The instrument can be supplied from internal lithium batteries, using AC adapter or from the 12 V car socket or other external 12 V/2 A source. For external power supply the connector „External power“ is to be used. -
Page 8: Connections
Connection to PC To connect the spectrometer and PC use the USB cable and connect it to the „USB“ socket of the instrument and to the related socket of the PC. See chapter Gamma Surveyor software for details. -
Page 9: Basic Operation Of The Instrument
GAMMA Surveyor Basic Operation of the Instrument The basic instructions for the operation of the instrument are given in this chapter. Menu Handling There are two possibilities how to choose the item from the displayed menu (see fig. below): 1) Choose the item using “Up/Down“ keys and then press “Yes“ key. -
Page 10: Input Of Numerical Values
GAMMA Surveyor New measurement File name: My test file 1 Locality: Laboratory Meas. type: Point Meas. time: 10 s Note: Input of Numerical Values Numerical values can be entered using keys “0“ to “9“ and “Minus/Decimal point“ key. If the “Minus/Decimal point“ key is pressed at first (before entering the number), it is displayed as a sign “minus”,... -
Page 11: Display Backlight
GAMMA Surveyor small, “abc“ – small letters and numbers, “ABC“ – capital letters and numbers, “123“ – numbers only. Charset New measurement File name: My test file 1 Locality: Laboratory Meas. type: Point Meas. time: 10 s Note: Example Edit cursor Display Backlight Backlight of the display can be switched on / off using the „Power /... -
Page 12: Full Spectra & Assay Mode
GAMMA Surveyor Full Spectra & Assay Mode This mode serves for measurement of the whole spectrum, determination of concentrations of elements K, eU, eTh and measurement of cps in 10 ROIs (regions of interest) - 4 of them preset for K, U, Th, TOT and 6 of them settable by a user. - Page 13 GAMMA Surveyor • cps measurement in 10 ROIs – 4 preset (K, U, Th, TOT), 6 user defined • Built-in isotope library • Possibility of going through spectrum and matching of the measured peak with the isotope • Support of point, profile and borehole measurements •...
-
Page 14: Measurement
GAMMA Surveyor Measurement Connect the probe (probes) to the control unit. Then switch the instrument on by pressing and holding the yellow “Power“ key. Choose the item “Full Spectra & Assay“ from the displayed main menu (or press the key “3”). - Page 15 GAMMA Surveyor New measurement File name: My test file 1 Locality: Laboratory Meas. type: Point Meas. time: 10 s Note: Meanings of the fields are as follows: File name – fill in the name of the file. Locality – name of the measured locality (non compulsory).
- Page 16 GAMMA Surveyor Position for point measurement: Position Latitude: E 12° 12.567' Longitude: N 54° 23.102' Point: Note: Position for profile measurement – first, other points: Position Latitude: E 12° 12.567' Longitude: N 54° 23.102' Profile: Step: 5.0 m Station: 125.0 m...
- Page 17 GAMMA Surveyor Meanings of the fields are as follows: Latitude, Longitude – GPS position data Point – number of the measured point Profile no. – number of the measured profile Step – distance between the measured points on the profile Station –...
- Page 18 GAMMA Surveyor Spectrum MEASURE - wait please. Graph 100 cps Remaining time: 1m 10s By pressing the “No” key the whole measurement is terminated. When the measurement is finished, the following window with the measured cps values in ROIs and calculated concentrations of K, eU, eTh is displayed.
- Page 19 GAMMA Surveyor ROI 1: 1163.1 ROI 2: 120.6 ROI 3: 40.2 ROI 4: 11.6 ROI 5: ROI 6: The spectrum view window can be opened using “1” key. Spectrum Cursor: Cs137 661.2 29.79 In this window you can move the cursor using “Left“ and “Right“...
-
Page 20: Setting
GAMMA Surveyor Setting Choose “Setting“ from the main menu and then “Spectrum & Assay“. The following window will appear: Setting Graph max.: 2000 cps Stab. source.: Internal Factory Calibration: Graph max. – scale (maximum value) in cps for a basic display of spectrum graph. - Page 21 GAMMA Surveyor be chosen: “Factory“ (factory calibration) or “User #1 / User #2“ (two user defined calibrations). Then the window, where up to six user defined ROIs can be set, appears. The first value on the line is the number of the channel where the ROI starts and the second value on the line is a width of the ROI (in number of channels).
-
Page 22: Calibration
GAMMA Surveyor Calibration The instrument is delivered with a factory calibration (“Factory“). The recommended time for recalibration is 3 – 5 years. A user can create two own calibrations “User #1 / User #2” according to his specific needs. To create a new user calibration, connect the probe that should be calibrated to the control unit and switch the instrument on by pressing and holding the yellow “Power”... - Page 23 GAMMA Surveyor Calibration Concentrations - K etalon: 20.82 18.67 31.96 Meas. time: K, U, Th – related concentrations of the calibration pad corrected by the geometrical factor (i.e. multiplied by the geometrical factor value). Geometrical factor G = 1-h/r, where h is the height of the middle of the detector above the pad (the value is given in the description of the probes) and r is the diameter of the pad.
-
Page 24: Dose Rate Mode
GAMMA Surveyor Dose Rate Mode This mode serves for measurements of a dose rate in nGy/h, effective dose rate in nSv/h and for registration of incoming pulse number in cps in the energy range of 410keV ~ 2.815MeV (according to the recommendation of IAEA). -
Page 25: Measurement
GAMMA Surveyor Measurement Connect the probe (probes) to the control unit. If the factory calibration is used, the reference source must not be inserted in the instrument. Please, check this and then switch the instrument on by pressing and holding the yellow “Power“ key. Choose the item “Dose Rate” from the displayed main menu (or press the key “2”). - Page 26 GAMMA Surveyor New measurement File name: My test file 1 Locality: Laboratory Meas. type: Point Meas. time: 10 s Note: Meanings of the fields are as follows: File name – fill in the name of the file. Locality – name of the measured locality (non compulsory).
- Page 27 GAMMA Surveyor Position for point measurement: Position Latitude: E 12° 12.567' Longitude: N 54° 23.102' Point: Note: Position for profile measurement: Position Latitude: E 12° 12.567' Longitude: N 54° 23.102' Profile: Step: 5.0 m Station: 125.0 m Note: Position for borehole measurement:...
- Page 28 GAMMA Surveyor Meanings of the fields are as follows: Latitude, Longitude – GPS position data Point – number of the measured point Profile no. – number of the measured profile Step –distance between the measured points on the profile Station – position on the measured profile in meters Borehole –...
- Page 29 GAMMA Surveyor When the measurement is finished, the window with the measured values and the question about their saving is displayed. Dode Rate Save? Dose rate: 71.8 548.3 nGy/h Total: 64.2 420.0 If you like to save the data and move to another point, press the “Yes”...
-
Page 30: Setting
GAMMA Surveyor Setting Choose item „Setting“ and then „Dose Rate Setting“ from the main menu. The following window will appear: Setting Graph max.: 2000 cps Factory Calibration: • Graph max. – scale (maximum value) in cps for a basic display of the measured values history graphs. -
Page 31: Calibration
GAMMA Surveyor Calibration The instrument is delivered with a factory calibration (“Factory“) done at the high-volume standards, without internal reference source. This source must not be inserted in the instrument during the measurement when the factory calibration is used. The recommended time for recalibration is 3 –... - Page 32 GAMMA Surveyor When the parameters are entered, the following window is displayed and the measurement started. Calibration 35.64 Measured: Measured: MEASURE - wait please. Remaining time: 1m 10s As soon as the measurement is finished, the calibration data are stored in the probe and the whole calibration is finished too.
-
Page 33: Search Mode
GAMMA Surveyor Search Mode This mode serves for quick search for radiation sources or radioactive anomalies in field. The searching is performed in the whole energy range available. For better orientation the measured value is displayed both as a numerical value and in a bar-graph. In the upper part of the window the history of the measured data (previous measured values) are displayed, which allows easy finding of radiation maxima and minima. -
Page 34: Measurement
GAMMA Surveyor Measurement Connect the probe (probes) to the control unit. Then switch the instrument on by pressing and holding of the yellow “Power“ key. Choose “Search” from the displayed main menu (or press “l” key). measurement starts and the following window is displayed:... -
Page 35: Setting
GAMMA Surveyor Setting Choose item “Setting“ and then “Search setting“ from the main menu. The following window will appear: Search Graph max.: 2000 cps 50 cps Threshold: 1000 cps Audio range: Graph max. – scale (maximum value) for a history graph and bar graph in cps. -
Page 36: File Manager
GAMMA Surveyor File manager This choice allows displaying of the measured data, deleting of the useless files from the memory or deleting of the whole instrument memory. Measured Data Displaying Choose “File Manager“ from the main menu and then “View Dose Rate File“... -
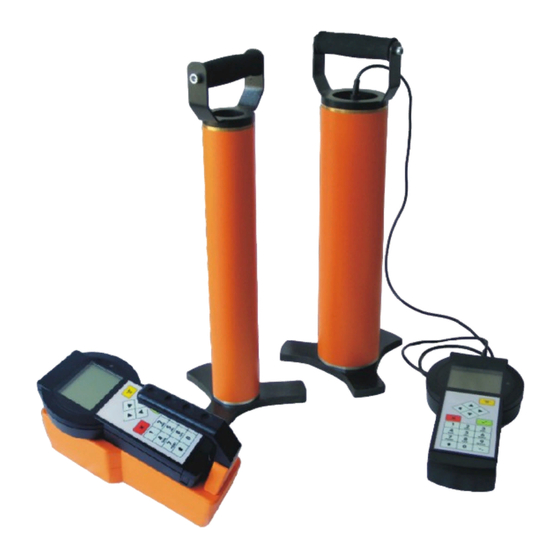
Page 37: Measuring Probes
• All probes can work in internal or external reference source modes. • All probes listed below can be connected to any Gamma Surveyor control unit. • The probes are supplied from the control unit (they are not to be charged separately). -
Page 38: Small Handheld Probe
GAMMA Surveyor Small Handheld probe The small handheld probe with the attachable control unit creates one compact instrument. It serves for surface measurements. The carrying belt delivered with the probe allows hanging and carrying of measuring set. - Page 39 GAMMA Surveyor Internal Cs source is fixed under the holder at the right side of the instrument. If you want to insert or remove the source, you must take off the holder.
-
Page 40: And 3" Combined Probes
GAMMA Surveyor 2" and 3" Combined Probes Combined probes are separate probes designed for surface and borehole measurements (with optional accessories). Standard probes are equipped with either NaI(Tl) crystal, diameter 3”, length 3” (volume 6.3 in or BGO crystal, diameter 2”, length 2” (volume 21.2 in For surface measurement the tripod base can be attached to the bottom of the probe to ensure its stability during the measurement. - Page 41 GAMMA Surveyor Internal Cs source is fixed under the removable holder in the bottom part of the probe – see picture below. If you want to insert or remove the source, you must unscrew the holder.
-
Page 42: Borehole Accessories
GAMMA Surveyor Borehole Accessories The borehole accessories enhance the possibilities of use of the combined probes by measurements in boreholes. Standard borehole accessories are available in versions for 2” and 3” combined probes. The borehole accessories consist of a borehole tip, which can be fixed to the bottom of the probe (replacing the tripod base) and serves for leading the probe in a borehole. - Page 43 GAMMA Surveyor screw the cable head in to the probe. If water leaks into the probe as a result of not keeping these instructions, the complaint will not be accepted.
-
Page 44: Gamma Surveyor Software
Gamma Surveyor Software Installation of the Software Insert the installation CD Gamma Surveyor to the PC. Connect the instrument with the PC using USB cable from accessories and turn it on. Then wait till the dialog screen is shown and continue according with it (the USB driver is installed). -
Page 45: Start Of The Software
Start of the Software Run the PC software by double-click on “Gamma Surveyor Transfer“ icon or choose the item “Gamma Surveyor Transfer” from the menu “Start \ Programs \ Gamma Surveyor“. There is a list of all instrument files displayed in the main window. -
Page 46: File Deleting
GAMMA Surveyor When the download of the main file with all measured data is finished, a set of related export files (see the description of the file types) is generated automatically. These export files serve for easy import and processing of the measured data e.g. in MS Excel, Surfer etc. - Page 47 GAMMA Surveyor...
-
Page 48: Technical Specifications
GAMMA Surveyor Technical Specifications Control Unit: • Works with all types of probes • Attached to the small handheld probe forms a compact instrument • Possibility of connection of more probes, GPS receiver, PC (USB) • Data memory: max. 32 MBit, max. 100 files... - Page 49 GAMMA Surveyor • Measuring range 100keV to 3MeV / NaI(Tl) detector 150keV to 3MeV / BGO detector • Zero dead time • Detectors: NaI(Tl), BGO, volumes 21.2 in (0.35 l) and 6.3 in (0.1 l), or other ones on request •...
- Page 50 GAMMA Surveyor • Weights: 1.6 kg (handheld probe) 2.8 kg (2" combined probe) 5.3 kg (3" combined probe) For warranty or after warranty repair contact the producer at the address: GF Instruments, s.r.o Ječná 29a E-mail: gregor@gfinstruments.cz 621 00 BRNO tel.: +420 541 634 285, 366...
Need help?
Do you have a question about the GAMMA Surveyor and is the answer not in the manual?
Questions and answers