Advertisement
Advertisement
Table of Contents

Related Manuals for Hamilton Beach D100N30AL-T4


Summary of Contents for Hamilton Beach D100N30AL-T4
- Page 1 Model: D100N30AL-T4 Microwave Oven User's manual Please read these instructions carefully before installing and operating the oven. Record in the space below the SERIAL NO. found on the nameplate on your oven and retain this information for future reference. SERIAL NO.
- Page 2 Do not attempt to operate this oven with the door-open since open-door operation can result in harmful exposure to microwave energy. It is important not to defeat or tamper with the safety interlocks. Do not place any object between the oven front face and the door or allow soil or cleaner residue to accumulate on sealing surfaces.
-
Page 3: Grounding Instructions
without appearing to be boiling due to surface When using electrical appliances, basic safety tension of the liquid. Visible bubbling or precautions should be followed, including the boiling when the container is removed from following: the microwave oven is not always present. WARNING - To reduce the risk of burns, electric THEIS COULD RESULT IN VERY HOT shock, fire, injury to persons or exposure to... -
Page 4: Save These Instructions
Use only thermometers, which are specifically qualified service personnel, contact nearest designed for use in microwave ovens. authorized service facility for examination, repair, or adjustment. Do not operate any heating or cooking appliance beneath this appliance. When cleaning surfaces of door and oven that comes together on closing the door, use only Be certain the glass tray and roller rings are in mild,... -
Page 5: Limited Use
entangled in or tripping over a longer cord. unintentionally. Longer cord sets or extension cords are Notes: available and may be used if care is exercised If you have any questions about the grounding in their use. or electrical instructions, consult a qualified If long cord or extension cord is used:... - Page 6 Glass jars and bottles — Regular glass is too Should you wish to check if a dish is safe for thin to be used in a microwave. It can shatter microwaving, place the empty dish in the oven and cause damage and injury. and microwave on HIGH for 30 seconds.
-
Page 7: Part Names
content should be covered or allowed to stand so that the heat disperses evenly. Add a small DDING MOISTURE amount of water to dry food to help it cook. Microwave energy attracted water molecules. Food that is uneven in moisture Power Consumption: 120V~60Hz, 1500W (MICROWAVE) Output:... -
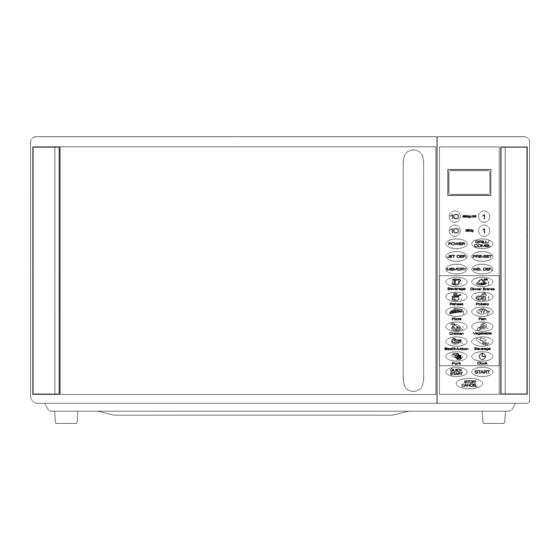
Page 8: Control Panel
MENU ACTION SCREEN Cooking time, power, action indicators, and clock time are displayed. NUMBER PADS Touch to set clock, cooking time or enter food weight. QUICK COOK BUTTONS Instant settings to cook popular foods. CLOCK Touch to set the digital clock. POWER Touch once or repeatedly to set microwave cooking power. -
Page 9: Setting The Clock
Each time a button is touched, a beep will sound Press Power Level Description to acknowledge the touch. Once 100% of total High Twice M. High Thrice Medium ETTING THE CLOCK 4 times M. Low To enter the digital clock time, touch the CLOCK 5 times button once (or twice to set the clock time in 24 hour cycle by some models) and then press the... -
Page 10: Auto Cook
For food or the following cooking mode, it is not necessary to program the duration and the cooking power. It is sufficient to indicate the type of food that you wish to cook as well as the weight of this food. In order to do this, press the individual icon pad of the food you are going to cook, the first of a number of preset weight parameters will appear, choose the one that’s equivalent to the weight of food you have placed into the oven. -
Page 11: Multi-Stage Cooking
Touch 1-min. button 5 times. Touch START button. UICK START This feature allows you to start the oven quickly. Press the QUICK START button once or ULTI STAGE OOKING repeatedly to set cooking time, the oven starts work at full power level immediately. The oven can be programmed to do several consecutive functions. -
Page 12: Cleaning
Turn off the oven and remove the power may be washed in mild sudsy water or plug from the wall socket before cleaning. dishwasher. When removing the roller ring from cavity floor for cleaning, be sure to Keep the inside of the oven clean. When replace in the proper position.
Need help?
Do you have a question about the D100N30AL-T4 and is the answer not in the manual?
Questions and answers