Table of Contents
Advertisement
Advertisement
Table of Contents

Related Manuals for LG Wine Smart LGS01


Summary of Contents for LG Wine Smart LGS01
- Page 1 取扱説明書 LGS01 MFL69326801 (1.0)
- Page 3 はじめに 日本語 このたびは、当社製品をご購入いただき、誠にありがとうございます。安全 に正しくお使いいただくために、本製品を初めて使う前にこの取扱説明書を よくお読みください。 必ず当社指定のアクセサリーをお使いください。同梱品は本製品専用に設 • 計されており、他の製品との互換性は保証しておりません。 本製品はタッチスクリーンキーボードを採用しており、目の不自由な方に • は適していません。 本書の説明は、製品の初期設定に基づいております。 • 本製品にプリインストールされているアプリは更新される場合がありま • す。また、これらのアプリのサポートは、事前の通知なく打ち切られる場 合があります。本製品にプリインストールされているアプリについてご不 明な点があれば、J:COMカスタマーセンターにお問い合わせください。お 客様がインストールされたアプリについては、そのアプリのサービスプロ バイダーにお問い合わせください。 本製品のOS(オペレーティングシステム)に変更を加えたり、非公式の • 提供元からソフトウェアをインストールしたりすると、本製品が故障し、 データが破損または消失する場合があります。こうした行為は保証の対象 外となります。 本書の内容およびイラストは、お住まいの地域、ソフトウェアのバージョ • ン、またはOSのバージョンによってお使いの製品と異なる場合がありま す。また、通知なしに変更されることがあります 警告表示 危険 警告 P.6の説明を参照ください。 注意 メモ 注意点や追加情報です。 ヒント 機能を使用するときの参考情報です。...
-
Page 4: Table Of Contents
目次 本書について ........4 Googleアカウン トを設定する ..51 本書について ........4 Googleアカウン トを作成する ..51 商標 ..........5 Googleアカウン トにログイン する ..........51 安全 .............6 ネッ トワークおよびデバイス 重要な注意事項 .......29 への接続 ..........53 Wi-Fi ..........53 ご利用の準備 ........32 Bluetooth ........54 各部の名称 ........32 Wi-Fi Direct .......55 ソフ トキーとハードキーの対応 ..34 PCと本製品の間でデータを microSIMカードの挿入、... - Page 5 メッセージの各種設定を ソフ トウェアの更新 ......89 変更する ........62 ソフ トウェアの更新 .......89 カメラとビデオ ........63 同梱物 ..........91 ビューファインダー上のカメラ こんなときは ........92 オプション ........63 解像度を設定する ......64 よくある質問 ........96 写真を撮影する ......64 撮影した写真の編集 .....64 ビデオを録画する ......65 録画したビデオの共有、 削除..65 ギャラリー ........66 マルチメディア ........69 音楽 ..........69 便利な機能 ........71 時計 ..........71 電卓...
- Page 6 本書について 本書について 本製品を安全に正しくお使いいただくために、 本製品をお使いになる • 前に、 この取扱説明書をよくお読みください。 本書に掲載されている画像やスクリーンショ ッ トの一部は、 本製品で • の見た目と異なる場合があります。 本書の内容は、 最終的な製品、 ソフ トウェアの内容と異なる場合があ • ります。 また、 内容は事前の予告なく変更されることがあります。 本書 の最新版については、 J:COMサポー トサイ トをご覧ください。 本製品のアプリやその機能は、 国、 地域、 ハー ドウェア機能によって異 • なる場合があります。 当社以外のプロバイダーによって開発されたア プリの使用に起因するいかなる性能の問題についても当社は責任を 負いかねますので、 あらかじめご了承ください。 当社は、 レジス トリー設定の変更やOSの改造に起因する性能または •...
- Page 7 商標 Copyright ©2015 LG Electronics, Inc. All rights reserved. • LGおよびLGロゴは、 LG Groupと関連各社の登録商標です。 その他 すべての商標は、 対応する保有者の保有物です。 Google™、 Google マップ™、 Gmail™、 YouTube™、 ハングアウ • ト™ 、 Google Play™ は、 Google, Inc.の商標です。 Bluetooth は、 Bluetooth SIG, Inc. の世界各国における登録商 • 標です。 Wi-Fi および Wi-Fi ロゴは、 Wi-Fi Alliance の登録商標です。 • QRコー ドは(株)デンソーウェーブの登録商標です。 • その他すべての商標と著作権は、 対応する保有者の保有物です。 • 本書について...
- Page 8 安全 安全上のご注意 (必ずお守りください) ご使用の前に、 この 「安全上のご注意」 をよくお読みの上、 正しくお使 • いください。 また、 お読みになった後は大切に保管してください。 ここに示した注意事項は、 お使いになる人や、 他の人への危害、 財産 • への損害を未然に防ぐための内容を記載していますので、 必ずお守 りください。 次の表示の区分は、 表示内容を守らず、 誤った使用をした場合に生じ • る危害や損害の程度を説明しています。 この表示は、 取り扱いを誤った場合、 「 死亡または重傷 を ※1 負う危険が切迫して生じることが想定される」 内容です。 この表示は、 取り扱いを誤った場合、 「 死亡または重傷 を ※1 負う可能性が想定される」 内容です。 この表示は、...
- Page 9 次の絵表示の区分は、 お守りいただく内容を説明しています。 • 禁止 (してはいけないこと) を示します。 分解してはいけないことを示します。 水がかかる場所で使用したり、 水に濡らしたり してはいけないこと を示します。 濡れた手で扱ってはいけないことを示します。 指示に基づく行為の強制 (必ず実行していただくこと) を示します。 電源プラグをコンセン トから抜いていただくことを示します。 本体、 充電用機器の取り扱いについて (共通) 高温になる場所や熱のこもりやすい場所 (火のそば、 暖房器具の そば、 こたつや布団の中、 直射日光の当たる場所、 炎天下の車内 など) で使用、 保管、 放置しないでください。 火災、 やけど、 けが、 感電などの原因となります。 電子レンジなどの加熱調理機器や高圧容器に入れないでくださ い。 火災、 やけど、 けが、 感電などの原因となります。 分解、...
- Page 10 水などの液体 (飲料水、 汗、 海水、 ペッ トの尿など) で濡らさないで ください。 本製品が液体に濡れた場合は、 製品内部のラベルの色 が変わります。 この場合、 保証の対象外となり有償修理となります ので、 ご注意ください。 火災、 やけど、 けが、 感電などの原因となります。 本製品に使用するアダプタなどの周辺機器は、 メーカーが指定し たものを使用してください。 火災、 やけど、 けが、 感電などの原因となります。 落下させる、 踏みつける、 投げつけるなど強い力や衝撃を与えな いでください。 火災、 やけど、 けが、 感電などの原因となります 充電/外部接続端子に導電性異物 (金属片、 鉛筆の芯など) を接 触させたり、 ほこりが内部に入ったりしないようにしてください。 火災、...
- Page 11 使用中、 充電中、 保管時に、 異臭、 異音、 発煙、 発熱、 変色、 変形な ど、 いままでと異なるときは次の作業を行ってください。 電源プラグをコンセン トから抜く。 • 本製品の電源を切る。 • 電池パックを本製品から取り外す。 • 上記の作業を行わないと、 火災、 やけど、 けが、 感電などの原因とな ります。 ぐらついた台の上や傾いた場所など、 不安定な場所には置かない でください。 落下して、 けがなどの原因となります。 湿気やほこりの多い場所や高温になる場所には、 保管しないでく ださい。 火災、 やけど、 感電などの原因となります。 子供が使用する場合は、 保護者が取り扱いの方法を教えてくださ い。 また、 使用中においても、 指示どおりに使用しているかをご確 認ください。...
- Page 12 本体の取り扱いについて 本製品内のmicroSIMカードやメモリーカード挿入口に水など の液体や金属片、 燃えやすいものなどの異物を入れないでくだ さい。 火災、 やけど、 けが、 感電などの原因となります。 航空機へのご搭乗にあたり、 本製品の電源を切るか、 機内モード に設定してください。 航空機内での使用については制限があるため、 各航空会社の指示 に従ってください。 航空機の電子機器に悪影響を及ぼす原因となります。 なお、 航空機内での使用において禁止行為をした場合、 法令により 罰せられることがあります。 病院での使用については、 各医療機関の指示に従ってください。 使用を禁止されている場所では、 本製品の電源を切ってください。 電子機器や医用電気機器に悪影響を及ぼす原因となります。 ハンズフリーに設定して通話する際や、 着信音が鳴っているとき などは、 必ず本製品を耳から離してください。 また、 イヤホンマイ クなどを本製品に装着し、 ゲームや音楽再生などをする場合は、 適度なボリュームに調節してください。 音量が大きすぎると難聴などの原因となります。 また、 周囲の音が聞こえにくいと、 事故の原因となります。 心臓の弱い方は、 着信バイブレータ (振動) や着信音量の設定に 注意してください。...
- Page 13 医用電気機器などを装着している場合は、 医用電気機器メーカー もしくは販売業者に、 電波による影響についてご確認の上ご使用 ください。 医用電気機器などに悪影響を及ぼす原因となります。 高精度な制御や微弱な信号を取り扱う電子機器の近くでは、 本製 品の電源を切ってください。 電子機器が誤動作するなどの悪影響を及ぼす原因となります。 ※ご注意いただきたい電子機器の例 補聴器、 植込み型心臓ペースメーカおよび植込み型除細動器、 そ の他の医用電気機器、 火災報知器、 自動 ドア、 その他の自動制御機 器など。 植込み型心臓ペースメーカおよび植込み型除細動器、 そ の他の医用電気機器をご使用される方は、 当該の各医用電気機器 メーカーもしくは販売業者に電波による影響についてご確認くだ さい。 万が一、 ディスプレイ部やカメラのレンズを破損した際には、 割れ たガラスや露出した本製品の内部にご注意ください。 ディスプレイ部やカメラのレンズの表面には、 プラスチックパネル を使用し、 ガラスが飛散りにくい構造となっておりますが、 誤って割 れた破損部や露出部に触れますと、 けがなどの原因となります。 本製品が破損したまま使用しないでください。 火災、 やけど、 けが、 感電などの原因となります。 モーションセンサーのご使用にあたっては、...
- Page 14 誤ってディスプレイを破損し、 内部の物質などが漏れた場合には、 顔や手などの皮膚につけないでください。 失明や皮膚に傷害を起こす原因となります。 内部の物質などが目や口に入った場合には、 すぐにきれいな水で洗 い流し、 直ちに医師の診療を受けてください。 また、 皮膚や衣類に付着した場合は、 すぐにアルコールなどで拭き 取り、 石鹸などで洗い流してください。 自動車内で使用する場合、 自動車メーカーもしくは販売業者に、 電波による影響についてご確認の上ご使用ください。 車種によっては、 まれに車載電子機器に悪影響を及ぼす原因となり ますので、 その場合は直ちに使用を中止してください。 お客様の体質や体調によっては、 かゆみ、 かぶれ、 湿疹などが生じ ることがあります。 異状が生じた場合は、 直ちに使用をやめ、 医師 の診療を受けてください。 本製品で使用している各部品の材質は次の通りです。 使用箇所 使用材質 表面処理 ディスプレイ アクリル ー フロン ト 外装 UVコーティング ケース...
- Page 15 ディスプレイを見る際は、 十分明るい場所で、 画面からある程度 の距離をとってご使用ください。 視力低下などの原因となります。 電池パックの取り扱いについて 電池パックのラベルに記載されている表示により、 電池の種類をご確認 ください。 表示 電池の種類 Li-ion00 リチウムイオン電池 端子に針金などの金属類を接触させないでください。 また、 金属 製ネックレスなどと一緒に持ち運んだり、 保管したりしないでく ださい。 電池パックの発火、 破裂、 発熱、 漏液により、 火災、 やけど、 けがなど の原因となります。 電池パックを本製品に取り付けるときは、 電池パックの向きを確か め、 うまく取り付けできない場合は、 無理に取り付けないでくださ い。 電池パックの発火、 破裂、 発熱、 漏液により、 火災、 やけど、 けがなど の原因となります。...
- Page 16 釘 (鋭利なもの) を刺したり、 ハンマー (硬いもの) で叩いたり、 踏み つけたりするなど過度な力を加えないでください。 電池パックの発火、 破裂、 発熱、 漏液により、 火災、 やけど、 けがなど の原因となります。 電池パック内部の液体などが目の中に入ったときは、 こすらず、 す ぐにきれいな水で洗った後、 直ちに医師の診療を受けてください。 失明などの原因となります。 異臭、 発熱、 変色、 変形などの異常が見られた場合は、 直ちに使用 をやめて火気から遠ざけてください。 電池パックの発火、 破裂、 発熱、 漏液により、 火災、 やけど、 けがなど の原因となります。 電池パックが漏液したり、 異臭がしたりするときは、 直ちに使用をや めて火気から遠ざけてください。 漏液した液体に引火し、...
- Page 17 電池パック内部の液体などが漏れた場合は、 顔や手などの皮膚に つけないでください。 失明や皮膚に傷害を起こす原因となります。 液体などが目や口に入った場合や、 皮膚や衣類に付着した場合は、 すぐにきれいな水で洗い流してください。 また、 目や口に入った場合は、 洗浄後直ちに医師の診療を受けてく ださい。 充電用機器の取り扱いについて アダプタやUSBケーブルのコードが傷んだら使用しないでくだ さい。 火災、 やけど、 感電などの原因となります。 ACアダプタは、 風呂場などの湿気の多い場所では使用しないで ください。 火災、 やけど、 感電などの原因となります。 雷が鳴り出したら、 アダプタには触れないでください。 感電などの原因となります。 コンセン トにつないだ状態で充電端子をショートさせないでくだ さい。 また、 充電端子に手や指など、 身体の一部を触れさせない でください。 火災、 やけど、 感電などの原因となります。 アダプタやUSBケーブルのコードの上に重いものをのせないで ください。 火災、 やけど、 感電などの原因となります。 安全...
- Page 18 コンセン トにACアダプタを抜き差しするときは、 金属製ストラッ プなどの金属類を接触させないでください。 火災、 やけど、 感電などの原因となります。 ACアダプタに海外旅行用の変圧器 (トラベルコンバーター) を使 用しないでください。 発火、 発熱、 感電などの原因となります。 本製品にUSBケーブルを接続した状態で、 接続部に無理な力を 加えないでください。 火災、 やけど、 けが、 感電などの原因となります。 濡れた手でアダプタやUSBケーブルのコード、 電源プラグに触れ ないでください。 火災、 やけど、 感電などの原因となります。 指定の電源、 電圧で使用してください。 また、 海外で充電する場合も、 メーカーが指定したACアダプタで 充電してください。 誤った電源、 電圧で使用すると火災、 やけど、 感電などの原因とな ります。 ACアダプタ : AC100V~240V (家庭用交流コンセン トのみに接 続すること)...
- Page 19 電源プラグをコンセン トから抜く場合は、 アダプタやUSBケーブ ルのコードを引っ張るなど無理な力を加えず、 アダプタを持って 抜いてください。 アダプタやUSBケーブルのコー ドを引っ張るとコー ドが傷つき、 火 災、 やけど、 感電などの原因となります。 本製品にUSBケーブルを抜き差しする場合は、 コードを引っ張る など無理な力を加えず、 接続する端子に対してまっすぐ抜き差し してください。 正しく抜き差ししないと、 火災、 やけど、 けが、 感電などの原因とな ります。 使用しない場合は、 アダプタの電源プラグをコンセン トから抜い てください。 電源プラグを差したまま放置すると、 火災、 やけど、 感電などの原因 となります。 万が一、 水などの液体 (飲料水、 汗、 海水、 ペッ トの尿など) が入っ た場合は、...
- Page 20 microSIMカードの取り扱いについて microSIMカードを取り扱う際は切断面にご注意ください。 けがなどの原因となります。 医用電気機器近くでの取り扱いについて 植込み型心臓ペースメーカおよび植込み型除細動器などの医用 電気機器を装着されている場合は、 装着部から本端末を15cm 以上離して携行および使用してください。 電波により医用電気機器の作動に悪影響を及ぼす原因となりま す。 自宅療養などにより医療機関の外で、 植込み型心臓ペースメーカ および植込み型除細動器以外の医用電気機器を使用される場合 には、 電波による影響について個別に医用電気機器メーカーなど にご確認ください。 電波により医用電気機器の作動に悪影響を及ぼす原因となりま す。 身動きが自由に取れないなど、 周囲の方と15cm未満に近づく恐 れがある場合には、 事前に本製品を電波の出ない状態に切り替え てください (機内モードまたは電源オフなど) 。 付近に植込み型心臓ペースメーカおよび植込み型除細動器などの 医用電気機器を装着している方がいる可能性があります。 電波に より医用電気機器の作動に悪影響を及ぼす原因となります。 医療機関内における本製品の使用については、 各医療機関の指 示に従ってください。 安全...
- Page 21 取り扱い上のご注意 共通のお願い 改造された本製品は絶対に使用しないでください。 改造した機 器を使用した場合は電波法/電気通信事業法に抵触します。 本製品は電波法に基づく特定無線設備の技術基準適合証明等に関する 規則、 および電気通信事業法に基づく端末機器の技術基準適合認定等 に関する規則を順守しており、 その証として 「技適マーク 」 が本製品 の銘板シールに表示されております。 本製品のネジを外して内部の改造 を行った場合、 技術基準適合証明などが無効となります。 技術基準適合証明などが無効となった状態で使用すると、 電波法および 電気通信事業法に抵触しますので、 絶対に使用されないようにお願い致 します。 雷が鳴り出したら、 本製品の使用を中止して、 USBケーブルと 充電器をコンセン トから抜いてください。 落雷により、 深刻な障害や火災が発生する恐れがあります。 自動車、 原動機付自転車、 自転車運転中は非常に危険ですので、 本製品を操作したり、 電話番号の検索など、 本製品を使用しない でください。 やむを得ない場合はマイクまたはハンズフリーカー キッ トを使用したり、 車を止めた後ご利用ください。 自動車用のエアバッグ近くに本製品を置いたり、...
- Page 22 お手入れは乾いた柔らかい布 (めがね拭きなど) で拭いてくださ い。 乾いた布などで強く擦ると、 ディスプレイに傷がつく場合があります。 • ディスプレイに水滴や汚れなどが付着したまま放置すると、 シミにな • ることがあります。 アルコール、 シンナー、 ベンジン、 洗剤などで拭くと、 印刷が消えたり、 • 色があせたりすることがあります。 端子は時々乾いた綿棒などで清掃してください。 端子が汚れていると接触が悪くなり、 電源が切れたり充電不十分の原因 となったり しますので、 端子を乾いた綿棒などで拭いてください。 また、 清掃する際には端子の破損に十分ご注意ください。 エアコンの吹き出し口の近くに置かないでください。 急激な温度の変化により結露し、 内部が腐食し故障の原因となります。 本体などに無理な力がかからないように使用してください。 多くのものが詰まった荷物の中に入れたり、 衣類のポケッ トに入れて座っ たりするとディスプレイ、 内部基板、 電池パックなどの破損、 故障の原因と なります。 また、 外部接続機器を充電/外部接続端子、 イヤホンマイク端 子に差した状態の場合、...
- Page 23 本体についてのお願い 本製品に色を塗る場合、 外観や画面が破損する原因となります。 外観の塗料が剥がれたり本製品の材質に応じてアレルギー反応 がある場合は直ちに使用を止め、 医師の診療を受けてください。 製品の故障修理やソフ トウェアのアップデート時、 やむを得ない 場合、 本製品に保存された主な内容は消去される場合もありま すので、 重要な電話番号などはあらかじめメモしておいてくだ さい。 データの損失による被害は、 責任を負いかねますので、 あらかじ めご了承ください。 キャラクター/写真/動画などが初期化される場合もあります。 タッチスクリーンの表面を強く押したり、 爪やボールペン、 ピン など先の尖ったもので操作したりしないでください。 タッチスクリーンが破損する原因となります。 極端な高温、 低温は避けてください。 温度は 5℃~ 35℃、 湿度は 45% ~ 85%の範囲でご使用ください。 一般の電話機やテレビ ・ ラジオなどをお使いになっている近くで 使用すると、 悪影響を及ぼす原因となりますので、 なるべく離れ た場所でご使用ください。 安全...
- Page 24 お客様ご自身で本製品に登録された情報内容は、 別にメモを取 るなどして保管してくださるようお願いします。 万が一登録された情報内容が消失してしまうことがあっても、 当社として は責任を負いかねますのであらかじめご了承ください。 本製品を落としたり、 衝撃を与えたりしないでください。 故障、 破損の原因となります。 充電/外部接続端子やイヤホンマイク端子に外部接続機器を接 続する際に斜めに差したり、 差した状態で引っ張ったりしないで ください。 故障、 破損の原因となります。 使用中、 充電中、 本製品は温かくなりますが、 異常ではありませ ん。 そのままご使用ください。 カメラを直射日光の当たる場所に放置しないでください。 レンズの集光作用により、 発火・破裂・火災などの原因となります。 また、 素子の退色 ・ 焼付きを起こす場合があります。 磁気カードなどを本製品に近づけないでください。 キャ ッシュカー ド、 クレジッ トカー ド、 テレホンカー ド、 フロッピーディスクな どの磁気データが消えてしまうことがあります。 本製品に磁気を帯びたものを近づけないでください。 強い磁気を近づけると誤動作の原因となります。...
- Page 25 電池パックの使用時間は、 使用環境や電池パックの劣化度により 異なります。 電池パックの使用条件により、 寿命が近づくにつれて電池パック が膨れる場合がありますが問題ありません。 電池パックを保管される場合は、 次の点にご注意ください。 フル充電状態 (充電完了後すぐの状態) での保管 • 電池残量なしの状態 (本製品の電源が入らない程消費している状態) • での保管 電池パックの性能や寿命を低下させる原因となります。 保管に適した電池残量は、 目安として電池残量が40パーセン ト程度の状 態をおすすめします。 充電用機器についてのお願い 充電は、 適正な周囲温度 (5℃~35℃) の場所で行ってください。 次のような場所では、 充電しないでください。 湿気、 ほこり、 振動の多い場所 • 一般の電話機やテレビ ・ ラジオなどの近く • 充電中、 アダプタが温かくなることがありますが、 異常ではあり ません。 そのままご使用ください。 強い衝撃を与えないでください。...
- Page 26 Bluetooth 機能を使用する場合のお願い ® 本製品は、 Bluetooth 機能を使用した通信時のセキュリティとし ® て、 Bluetooth 標準規格に準拠したセキュリティ機能に対応しており ® ますが、 設定内容などによってセキュリティが十分でない場合がありま す。 Bluetooth 機能を使用した通信を行う際にはご注意ください。 ® Bluetooth 機能を使用した通信時にデータや情報の漏洩が発生しまし ® ても、 責任を負いかねますので、 あらかじめご了承ください。 周波数帯について 本製品のBluetooth 機能/無線LAN機能が使用する周波数帯 ® は、 2.4GHz帯の周波数を使用します。 2.4FH1/ DS4 / OF4 2.4 : 2400MHz帯を使用する無線設備を表します。 FH/DS/OF : 変調方式がFH-SS、 DS-SS、 OFDM であることを示し ます。...
- Page 27 2. 万 が一、 本製品と 「他の無線局」 との間に電波干渉が発生した場合に は、 速やかに使用場所を変えるか、 「 電源を切る」 など電波干渉を避 けてください。 3. そ の他、 ご不明な点につきましては、 J : COMカスタマーセンターま でお問い合わせください。 Bluetooth ワー ドマークおよびロゴは、 Bluetooth SIG, Inc.が保 ® ® • 有する登録商標であり、 LG Electronics Inc.は、 これら商標を使用 する許可を受けています。 Wi-Fi 、 Wi-Fi Direct はWi-Fi Alliance の登録商標です。 ® ® ® • 無線LAN (WLAN) についてのお願い...
- Page 28 かご利用を中断していただいた上で、 J : COMカスタマーセンターま でお問い合わせいただき、 混信回避のための処置など (例えば、 パ ーティションの設置など) についてご相談ください。 3. そ の他、 この機器から移動体識別用の特定小電力無線局あるいはア マチュア無線局に対して電波干渉の事例が発生した場合など何かお 困りのことが起きたときは、 J : COMカスタマーセンターまでお問い 合わせください。 携帯電話機の比吸収率 (SAR) について この機種 【LG Wine Smart LGS01】 の携帯電話機は、 国が定めた電 波の人体吸収に関する技術基準および電波防護の国際ガイ ドラインに適 合しています。 この携帯電話機は、 国が定めた電波の人体吸収に関する技術基準 な ※ らびに、 これと同等な国際ガイ ドラインが推奨する電波防護の許容値を 遵守するよう設計されています。 この国際ガイ ドラインは世界保健機関...
- Page 29 国の技術基準および国際ガイ ドラインは電波防護の許容値を人体に吸 収される電波の平均エネルギー量を表す比吸収率 (SAR : Specific Absorption Rate) で定めており、携帯電話機に対するSARの許容値は 2.0W/kgです。 この携帯電話機の側頭部におけるSARの最大値は 0.121W/kg、 身体に装着した場合のSARの最大値は0.691W/kgで す。 個々の製品によってSARに多少の差異が生じることもありますが、 い ずれも許容値を満足しています。 携帯電話機は、 携帯電話基地局との通信に必要な最低限の送信電力に なるよう設計されているため、 実際に通話等を行っている状態では、 通常 SARはより小さい値となります。 一般的には、 基地局からの距離が近いほ ど、 携帯電話機の出力は小さくなります。 この携帯電話機は、 側頭部以外の位置でも使用可能です。 キャリングケー ス等のアクセサリをご使用するなどして、 身体から1.5センチ以上離し、 か つその間に金属 (部分) が含まれないようにしてください。 このことにより、 本携帯電話機が国の技術基準および電波防護の国際ガ イ ドラインに適合していることを確認しています。 世界保健機関は、 『 携帯電話が潜在的な健康リスクをもたらすかどうかを 評価するために、...
- Page 30 SARについて、 さらに詳しい情報をお知りになりたい方は、 次のホーム ページをご参照ください。 ○総務省のホームページ : http://www.tele.soumu.go.jp/j/ele/index.htm ○一般社団法人電波産業会のホームページ : http://www.arib-emf.org/01denpa/denpa02-02.html ○LG Electronics Inc.ホームページ : 本製品の 「仕様」 のページをご確認ください。 http://www.lg.com/jp/mobile-phone (URLは予告なく変更される場合があります。 ) ※ 技 術基準については、 電波法関連省令 (無線設備規則第14条の2) で 規定されています。 オープンソースソフ トウェア通知情報 本製品に搭載されているGPL、 LGPL、 MPL、 およびその他のオープ ンソースのライセンスのもとで開発されたソースコー ドを取得するに は、 http://opensource.lge.com をご参照ください。 ソースコー ドを はじめ、 該当するすべてのライセンスの内容や著作権の表示、 保障責任...
- Page 31 重要な注意事項 本製品を使い始める前に必ずお読みください 本製品に関するお問い合わせをいただく前に、 現在生じている問題がこ こで説明されているかどうかご確認ください。 1. 本製品のメモリ 本製品では、 使用可能なメモリの空き容量が10MB未満になると、 新しい メッセージを受信できなくなります。 メッセージの受信ができないなどの 場合、 アプリやメッセージなどのデータを一部削除し、 メモリの空き容量 を確保してください。 アプリのアンインス トール → → 「すべての設定を表示」 → 「アプリ」 インス トールされているアプリが表示されます。 「すべて」 タブを選択 アンインス トールするアプリを選択 「アンインス トール」 2. 電池パック寿命の最適化 必要のないバックグラウン ド機能の設定をオフにすることで、 電池パック の寿命を延ばすことができます。 また、 アプリやシステムが電池パックの 電力をどのように消費しているかを監視できます。 本製品の電池パック寿命を延ばすには...
- Page 32 Gmail、 カレンダー、 連絡先、 およびその他のアプリの自動同期の設 • 定をオフにします。 ダウンロー ドしたアプリによっては、 電池を消費する場合があります。 • ダウンロー ドしたアプリをお使いの間、 電池残量レベルに注意してく • ださい。 3. オープンソースのアプリやOSをインストールする前に 警告 製造元提供以外のOSをインストールして使用した場合、本製品が故障す • るおそれがあります。さらに、保証の対象外となります。 本製品と個人データを保護するため、アプリはGoogle Playなどの信頼 • できる提供元からのみダウンロードしてください。誤った方法でアプリを インストールすると、本製品が正常に動作しなかったり、深刻なエラーが 発生したりするおそれがあります。そのようなアプリとすべての関連デー タ、設定は、本製品からアンインストールする必要があります。 4. 起動しているアプリを切り替える Androidではマルチタスク操作が簡単にできます。 マルチタスク操作と は、 2つ以上のアプリを同時に実行することです。 1つのアプリを終了して から別のアプリを開く必要はなく、 同時に立ち上げている複数のアプリを 切り替えて使用できます。 Androidはそれぞれのアプリを管理し、 必要に 応じて起動/停止しながら、 アイ ドル状態の (使用されていない) アプリが 不必要にリソースを消費しないように調整します。...
- Page 33 5. 画面がフリーズした場合 画面がフリーズしたり、 操作中に応答しなくなったり した場合は、 電池パッ クをいったん取り外してから再度取り付けてください。 その後、 もう一度 本製品の電源を入れてください。 重要な注意事項...
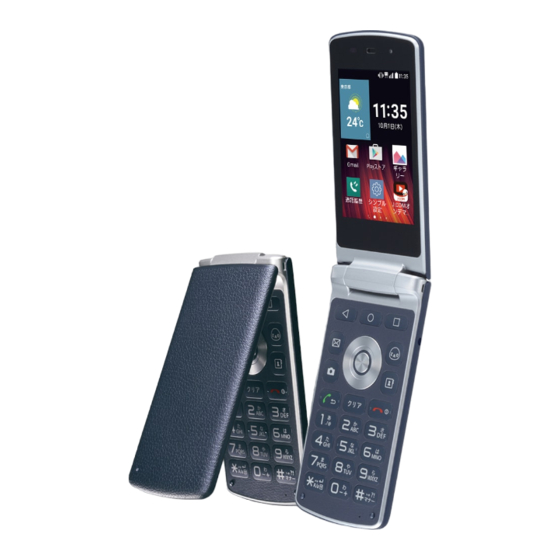
- Page 34 ご利用の準備 各部の名称 近接センサー フロン トカメラ 通知LED 受話口 タッチスクリーン ホームキー メインカメラ 履歴キー 戻るキー ざっく ぅキー メッセージキー 音量キー カメラキー 連絡先キー スピーカー 電源/終了キー 開始キー イヤホン ナビ (方向) キー クリアキー ジャ ック OKキー 充電/外部接 マイク 続端子 メモ デザイン上の理由により、スピーカーの穴は2個あります。ただし、実際 • に音が出るスピーカーは1つだけです。不良品ではありませんのでご了承 ください。 本製品は折りたたみ式であり、開いたときに特定の角度で止まるよう設計 • されています。 ご利用の準備...
- Page 35 戻る 前の画面に戻ります。 また、 メニュー、 ダイアログボック キー ス、 スクリーンキーボー ドなどといったポップアップを 閉じます。 ホーム ホーム画面に戻ります。 キー 履歴 最近使ったアプリが表示されます。 長押しすると、 アプ キー リ画面が表示されます。 短く押すと設定したアプリをショー トカッ トして起動する ざ っく ぅ ことができます。 初期設定はインターネッ トです。 キー 長押しすると、 起動するアプリを変更することができま す。 ※ 「ざっく ぅ」 はケーブルインターネッ トZAQのキャラク ターです。 長押しすると、 電源のON/OFFができます。 電源/終...
- Page 36 ソフ トキーとハードキーの対応 画面下部には、 表示中の画面でできる操作がソフ トキーとして表示され ます。 ソフ トキーの内容を実行するには、 対応する次のキーを押して操作 します。 ソフ トキーの表示は、 機能や表示状況によって異なります。 • 絵·記·顔 メニュー あ 編集 メモ 特定のウェブサイトやアプリ、設定には、ハードキー(OKキーやナビ(方 向)キーなど)またはソフトキー(タッチスクリーン)のいずれかでしか操 作できないものがあります。 ご利用の準備...
- Page 37 microSIMカードの挿入、 および電池パックの取り付け microSIMカー ドと、 同梱の電池パックを挿入します。 リアカバーを取り外す 片方の手で本製品をしっかり持ち、 図の位置にもう片方の指先をひっ かけて、 引き上げるようにリアカバーを取り外してください。 メモ リアカバーを取り外す際、必要以上に力を入れないでください。けがや故 障の原因となる場合があります。また、爪が長い方は爪を傷める可能性が ありますのでご注意ください。 電池パックを取り外す ご利用の準備...
- Page 38 microSIMカー ドを、 図のmicroSIMカー ドスロッ トに挿入する microSIMカー ドの金属 (IC) 面を下向きにしてください。 警告 本製品では、microSIMカードのみご使用になれます。 • 本製品を正しくお使いいただくために、当社指定のmicroSIMカードをご • 使用ください。模倣品や偽造品は使わないでください。 microSIMカードスロットにメモリーカードを挿入しないでください。 • もし誤ってメモリーカードがmicroSIMカードスロットから取り外せな くなってしまった場合は、J:COMカスタマーセンターまでお問い合わせ ください。 ご利用の準備...
- Page 39 電池パックを図のように取り付ける リアカバーを の方向に押し付けながら、 カチッと音がするまで の方向にしっかりと押して閉じる ご利用の準備...
- Page 40 充電する 本製品を初めて使用する前には、 電池パックを充電してください。 電池 パックはACアダプタを使って充電します。 また、 本製品とパソコンを USBケーブルで接続することで、 充電することもできます。 警告 当社指定のACアダプタ、電池パック、ケーブルをお使いください。指定外 のACアダプタ、電池パック、ケーブルを使った場合、充電が遅くなった り、場合によっては、電池パックの破裂や本製品の故障の原因になること もあります。指定外のものを使って生じた故障については、保証の対象外 となります。 充電/外部接続端子は本製品の底部にあります。 USBケーブルを充電/ 外部接続端子とACアダプタに接続し、 ACアダプタをコンセン トに差し込 みます。 メモ 充電中にリアカバーを取り外さないでください。 • 充電が終わったら充電器の不要な電力消費を避けるため、充電器は必ずコ • ンセントから外してください。 ご利用の準備...
-
Page 41: Microsdカードを挿入する
microSDカードを挿入する 本製品は最大32GBのmicroSDカードに対応しています。 microSD カードのメーカーや種類によっては、 本製品と互換性がない場合があり ます。 警告 microSDカードによっては、本製品と互換性がない場合があります。互換 性のないmicroSDカードを使うと、本製品またはmicroSDカードが損傷し たり、データが壊れたりする場合があります。 メモ データの書き込みや消去を頻繁に行うと、microSDカードの寿命が短くな ります。 リアカバーを取り外す 金色の金属面を下向きにしてmicroSDカー ドを挿入する リアカバーを元のように取り付ける ご利用の準備... -
Page 42: Microsdカードを取り外す
microSDカードを取り外す microSDカー ドを取り外す前に、 「 マウン ト解除」 の操作を行って、 安全に 取り外せるようにします。 → → 「すべての設定を表示」 → 「ス トレージ」 → 「SDカー ドのマウン ト解除」 リアカバーを取り外し、 microSDカー ドを引き出す 警告 データの転送またはアクセス中は、microSDカードを取り外さないでくださ い。データの消失や破損、または本製品やmicroSDカードの損傷の原因に なります。損傷したmicroSDカードの誤った使用を原因とする損失(デー タの消失を含む)について当社は責任を負いかねますので、あらかじめご了 承ください。 画面のロック方法を変更する 画面のロック方法を変更して、 他人が情報にアクセスする行為を防ぐこと ができます。 → → 「すべての設定を表示」 → 「画面のロック」 → 「画面 ロックを選択」 ロック方法として... - Page 43 ホーム画面 タッチスクリーンの操作方法 タッチスクリーンでは、 以下の操作ができます。 タップ (タッチ) – タッチスクリーンを指で軽く触れることをタップと • いいます。 主にアイテムやリンク、 ショー トカッ ト、 スクリーンキーボー ドの選択に用います。 ロングタッチ – アイテムを指でしばらく押し続けることをロングタッ • チといいます。 アイテムによってメニューなどが表示されます。 ドラッグ – アイテムを指でしばらく押し続け、 指を離さずに画面上の • 目的の位置まで動かすことを ドラッグといいます。 ホーム画面のアイ テムを ドラッグすると、 位置を動かすことができます。 スワイプ (スライ ド) – タッチスクリーンを指ですばやく上下または左 • 右になぞることをスワイプといいます。 通知パネルの表示やページの 切り替えなどに用います。 ダブルタップ – タッチスクリーンを短い間隔で2回タップすることを • ダブルタップといいます。 地図を表示中にダブルタップするとズーム アップします。...
-
Page 44: Easyホーム画面
easyホーム画面 easyホーム画面は、 多くのアプリや機能の起点となる画面です。 「ホーム画面」 に比べ、 シンプルなレイアウ トと大きなフォン トサイズが特 徴で、 初めてご使用になる方にも使いやすいものとなっております。 を押すことで、 いつでもeasyホーム画面に戻ることができます。 ステータスバー ウィジェ ッ ト アプリアイコン クイックボタンエリア 時刻、 電波強度、 バッテリー残量、 通知アイコンなど、 本製品のステー タス情報を表示します。 ウィジェ ッ トは、 ホーム画面から直接操作できる、 独立したアプリで す。 easyホーム画面では、 デフォル トのウィジェ ッ ト以外は設定でき ません。 アイコンをタップすると、 アプリが起動します (easyホーム画面では、 フォルダの作成はできません) 。 ホーム画面からワンタッチで機能にアクセスできます。... - Page 45 ホーム画面 ホーム画面は、 多くのアプリや機能の起点となる画面です。 ホーム画面にアプリのショー トカッ トやウィジェ ッ トを追加して、 情報やアプ リにすばやくアクセスできます。 を押すことで、 いつでもホーム画面に戻ることができます。 ステータスバー ウィジェ ッ ト アプリ/フォルダアイコン クイックボタンエリア 時刻、 電波強度、 バッテリー残量、 通知アイコンなど、 本製品のステー タス情報を表示します。 ウィジェ ッ トは、 ホーム画面から直接操作できる、 独立したアプリです。 ショー トカッ トとは異なり、 ウィジェ ッ トは画面上のアプリとして機能し ます。 アイコン (アプリ、 フォルダなど) をタップすると、 アプリが起動します ( フォルダの場合、...
- Page 46 ホーム画面のカスタマイズ アプリやウィジェ ッ トを追加したり、 壁紙を変更するなど、 ホーム画面をカ スタマイズできます。 ホーム画面にアイテムを追加する → 「アプリ」 タブまたは 「ウィジェ ッ ト」 タブ アイテムをロングタッチし、 目的の位置まで ドラッグして指を離す ヒント 壁紙を変更するには、ホーム画面の何もないところをロングタッチしま す。「壁紙を選択」メニューが表示されるので、項目を選択してくださ い。 メモ 本書の操作説明は「ホーム画面」を元としております。「easyホーム画 • 面」とは動作に差異があります。 が表示されません。 の部分はeasyホー easyホーム画面では • ム画面を右にスワイプして をタップすることで、 同様 の画面が表示されます (easyホーム画面では 「ウィジェ ッ ト」 タブはあ りません)...
- Page 47 クイックボタンエリアにアプリを追加する アプリ画面またはホーム画面で、 アプリのアイコンをロングタッチし、 • クイックボタンエリアに ドラッグして、 目的の位置で指を離す メモ クイックボタンエリアには、最大4個のアプリを配置できます。 クイックボタンエリアからアプリを削除する 削除したいアプリをロングタッチし、 に ドラッグ • メモ アプリボタン は削除できません。 ホーム画面のアプリアイコンをカスタマイズする アプリアイコンをロングタッチ アプリアイコンの右上隅に編集アイコン が表示されればカスタマ イズが可能となります。 が表示されている状態のアプリアイコンを再度タップ アイコンのデザインやサイズを変更できます。 「OK」 変更した設定が保存されます。 最近使ったアプリを起動する 最近使ったアプリのリス トが表示されます アプリのプレビューをタップして、 アプリを開く - または - を押して、 元の画面に戻る ホーム画面...
- Page 48 通知パネル 本製品には、 新着メッセージ、 カレンダーの予定、 アラーム、 現在処理中の イベン ト (通話中) などをお知らせする通知機能があります。 通知が届くと、 画面上部のステータスバー (下図参照) にアイコンが表示 されます。 未処理の通知のアイコンが左側に、 Wi-Fi やバッテリー残量 ® などのステータス情報のアイコンが右側に表示されます。 未処理の ステータス 通知 情報 ホーム画面...
- Page 49 通知パネルを開く 通知パネルを開くには、 ステータスバーを下向きにスワイプします。 通知 パネルを閉じるには、 通知パネルを上向きにスワイプするか、 を押 します。 クイック設定エリア 通知 消去 タップすることで、 機能のオン/オフを切り替えられます。 機能の設定 メニューを直接表示するには、 目的のボタンをロングタッチします。 他のボタンを表示したい場合は、 左または右にスワイプしてください。 クイック設定ボタンの削除、 追加、 または並べ替えを行うには、 を タップします。 簡単な説明文とあわせて通知が表示されます。 通知をタップすると内 容を確認できます。 タップすると、 すべての通知を消去できます。 ステータスバーのインジケーターアイコン インジケーターアイコンが画面上部のステータスバーに表示され、 不在 着信、 新着メッセージ、 カレンダーの予定、 本製品のステータスなどをお 知らせします。 ホーム画面...
- Page 50 画面上部に表示されるアイコンによって、 本製品の状態がわかります。 主 なアイコンを以下の表に示します。 アイコン 説明 アイコン 説明 SIMカー ド未挿入 音楽再生中 鳴動しない (アラーム ネッ トワーク信号なし 含む) 機内モー ドオン バイブレー トのみ Wi-Fiネッ トワーク接 非充電状態 続中 有線ヘッ ドセッ ト接 充電中 続中 通話中 USB経由でPCに接続中 不在着信あり データのダウンロー ド中 Bluetoothオン データのアップロー ド中 システム警告 位置検索中 アラーム設定中 データ同期中...
- Page 51 メモ ステータスバーのアイコンの位置は、機能やサービスによって異なる場合 があります。 スクリーンショ ッ トのキャプチャ 「音量キー」 の下部分と 「電源/終了キー」 を同時に2秒以上長押しする と、 スクリーンショ ッ トをキャプチャできます。 スクリーンキーボード 本製品には、 タッチスクリーンをタップして文字を入力できる機能があり ます。 この入力機能をスクリーンキーボー ドといいます。 画面上のテキス ト入力欄をタップすると、 スクリーンキーボー ドが表示されます。 スクリーンキーボー ドで文字を入力する 前の文字を削除 Google音声入力を 使用します。 します。 テキス トカーソルを テキス トカーソルを 右に移動します。 左に移動します。 絵文字や顔文字を スペースを挿入 入力します。 します。 キーパッ...
- Page 52 特別な機能 ジェスチャーショ ッ ト ジェスチャーショ ッ ト機能を使って、 手のジェスチャーによりフロン トカメラ で写真を撮ることができます。 写真を撮るには ジェスチャーショ ッ ト機能には2通りの使い方があります。 カメラを起動中、 開いた手を上げると、 フロン トカメラが手を検出し • て画面にボックスが表示されます。 次に、 手を閉じてグーを作るとタ イマーがカウン トを開始し、 ゼロと同時に撮影されます。 - または - 閉じた手を上げると、 フロン トカメラが手を検出して画面にボックスが • 表示されます。 次に、 手を開くとタイマーがカウン トを開始し、 ゼロと 同時に撮影されます。 - または - 特別な機能...
-
Page 53: Googleアカウン トを設定する
Googleアカウントを設定する 本製品で最初にGoogleアプリを開くと、 お持ちのGoogleアカウン トで ログインするよう求められます。 Googleアカウン トをお持ちでない場合 は、 新しいアカウン トを作成してご利用ください。 Googleアカウン トを作成する → → 「すべての設定を表示」 → 「アカウン トと同期」 「アカウン トを追加」 → 「Google」 「または新しいアカウン トを作成」 案内に従ってアカウン トに関する情報を入力してアカウン トを作成し てください。 Googleアカウン トにログインする → → 「すべての設定を表示」 → 「アカウン トと同期」 「アカウン トを追加」 → 「Google」 メールア... - Page 54 Googleにログインすると、 Gmail、 連絡先、 Googleカレンダーなど のGoogleサービスと同期されます。 また、 Googleマップを使った り、 Google Playからアプリをダウンロー ドしたり、 Googleサーバーに設 定をバックアップしたり、 その他の各種Googleサービスを活用できます。 重要 初期設定の際にGoogleアカウントにログインしなかった場合、Gmailや • Google Playなどのアカウントを必要とするアプリを最初に起動したときに Googleアカウントのログインまたは作成を求められます。 会社などの組織の法人アカウントをお持ちの場合、IT部門からアカウントへ • のログイン方法に関する特別な案内が提供される場合があります。 特別な機能...
-
Page 55: Wi-Fi
ネッ トワークおよびデバイスへの接続 Wi-Fi 無線アクセスポイン ト (AP) の範囲内にいる間は、 高速なインターネッ トア クセスを利用できます。 Wi-Fiネッ トワークに接続する → → 「WI-FI」 下の 「ON」 Wi-Fi 機能がオンになり、 利用可能なWI-FIネッ トワークのスキャンが ® 開始されます。 接続したいネッ トワークをタップ ネッ トワークがセキュリティで保護されている場合 (鍵のアイコンが表 示) 、 セキュリティキーまたはパスワー ドを入力する必要があります。 「接続」 接続に成功すると、 ステータスバーにWi-Fi 接続を示すアイコンが表 ® 示されます。 メモ Wi-Fi の接続範囲外にいる場合、またはWi-Fi 機能をオフにしている場... -
Page 56: Bluetooth
Bluetooth Bluetooth は、 ヘッ ドセッ ト、 車載ハンズフリーキッ ト、 モバイル端 ® 末、 PC、 プリンター、 無線デバイスなどさまざまなBluetooth 対応デバ ® イスと接続できる、 短距離通信の規格です。 メモ Bluetooth 機能によって送受信したデータの損失、傍受、または誤った使用 ® • について、当社は責任を負いかねますので、あらかじめご了承ください。 データのやりとりは必ず、信頼できるセキュリティ保護されたデバイスと • の間で行ってください。 デバイスとの間に障害物があると、通信距離が短くなることがあります。 • 一部のデバイス、特にBluetooth SIG, Inc. のテストや承認を受けていな • いものは、本製品との互換性がない場合があります。 他のBluetooth 対応デバイスと接続 (ペアリング) する ® → → 「すべての設定を表示」 Bluetoothの... - Page 57 Bluetooth 経由でデータを送信する ® 連絡先やメディアファイルなどのファイルまたはアイテムを選択 Bluetooth 経由で送信するオプションを選択 ® Bluetooth 対応デバイスを検索してペアリング ® メモ Bluetooth 対応デバイスの仕様や機能はさまざまであるため、表示や操作 ® が異なる場合があります。また、Bluetooth 対応デバイスによっては、転 ® 送や交換などの機能を利用できない場合があります。 Bluetooth 経由でデータを受信する ® → → 「すべての設定を表示」 Bluetoothの をタップしてBluetooth 機能をオンにする ® 送信元デバイスから、 ペアリングの受け入れを求めるリクエス トが届 いたら、 「 ペアリング」 Wi-Fi Direct Wi-Fi Direct では、 アクセスポイン トを必要とせずに、 Wi-Fi 対応デバイ...
- Page 58 PCと本製品の間でデータをやりとりする PCと本製品の間でデータをコピーまたは移動できます。 データのやりとり 付属のUSBケーブルを使って、 本製品をPCに接続する 通知パネルを開き、 通知欄に表示される 「メディアデバイス (MTP) 」 を選択 接続の目的を選択 選択した目的に応じたウィン ドウがPC画面上にポップアップ表示さ れ、 目的のデータをやりとりできるようになります。 メモ 本製品を検出するには、LG United Mobile DriverをPCにインストールす • る必要があります。 メディアデバイス(MTP)の使用の要件を確認してください。 • 項目 要件 Microsoft Windows XP SP3, Vista またはそれ以降 Windows Media Windows Media Player 10 以降 Player バージョン ネッ トワークおよびデバイスへの接続...
- Page 59 電話 電話をかける ダイヤルキーを押して電話番号を入力 番号を1桁削除するには、 を押してください。 通話を終了するには、 ヒント 国際電話をかけるときなど「+」を入力したい場合は、 を長押しして ください。 連絡先に電話をかける → 連絡先が開きます。 電話をかけたい連絡先をスクロールして探し、 タップ 「連絡先を検索」 欄に連絡先を入力して探すこともできます。 「電話」 下の番号をタップ 電話に出る、 電話を拒否する 着信した電話に出るには、 を押します。 • を1回押すとサイレン トモー ド (電話には出ていない状況で、 通知 • 音、 バイブレーシ ョ ンがならない状況) 、 2回押すと応答を拒否します。 メモ 発信元に電話に出られない旨のメッセージを送るには、「応答拒否メッセー ジ」をタップし、流したいメッセージをタップします。 電話...
- Page 60 2番目の電話をかける 最初の通話中に、 → 「別の通話を追加」 をタップし、 番号を入力 通話画面に両方の通話が表示されます。 最初の通話はロックされ、 保 留されます。 を押して、 2つの通話を切り替える → 「グループ通話」 をタップすると、 会議のように3者間で通話が できるようになります。 すべての通話を終了するには、 メモ それぞれの通話に対して通話料がかかります。 通話履歴を見る → 発信、 着信、 不在着信のリス トを確認する ヒント 通話履歴をタップすると、通話の日付、時間、通話時間を確認できます。 • 記録された項目をすべて削除するには、 → 「すべて削除」をタップ • します。 電話...
- Page 61 連絡先 本製品では、 連絡先を追加したり、 Googleアカウン トや連絡先の同期に 対応したその他のアカウン トと連絡先情報を同期することができます。 連絡先を検索する → 「連絡先を検索」 をタップし、 連絡先をキーボー ドで入力 新しい連絡先を追加する を押して、 新しい連絡先の番号を入力 → 「連絡先に追加」 → 「連絡先を新規登録」 画像を追加する場合は、 画像アイコンをタップし、 「 写真を撮影」 または 「アルバムから選択」 を選択します。 連絡先の各種情報を入力 「保存」 お気に入りの連絡先 よく使う連絡先を 「お気に入り」 に登録できます。 連絡先をお気に入りに追加する → お気に入りに登録したい連絡先をタップ 画面右上の星をタップ 星が黄色になり、 お気に入りに登録されます。 連絡先...
- Page 62 連絡先をお気に入りから削除する → 対象の連絡先をタップ 画面右上の星をタップ 星が白になり、 お気に入りから削除されます。 グループを作成する → → 「グループ」 タブを選択 → 「新しいグループ」 グループ名を入力し、 グループ着信音を選択 「メンバー追加」 → グループに入れたい連絡先を選択 → 「追加」 「保存」 メモ グループを削除しても、そのグループに割り当てられた連絡先は削除され ず、連絡先リストに残ります。 連絡先...
- Page 63 メッセージ 本製品では、 SMS (テキス トメッセージ) でメッセージを送受信できます。 メッセージを送信する → → 「新規作成」 連絡先の名前または電話番号を 「To」 欄に入力 連絡先名の入力を進めると、 一致する連絡先候補が表示されます。 メモ テキストメッセージの送信ごとに課金される場合があります。詳しくは J:COMカスタマーセンターにお問い合わせください。 「メッセージ入力」 をタップしてメッセージを入力 をタップしてオプションメニューを開き、 使用可能なオプションから 入力内容を選択することもできます。 「送信」 メッセージが送信されます。 ヒント 文字数制限は70文字です。 メモ 通話中にテキストメッセージを受信した場合、通知音が鳴ります。 メッセージ...
- Page 64 会話ビュー 他の人とやりとり したメッセージが時系列順に表示されるため、 会話の確 認と検索がしやすくなっています。 メッセージの各種設定を変更する 本製品のメッセージに関する各種設定は、 以下の方法で変更できます。 → → → 「設定」 • メッセージ...
- Page 65 カメラとビデオ ビューファインダー上のカメラオプション カメラまたはビデオカメラ機能を使って、 写真やビデオを撮影したり、 撮っ たデータを共有できます。 → • オプションの表示/非表示 – メインカメラモー ドでは解像度を選択で き、 フロン トカメラモー ドでは左右反転して保存を選択できます。 ギャラリー – 最後に撮影/録画した写真/ビデオを表示します。 録画 – 録画を開始します。 撮影 – 写真を撮影します。 カメラの切り替え – メインカメラとフロン トカメラを切り替えます。 メモ 写真を撮影する前に、保護レンズをマイクロファイバー製のクロスで拭い てください。レンズカバーに指紋の汚れなどがついていると、クリアな撮 影に影響が生じる可能性があります。室内撮影時に画像がちらつく場合 は、「設定」→「位置情報」→「ちらつき抑制」で調整してください。 カメラとビデオ...
- Page 66 解像度を設定する メインカメラモー ドのビューファインダーで、 を長押し 解像度を設定 写真を撮影する → 画面内で、 被写体をフレームに収める 写真が撮影され、 自動的にギャラリーに保存されます。 カメラを終了します。 撮影した写真の編集 をタップして、 最後に撮った写真を表示します。 表示された写真をタップすると以下のアイコンが表示されます。 写真を編集します。 使用可能な共有オプションを開きます。 写真を削除します。 追加オプションを表示します。 カメラとビデオ...
- Page 67 ビデオを録画する → 画面内で、 被写体をフレームに収める ビデオの録画が開始されます。 また、 録画の時間が画面上部に表示 されます。 メモ ビデオの録画中に をタップすると、写真を撮影できます。 録画中に 録画が一時停止されます。 をタップすると録画が再開されます。 録画が終了します。 ビデオは自動的にギャラリーに保存されます。 ビデオを終了します。 録画したビデオの共有、 削除 をタップして、 最後に撮ったビデオを表示します。 表示されたビデオをタップすると以下のアイコンが表示されます。 使用可能な共有ツールの選択画面が表示され、 選択したアプリ とビデオデータを共有できます。 ビデオを削除します。 追加オプションを表示します。 カメラとビデオ...
- Page 68 ギャラリー ギャラリーアプリは、 保存されている画像やビデオを表示します。 これに は、 カメラアプリで撮ったものや、 ウェブなどからダウンロー ドしたものが 含まれます。 → 保存されている画像/ビデオの一覧が表示されます。 見たい画像/ビデオのサムネイルをタップ メモ インストールされているソフトウェアによっては、一部のファイル形式が • サポートされないことがあります。 エンコーディングが原因で、一部のファイルが正しく表示されないことが • あります。 画像を表示する ギャラリーでは、 画像はフォルダ別に表示されます。 メールなどのアプリで 画像を保存すると、 画像を入れておくための 「Download」 フォルダが自動 的に作成されます。 同様に、 スクリーンショ ッ トを撮ると、 「 Screenshots」 フォルダが作成されます。 画像は作成日時の順に表示されます。 画像を選択すると、 フルスクリーン で表示されます。 次または前の画像を表示するには、 左右にスクロールし ます。...
- Page 69 ビデオオプション → 視聴したいビデオを選択 ビデオの再生を一時停止/再開します。 10秒早送り します。 10秒巻き戻します。 ビデオの音量を調整します。 画面をロック/ロック解除します。 追加オプションを表示します。 メモ ビデオ再生中に画面の右側を上下にスライドすると、音量を調整できま • す。 ビデオ再生中に画面の左側を上下にスライドすると、明るさを調整でき • ます。 ビデオ再生中に指を左から右(または右から左)にスライドすると、早送 • りと巻き戻しができます。 カメラとビデオ...
- Page 70 画像を編集する 画像の表示中に をタップします。 画像/ビデオの削除 次のいずれかの方法で行います。 フォルダ内のサムネイル一覧を表示中に をタップし、 画像やビデ • オを選択して 「削除」 画像の表示中に • 壁紙に設定する 画像の表示中に → 「画像を設定」 → 「壁紙」 をタップします。 壁紙以外にも、 連絡先の写真やロック画面の背景に設定できます。 メモ インストールされているソフトウェアによっては、一部のファイル形式が • サポートされないことがあります。 ファイルサイズが利用可能なメモリ容量を超えると、ファイルを開いたと • きにエラーが発生することがあります。 カメラとビデオ...
- Page 71 マルチメディア 音楽 お気に入りの楽曲を音楽プレイヤーで再生してお楽しみいただけます。 曲を再生する → → 「曲」 タブをタップ 再生したい曲を選択 音楽アプリでは、 以下の機能が利用可能です。 再生を一時停止します。 再生を再開します。 次の トラックにスキップします。 ロングタッチすると早送り しま す。 マルチメディア...
- Page 72 その曲の先頭に戻ります。 ダブルタップすると前の トラックに スキップします。 ロングタッチすると巻き戻します。 音量を調整します。 ミュージックライブラリを開きます。 プレイリス トをシャ ッフルモー ドで再生します。 (楽曲がランダムな順番で再生されます) 全曲繰り返し/現在の曲を繰り返し/繰り返しオフの順に切り 替わります。 曲をお気に入りに追加します。 現在のプレイリス トを開きます。 追加オプションを表示します。 メモ インストールされているソフトウェアによっては、一部のファイル形式が • サポートされないことがあります。 ファイルサイズが利用可能なメモリ容量を超えると、ファイルを開いたと • きにエラーが発生することがあります。 音楽ファイルの著作権が、国際条約と国内著作権法で保護されている場合 • があります。このため、曲を複製またはコピーする際に、許可やライセン スの取得が必要になる場合があります。国によっては、著作権で保護され た素材の私的なコピーが禁止されていることもあります。ファイルのダウ ンロードやコピーを行う前に、そのような素材の使用に関する国内法を確 認してください。 マルチメディア...
- Page 73 便利な機能 時計 時計アプリでは、 アラーム、 タイマー、 ワール ドクロック (世界時計) 、 ス トッ プウォ ッチの機能を利用できます。 これらは、 画面上部のタブをタップす るか、 画面を横にスワイプして切り替えます。 → → • アラーム 設定した時刻になると音で知らせてくれます。 → → → 「アラーム」 タブ 設定を行います。 「保存」 メモ 設定済みのアラームをタップして編集することもできます。 タイマー 設定した時間が経過すると音で知らせてくれます。 → → → 「タイマー」 タブ 数字をタップして、 設定したい時間をダイヤルキーで入力 → 「設定」...
- Page 74 ワール ドクロック 世界中にある都市の現在時刻を簡単に確認できます。 → → → 「ワール ドクロック」 タブ 「都市検索」 欄に都市名を入力して、 一覧表示された都市名をタップ ネッ トワークに接続しているときはリス トが表示されますので、 スク ロールして目的の都市をタップすることでも確認できます。 ス トップウォ ッチ 本製品をス トップウォ ッチとして使えます。 → → → 「ス トップウォ ッチ」 タブ 「開始」 計測中に 「ラップ」 をタップするとラップタイムを記録できます。 「停止」 電卓 標準的な電卓を使った数値計算ができます。 → → 数字ボタンをタップして数字を入力 実行する機能...
- Page 75 カレンダー スケジュールを管理できます。 → → 予定を追加する日付をタップしてから、 → 「予定の新規作成」 メモ をタップするかわりに、 を長押ししてもカレンダーのメニュー を表示することができます。 ボイスレコーダー 音声を録音できます。 音声を録音する → → 録音が開始されます。 録音が終了します。 録音した音声が再生されます。 メモ をタップすると、保存した音声ファイルを聴くことができます。 便利な機能...
- Page 76 音声検索 音声でウェブページを検索できます。 → → 画面に 「認識しています...」 と表示されたら、 キーワー ドを話す 検索された内容から、 確認したいページのリンクをタップ ダウンロード アプリを通じてダウンロー ドしたファイルを確認できます。 → → • 便利な機能...
- Page 77 Webブラウザ インターネッ ト インターネッ トを利用して、 高速でフルカラーのゲーム、 音楽、 ニュース、 スポーツ、 エンターテインメン トなどの世界を楽しむことができます。 メモ サービスに接続したり、コンテンツをダウンロードしたりすると、追加料 • 金がかかる場合があります。料金については、J:COMカスタマーセンター にお問い合わせください。 ウェブページによっては、ハードキー(OKキーやナビ(方向)キーなど) • で操作ができない場合があります。その場合はタッチスクリーンを利用し て操作してください。 → → • ウェブページを見る ア ドレス欄をタップしてウェブのURLを入力し、 キーボー ドの 「確定」 → をタップします。 ページを開く 新しいページに移動するには、 → をタップします。 別のページに切り替えるには、 をタップして、 上または下にスワイプ し、...
- Page 78 ブックマーク 現在のウェブページをブックマークするには、 → 「ブックマークを追 加」 → 「保存」 の順にタップします。 ブックマークしたウェブページを開くには、 → 「ブックマーク」 をタップ し、 目的のブックマークを選択します。 履歴 → 「ブックマーク」 → 「 閲覧履歴」 タブをタップすると、 最近表示した ウェブページが一覧表示されます。 履歴をすべてクリアするには、 → 「 はい」 をタップします。 Chrome 情報を検索したり、 ウェブページを閲覧したりできます。 → → 「Google」 フォルダ → • ウェブページを見る ア ドレス欄をタップし、 ウェブのURLまたは検索条件を入力します。 ページを開く...
- Page 79 設定 設定アプリでは、 本製品のカスタマイズと設定を行うことができます。 こ こでは、 各設定項目について説明します。 設定アプリを開く → → • 無線ネッ トワーク < Wi-Fi > Wi-Fi 機能をオンにして、 使用可能なWi-Fiネッ トワークに接続します。 ® < Bluetooth > Bluetooth 機能をオンまたはオフにします。 ® < データ通信 > データ使用量と、 データ通信の使用量制限を表示します。 < 通話設定 > このメニューでは、 さまざまな通話設定を行えます。 着信転送 ・ お留守番サービス ご契約の通信事業者が提供している各サービスを選択できます。 着信拒否...
- Page 80 応答拒否メッセージ この機能を使うことで、 応答拒否をする際に簡単なメッセージを送信でき ます。 会議などで応答を拒否する必要がある場合などに便利です。 着信応答 着信に応答する方法を選択します。 連絡先未登録番号追加 通話終了後、 連絡先未登録番号の登録確認画面が表示されます。 ガイ ドの言語を変更する 英語または日本語でのガイダンスを選択します。 通話時間 最後の通話/発信/着信/すべての通話のカテゴリで通話時間を確認 できます。 その他の設定 その他の設定ができます。 < テザリング > USBテザリング 本製品のインターネッ ト接続を、 USBケーブル経由で他のUSB対応機器 と共有できます。 Wi-Fiテザリング 本製品のインターネッ ト接続を、 Wi-Fi 経由で他のWi-F 対応機器と共 ® i® 有できます。 アクセスポイン トを作成し、 本製品の接続を共有します。 Bluetoothテザリング 本製品のインターネッ ト接続を、 Bluetooth 経由で他のBluetooth 対...
- Page 81 < その他 > 機内モー ド 機内モー ドに設定すると、 通話やオンラインデータへのアクセスができな くなります。 なお、 ゲームや音楽再生など本製品が備えている機能の多く は使用できますが、 航空機内や病院など、 場所によるルールを守ってご使 用ください。 モバイルネッ トワーク モバイルネッ トワークの各種設定ができます。 VPN (仮想プライベー トネッ トワーク) を追加、 設定、 管理します。 これによ り、 社内ネッ トワークなど、 セキュリティで保護されたローカルネッ トワー ク内のリソースに接続、 アクセスができます。 デバイス < サウン ド & お知らせ > サウン...
- Page 82 通知の鳴動設定 通知による割り込みを防ぐタイミングのスケジュールを設定できます。 「 重 要な通知のみ鳴動」 を設定している場合には、 特定の機能を割り込ませる ことができます。 アプリ 各アプリによる通知の有無、 および 「通知の鳴動設定」 の 「着信と通知」 に ついて、 「 重要な通知のみ鳴動」 に設定している場合に通知を行うかどう かを設定できます。 通知表示LED スイッチをタップしてオンまたはオフにします。 オンにすると、 選択した通 知について、 それぞれに設定した色のLEDランプが点灯します。 通知音 通知音を設定できます。 また、 画面の右上隅にある をタップして通知 音を追加することもできます。 選択時のバイブレー ト ホームキーや履歴キー、 アプリアイコンなどを長押ししたときに振動させ る場合はチェ ックします。 サウン ドエフェク ト タップしてダイヤルパッ...
- Page 83 縦横表示の自動回転 チェ ックを入れると、 本製品の向きを変えたときに自動的に画面の向きが 変更されます。 バックライ ト点灯時間 画面を自動的にオフにするまでの時間を設定します。 スクリーンセーバー スイッチをオンにすると、 充電またはクレー ドル接続中に、 本体がスリープ 状態になるとスクリーンセーバーが表示されます。 キーパッ ドライ ト 「キーパッ ドライ トをONにします」 にチェ ックすると有効になります。 ま た、 キーパッ ドライ トの点灯時間を設定します。 センサー感度補正 本製品を傾けたり したときのセンサーの感度 (傾斜角や速度) を補正しま す。 < ホームスクリーン > ホーム選択 「ホーム」 ( 標準のAndroidレイアウ ト) または 「easyホーム」 ( Android の操作に慣れていないお客様向けの簡易版レイアウ...
- Page 84 < 画面のロック > 画面ロックを選択 本製品をセキュリティ保護するための画面ロックの種類を設定します。 < ス トレージ > 内部ス トレージやmicroSDカー ドの使用状況を確認できます。 < 電源の管理 > バッテリー消費量 電池消費量を表示します。 ステータスバーに表示 ステータスバーの電池アイコンの隣に電池残量を%単位で表示する場 合はチェ ックします。 バッテリーセーブ スイッチをタップしてオンとオフを切り替えます。 また、 自動的にオンに する電池残量レベルを、 「 すぐに」 、 「 バッテリー残量 : 5%」 、 「 バッテリー残 量 : 15%」 から選択します。 ヘルプ...
- Page 85 パーソナル < 位置情報 > をタップしてGPS機能をオンまたはオフに切り替えます。 本製品で は、 Wi-Fi またはモバイルネッ トワークを使っている間、 おおよその位置 ® を取得します。 このオプションを選択すると、 Googleがサービス提供時に 位置情報を使うことに同意するかどうかの確認が表示されます。 モー ド 現在の位置情報を取得する方法を設定します。 カメラ 写真やビデオに位置情報のタグを付ける場合、 チェ ックします。 ちらつき抑制 カメラ撮影画面でのちらつきを調整します。 Googleロケーション履歴 Googleと製品がアクセスする位置情報設定を選択します。 < セキュリティ > 本製品およびデータをセキュリティ保護する方法を設定します。 携帯端末を暗号化 本製品のデータを暗号化して、 セキュリティ保護できます。 電源を入れる たびに、 暗証番号またはパスワー ドを入力して暗号化を解除する必要が あります。 SDカー ドの暗号化 microSDカー...
- Page 86 デバイス管理機能の選択 デバイス管理機能を表示し、 各機能の有効/無効を設定します。 提供元不明のアプリ Googel Play以外からのアプリのインス トールを許可します。 アプリを確認する 有害である可能性のあるアプリのインス トールを禁止するか、 インス トー ル前に警告します。 ス トレージタイプ 認証情報ス トレージのバックアップ先を表示します。 証明書の管理 確認済み証明書 – セキュアな証明書、 関連パスワー ド、 およびその他 • の認証情報の暗号化された情報にアプリからアクセスできるようにす るには、 このボックスをチェ ックします。 認証ス トレージは、 一部の種類 のVPNやWi-Fi 接続を確立するために必要となります。 ® セキュアな認証情報ス トレージ用のパスワー ドを設定していない場 合、 この設定はグレーになります。 ス トレージからインス トール – タップしてセキュアな証明書をインス •...
- Page 87 データ自動同期 ウェブ上で変更されたアカウン ト情報を自動的に端末にコピーするよう 設定します。 < 言語と入力 > 本製品の文字と、 スクリーンキーボー ド設定に使う言語を選択します。 辞 書に登録した単語もここで設定します。 言語 本製品で使う言語を選択します。 デフォル ト デフォル トのキーボー ドの種類を選択できます。 L G 日本語キーボー ド LG 日本語キーボー ドを使って日本語データを入力するにはチェ ックしま す。 をタップすると、 各種設定を変更できます。 Google音声入力 データの入力にGoogle音声入力を使用する場合はチェ ックします。 をタップすると、 Google音声設定を変更できます。 音声検索 音声検索を設定します。 音声出力 優先的に使う音声合成出力エンジンの設定と、 エンジンの一般設定を行 います。...
- Page 88 ポインター速度 ポインターの速度を調整します。 ボタンの切替 左右のボタン機能を切り替えます。 < データ複製と初期化 > バックアップやデータの管理に関する設定を変更します。 LG Backup 着信拒否リス トやメッセージ、 画像およびホーム画面などのデータのバッ クアップやコピーを行います。 データのバックアップ アプリのデータ、 Wi-Fiパスワー ド、 その他の設定をGoogleサーバーに バックアップします。 バックアップアカウン ト 情報のバックアップに現在使っているアカウン トを表示します。 また、 アカ ウン トの追加も行えます。 自動リス トア アプリを再インス トールしたときに、 バックアップした設定とデータを復元 します。 データの初期化 設定を工場出荷時の状態にリセッ トし、 すべてのデータを削除します。 こ の方法で本製品をリセッ トした場合、 最初にAndroidを起動したときと同...
- Page 89 システム < ざっく ぅキー > このキーを短く押したときに起動するアプリの設定変更ができます。 < 日付と時刻 > 日付と時刻を設定します。 < ユーザー補助 > 本製品にインス トールしたアクセシビリティプラグインを設定するには、 「ユーザー補助」 設定を使います。 見る TalkBack – TalkBack機能を設定できます。 この機能では、 目の不 • 自由な方への補助として、 音声でフィー ドバックを行います。 メッセージ/着信の音声通知 – をタップしてオンまたはオフに切 • り替えます。 オンにすると、 電話やメッセージを着信/受信したときに、 音声で通知されます。 画面表示を最も暗くする – 画面のコン トラス トを暗く します。 • フォン...
- Page 90 音声形式 – オーディオタイプを設定します。 • 音声バランス – 左右の音量のバランスを設定します。 スライ ドバーの • スライダーを動かして設定します。 動作と認識 タッチフィー ドバックタイム – タッチの感度を短め、 中、 長めから選択 • します。 Touch assistant – 一般的な機能にすばやくアクセスできるタッチ • ボー ドを表示します。 バックライ ト点灯時間 – バックライ トが自動的に消えるまでの時間を • 設定します。 タッチ操作エリア – 画面の領域を選択して、 その領域だけタッチ操作 • を有効にすることができます。 ユーザー補助機能のショー トカッ ト ホームキーを短く3回押して、 選択した機能にすばやくアクセスできるよ うにします。 縦横表示の自動回転...
- Page 91 ソフトウェアの更新 ソフ トウェアの更新 ソフ トウェアをインターネッ トから更新する この機能を利用すると、 サービスセンターにご来店いただかなくても、 イ ンターネッ ト経由で本製品のファームウェアを最新バージョンに更新でき ます。 この機能の使用方法に関する詳細については以下を参照してくだ さい。 http://www.lg.com/jp/support 本製品のファームウェアを更新する際は、 更新が終わるまでお客様が目 を離さずに行う必要があります。 ステップごとに表示される指示と注意事 項をよく確認してから、 次に進んでください。 更新中にUSBケーブルを 取り外すと本製品に深刻な損傷をきたす恐れがありますのでご注意くだ さい。 メモ 当社は、ソフトウェア更新を自らの判断で一部機種のみに提供する権利を 有し、すべてのモデルで新バージョンのソフトウェアを入手できることを 保証するわけではありません。 ソフ トウェアをOver-the-Air (OTA) 経由で更新する この機能では、 USBケーブルを使用せずに、 本製品のソフ トウェアを OTA経由で簡単に新バージョンに更新できます。 この機能は当社が本 製品の新しいソフ トウェアを公開した場合にのみ利用可能になります。...
- Page 92 メモ 本製品の内部ストレージに保存された個人データは、Googleアカウント • やその他のアカウントに関する情報、システムやアプリのデータと設定、 ダウンロードしたアプリ、DRMライセンスなどを含め、本製品のソフト ウェアを更新する際に失われる場合があります。そのため、本製品のソフ トウェア更新前に、個人データをバックアップすることをお勧めします。 当社は個人データの紛失について一切責任を負いかねますので、あらかじ めご了承ください。 ソフ トウェアの更新...
- Page 93 同梱物 本製品では、 携帯電話本体以外で以下が同梱されております。 クイックスター トガイ ド • 電池パック • USBケーブル • ACアダプタ • 保証書 • リアカバー • メモ 必ず当社指定のものをお使いください。同梱物は本製品専用に設計されて おり、他の端末との互換性はありません。 同梱物...
- Page 94 こんなときは この章では、 本製品をお使いの際に想定されるいくつかの問題を示して います。 お問い合わせいただく必要のある問題もありますが、 お客様ご自 身で解決いただけるものもあります。 製品でお困りのことがありましたら、 まずは本章をご確認ください。 想定される問題 考えられる原因 対処方法 microSIMカード microSIMカー が本製品に挿入さ microSIMカードが正しく挿入 ドが認識され れていないか、 されていることを確認してくだ ない 誤って挿入され さい。 ている 窓の近く、または広い空間に移動 電波が弱いか、 してください。ネットワークオ ネットワークの外 ペレーターの対応範囲をご確認く にいる ださい。 ネットワーク microSIMカードが6~12か月以 に接続できない 上前のものかどうかを確認してく 新しいサービスが ださい。microSIMカードが古い 適用された 場合、J:COMカスタマーセンター にお問い合わせください。 登録したPINコー PINコードをお忘れの場...
- Page 95 想定される問題 考えられる原因 対処方法 正しい電話番号を入力してくだ 番号の入力違い さい。 電話がかけら 新しいmicroSIM 新しい電話番号を確認してくださ れない/受け カードが挿入さ い。また、ネットワーク認証を正 られない れた しく行ってください。 プリペイド料金の J:COMカスタマーセンターにお 制限に達した 問い合わせください。 電源/終了キーを 電源/終了キーを2秒以上押して 押す時間が短す ください。 ぎる 電源が入らない 充電してください。正しく充電器 電池パックが充電 が接続されていると、充電中は通 されていない 知表示LEDが赤くゆっくり点滅 します。 外気温が高すぎ 本製品が通常の温度で充電されて る/低すぎる いることを確認してください。 充電器と本製品との接続を確認し 接触の問題 てください。 充電できない 他のコンセントに接続してくだ 電圧の不足...
- Page 96 想定される問題 考えられる原因 対処方法 メッセージや メモリが不足し 本製品から不要なファイルを削除 画像が送れない ている してください。 ファイルが開 サポートされてい サポートされているファイル形式 けない ないファイル形式 をご確認ください。 保護テープまたは保護ケースをお 使いの場合、近接センサー付近の 着信通話中、 近接センサーに問 領域を覆っていないかご確認くだ 画面が切り替 題がある さい。また、近接センサー付近の わらない 領域がきれいになっていることを 確認してください。 バイブレーション 「サウンド & お知らせ」の設定 音声が出ない モードになって を確認し、調整してください。 いる 「サウンド & お 通知パネルのクイック設定エリア バイブレーショ 知らせ」の設定 から「鳴動しない」に設定してく ンがオフにで ではバイブレー ださい。 きない...
- Page 97 想定される問題 考えられる原因 対処方法 QRコードフォーカスに合わせる ように端末を上下に動かして距離 を調整をしてください。 QRコードのサイ Google Playからインストール ズが小さすぎる したQRコードリーダアプリの場 合、認識できない場合があるの QRコードが認 で、端末に搭載されたQRコード 識できない アプリを利用してください。 影で認識しにくく 影ができないように明るい場所で なっている 試してください。 カメラが汚れて カメラをきれいにしてください。 いる 撮影後の保存 先を内部スト microSDカードを一度、抜き差 端末のコンセプト レージまたは しを行った後、再度カメラアプリ により、メニュー microSDカー を起動してください。初期起動時 が存在しない ドに変更でき に選択画面が表示されます。 ない こんなときは...
- Page 98 よくある質問 分類 質問 回答 ステレオ/モノラルヘッドセットや車 Bluetooth ® Bluetooth 経由でど ® のような機能を利用 載キットなどのBluetooth 対応オー 対応デバ ® できますか。 ディオデバイスを接続できます。 イス 連絡先はどのように 連絡先のバ 連絡先データを本製品とGoogleアカ バックアップしま ックアップ ウントの間で同期できます。 すか。 Gmailで一方向同期 同期 双方向同期のみ利用できます。 を設定できますか。 Gmailにアクセスす るたびに、Gmailに いったんGmailにログインしたら、再 ログインしなければ びログインする必要はありません。 ならないのでしょ Gmail うか。 メールはフィルタリ いいえ、本製品はメールフィルタリン ングできますか。 グに対応していません。...
- Page 99 分類 質問 回答 メモリがいついっぱ はい、メモリ容量が134MB以下とな メモリ いになるか判断でき ると通知が表示されます。 ますか。 本製品は多言語対応です。言語を変更 するには、 言語 本製品の言語は変更 1. を押して → → 「言 サポート できますか。 語と入力」 → 「言語」 2. 目 的の言語をタップ VPNアクセス設定は会社により異なり VPNを設定するには ます。本製品にVPNアクセスを設定す どのようにしたらよ るには、ネットワーク管理者に相談し いでしょうか。 てください。 画面が15秒でオフに 1. → → → 「表示」 → なります。バックラ 画面のタイ イトがオフになる時 「バックライト点灯時間」 ムアウト 間を変更するにはど...
- Page 100 分類 質問 回答 はい。 アプリをホーム画面 アイコンをロングタッチすると、ごみ ホーム画面 から削除することは 箱アイコンが画面の上部中央に表示さ できますか。 れます。指を離さずにアイコンをごみ 箱にドラッグしてください。 アプリをダウンロー 1. → → → 「アプリ」 ドしましたが、エ → 「ダウンロード済み」 アプリ ラーがたくさん発生 2. ア プリをタップして「アンインス します。どうすれば トール」 削除できますか。 必要なUSBドライバ はい。必要なドライバがインストール をインストールせず されているかどうかにかかわらず、 充電器 に、USBケーブルを 本製品はUSBケーブル経由で充電さ 接続して本製品を充 れます。 電できますか。 はい。できます。 通知音に自分の音楽 → 「サウンド & お知らせ」 ファイルを使用でき...
- Page 102 Welcome! ENGLISH Thank you for choosing this device. Please carefully read this user guide before using the device for the first time to ensure safe and proper use. Always use genuine accessories. The supplied items are designed only for this •...
- Page 103 Table of contents Important notice ........4 Wi-Fi Direct ...........29 Transferring data between a Getting to know your phone .....6 PC and the device ........30 Phone layout ..........6 Calls ............31 Soft Key and Hard Key Support ....8 Making a call .........31 Installing the microSIM card and battery ..9 Calling your contacts ......31 Charging the battery ......12...
- Page 104 Multimedia ..........42 Music ............42 Utilities ............44 Clock .............44 Calculator ..........45 Calendar ..........46 Voice Recorder ........46 Voice Search..........47 Downloads ..........47 Web Browser ...........48 Internet ..........48 Chrome ..........49 Settings ...........50 WIRELESS NETWORKS ......50 DEVICE ..........52 PERSONAL ..........55 SYSTEM ..........58 Phone software update ......61 Phone software update ......61 About this user guide ......63 About this user guide ......63...
-
Page 105: Phone Memory
Important notice Please read this before you start using your phone! Please check to see whether any problems you encountered with your phone are described in this section before taking the phone in for service or calling a service representative. 1. -
Page 106: Opening And Switching Applications
Some applications you download may consume battery power. • While using downloaded applications, check the battery charge level. • 3. Before installing an open source application and OS WARNING If you install and use an OS other than the one provided by the manufacturer •... -
Page 107: Phone Layout
Getting to know your phone Phone layout Proximity Sensor Front Camera Lens Notification Earpiece Touch Screen Home Key Rear Camera Lens Back Key Recent Apps Key Message Key ZAQ Key Volume Keys Camera Key Contacts Key Speaker End/Power Key Start Key Navigation Headset Clear Key... - Page 108 Back Key Returns to the previous screen. Also closes pop-up items, such as menus, dialog boxes and the on-screen keyboard. Home Returns to the Home screen from any screen. Recent Displays recently used applications. If you touch and hold this Apps Key button, it opens the Apps screen.
- Page 109 Soft Key and Hard Key Support At the bottom of the screen a soft key is displayed which can be operated via the displayed screen. To implement the soft key contents, press the corresponding following key to operate. The soft key displays may vary depending upon the functions and display conditions. •...
- Page 110 Installing the microSIM card and battery Insert the microSIM card and the included battery. To remove the back cover, hold the phone firmly in one hand. With your other hand, lift off the back cover with your thumbnail as shown in the figure below. NOTE When removing the back cover do not apply more force than necessary.
- Page 111 Slide the microSIM card into the microSIM card slot as shown in the figure. Make sure the gold contact area on the card is facing downward. WARNING Only the microSIM cards work with the device. • So that we may have you use this device properly, use specified microSIM •...
- Page 112 Insert the battery. To replace the cover onto the device, align the back cover over the battery compartment and press it down until it clicks into place Getting to know your phone...
-
Page 113: Charging The Battery
Charging the battery Charge the battery before using it for first time. Use the charger to charge the battery. A computer can also be used to charge the battery by connecting the phone to it using the USB cable. WARNING Use only approved chargers, batteries and cables. -
Page 114: Inserting A Memory Card
Inserting a memory card Your device supports up to a 32GB microSD card. Depending on the memory card manufacturer and type, some memory cards may not be compatible with your device. WARNING Some memory cards may not be fully compatible with the device. Using an incompatible card may damage the device or the memory card, or corrupt the data stored in it. -
Page 115: Removing The Memory Card
Removing the memory card Before removing the memory card, first unmount it for safe removal. > View all settings > Storage > Unmount SD card. Press and tap Remove the back cover and pull out the memory card. WARNING Do not remove the memory card while the device is transferring or accessing information. -
Page 116: Touch Screen Tips
Your Home screen Touch screen tips Here are some tips on how to navigate on your phone. Tap or touch – A single finger tap selects items, links, shortcuts and letters on the • on-screen keyboard. Touch and hold – Touch and hold an item on the screen by tapping it and not •... - Page 117 EasyHome Screen The EasyHome screen is the screen which is the starting point for many applications and functions. In comparison to the “Home screen,” it features a simple layout and large- sized fonts, thus it is user-friendly for first time users. This is the default canvas and accessible from any menu by pressing Status Bar Widget...
-
Page 118: Home Screen
Home screen The Home screen is the starting point for many applications and functions. It allows you to add items like app shortcuts and widgets to give you instant access to information and applications. This is the default canvas and accessible from any menu by pressing Status Bar Widget Application Icons... -
Page 119: Customising The Home Screen
Customising the Home screen You can customise your Home screen by adding apps and widgets and changing wallpapers. Adding items on your Home screen Press and tap Tap the desired tab from Apps or Widgets. Drag an item to the desired location and lift your finger. TIP! To change the wallpaper from the Home screen, touch and hold the empty part of the Home screen. - Page 120 Adding an app to the Quick Button Area From the Apps screen or on the Home screen, touch and hold an application icon • and drag it to the Quick Button Area. Then release it in the desired location. NOTE Maximum 4 apps can be placed in the Quick Button Area.
-
Page 121: Notifications Panel
Notifications panel Notifications alert you to the arrival of new messages, calendar events and alarms, as well as ongoing events, such as when you are on a call. When a notification arrives, its icon appears at the top of the screen. Icons for pending notifications appear on the left, and system icons, such as Wi-Fi and battery strength ®... - Page 122 Opening the notifications panel Swipe down from the status to open the notifications panel. To close the notifications panel, swipe the screen upwards or tap Quick Settings Area Notifications Clear Tap each quick setting button to toggle it on/off. Touch and hold the desired button to directly access the settings menu for the function.
- Page 123 The icons displayed at the top of the screen provide information about the status of the device. The icons listed in the table below are some of the most common ones. Icon Description Icon Description No microSIM card inserted A song is currently playing No interruptions, not even No network signal available alarms...
- Page 124 NOTE The icon's location in the status bar may differ according to the function or • service. Screenshot capture If the section underneath the “Volume Keys” and the “End/Power Key” are simultaneously long pressed for two seconds or more, screenshots can be captured. On-screen keyboard You can enter text using the on-screen keyboard.
-
Page 125: Gesture Shot
Special Features Gesture shot The Gesture shot feature allows you to take a picture with a hand gesture using the front camera. To take a photo There are two methods for using the Gesture shot feature. Raise your hand, with an open palm, until the front camera detects it and a box •... -
Page 126: Creating Your Google Account
Google account setup The first time you open a Google application on your phone, you will be required to sign in with your existing Google account. If you do not have a Google account, you will be prompted to create one. Creating your Google account Press and tap... - Page 127 After signing in, your phone will sync with your Google services, such as Gmail, Contacts, and Google Calendar. You can also use Maps, download applications from Play Store, back up your settings to Google servers, and take advantage of other Google services on your phone.
- Page 128 Connecting to Networks and Devices Wi-Fi You can use high-speed Internet access while within the coverage of the wireless access point (AP). Connecting to Wi-Fi networks Press and tap > On under WI-FI to turn Wi-Fi on and it will start scanning for available Wi-Fi networks. ®...
- Page 129 Bluetooth Bluetooth is a short-range communications technology that allows you to connect ® wirelessly to a number of Bluetooth devices, such as headsets and hands-free car kits, ® and Bluetooth-enabled handhelds, computers, printers, and wireless devices. NOTE We are not responsible for the loss, interception or misuse of data sent or •...
- Page 130 Sending data via Bluetooth ® Select a file or item such as a contact or media file. Select the option for sending data via Bluetooth ® Search for and pair with a Bluetooth -enabled device. ® NOTE ® Due to different specifications and features of other Bluetooth -compatible •...
- Page 131 Select the connection objective. A window will pop-up on your PC, allowing you to transfer the desired data. NOTE The LG United Mobile Driver is required to be installed on your PC to be able • to detect the phone.
-
Page 132: Making A Call
Calls Making a call Press and enter the number using the dialer. To delete a digit, press After entering the desired number, press to place the call. To end the call, press TIP! To enter "+" to make international calls, press and hold Calling your contacts Press >... -
Page 133: Making A Second Call
Making a second call > Add call and enter the number. During your first call, tap Press to place the call. Both calls are displayed on the call screen. Your initial call is locked and put on hold. > Merge calls to start a conference Press to toggle between calls. -
Page 134: Searching For A Contact
Contacts You can add contacts on your phone and synchronise them with the contacts in your Google Account or other accounts that support syncing contacts. Searching for a contact Press > to open your contacts. Tap Search contacts and enter the contact name using the keyboard. Adding a new contact Press and enter the new contact's number. -
Page 135: Creating A Group
Removing a contact from your favorites list Press > to open your contacts. Tap a contact to view its details. Tap the yellow star at the top right of the screen. The star turns a white color and the contact is removed from your favorites. Creating a group and tap Groups tab. -
Page 136: Sending A Message
Messaging Your phone combines text messaging into one intuitive, easy to use menu. Sending a message Press > and tap New compose. Enter a contact name or contact number into the To field. As you enter the contact name, matching contacts appear. You can tap a suggested recipient. NOTE You may be charged for each text message you send. -
Page 137: Conversation View
Conversation view Messages exchanged with another party are displayed in chronological order so that you can conveniently see and find your conversations. Changing your messaging settings Your phone's messaging settings are predefined to allow you to send messages immediately. You can change the settings based on your preferences. >... -
Page 138: Camera Options On The Viewfinder
Camera and Video Camera options on the viewfinder You can use the camera or camcorder to take and share pictures and videos. Press > • Hide/Display Options – Tap to select the resoultion in rear camera mode and select the save as flipped in front camera mode. Gallery –... -
Page 139: Taking A Photo
Setting the resolution In the camera viewfinder, press and hold Set the resolution. Taking a photo Press > Frame your subject on the screen. to take a photo. Your picture will be automatically saved to the Gallery. Once you have taken a photo Tap the image thumbnail on the screen to view the last photo you took. -
Page 140: After Recording A Video
to pause recording video. You can resume recording again by tapping . to stop recording. Your video will be automatically saved to the Gallery. After recording a video Tap the video thumbnail on the screen to view the last video you recorded. Tap to open the available sharing options (such as Messaging or Bluetooth) to share. -
Page 141: Viewing Pictures
Viewing pictures The Gallery displays your pictures in folders. When an application, such as E-mail, saves a picture, the download folder is automatically created to contain the picture. Likewise, capturing a screenshot automatically creates the Screenshots folder. Pictures are displayed by the date they were created. Select a picture to view it full screen. - Page 142 Tap to lock/unlock the screen. Tap to access additional options. NOTE While playing a video, slide the right side of the screen up or down to adjust • the sound. While playing a video, slide the left side of the screen up or down to adjust •...
- Page 143 Multimedia Music Your phone has a music player that lets you play all your favourite tracks. Playing a song Press and tap > Tap the Songs tab. Select the song you want to play. The following options are available. Tap to pause playback. Tap to resume playback.
- Page 144 Tap to restart the current track or skip to the previous track in the album, playlist or shuffle list. Touch and hold to rewind. Tap to adjust the volume. Tap to open the music library. Tap to play the current playlist in shuffle mode (tracks are played in random order).
- Page 145 Utilities Clock The Clock app gives you access to the Alarms, Timer, World clock and Stopwatch functions. Access these functions by tapping the tabs across the top of the screen or swiping horizontally across the screen. Press and tap > •...
- Page 146 World clock The World clock tab allows you to easily check the current time in other cities around the world. Press and tap > > World clock tab. and select the desired city. Enter the city name in the Search cities field, and tap the city name which is displayed in a list.
-
Page 147: Voice Recorder
Calendar The Calendar app allows you to track your schedule of events. Press and tap > > New event. Tap the date you want to add an event to. Then tap NOTE Instead of tapping the , the calendar menu can be displayed by also long •... -
Page 148: Voice Search
Voice Search Use this application to search webpages using voice. Press and tap > Say a keyword or phrase when Listening... appears on the screen. Select one of the suggested keywords that appear. Downloads Use this application to see what files have been downloaded through the applications. Press and tap >... - Page 149 Web Browser Internet The internet gives you a fast, full colour world of games, music, news, sports, entertainment, and much more, right on your mobile phone. NOTE Additional charges apply when connecting to these services and • downloading content. Check data charges with J:COM Customer Center. Depending upon the web pages, operations may not be possible via the •...
- Page 150 Bookmarks > Add bookmark > Save. To bookmark the current webpage, tap > Bookmarks and select the desired To open a bookmarked webpage, tap bookmark. History > Bookmarks > History tab to open a list of recently visited webpages. To clear all of your history, tap >...
-
Page 151: Wireless Networks
Settings The Settings application contains most of the tools for customizing and configuring your phone. All of the settings in the Settings application are described in this section. To open the Settings application Press and tap > • WIRELESS NETWORKS <... - Page 152 Change guide language Select guidance in English or Japanese. Call duration You can check call durations via the categories in Last call/Outgoing calls/Incoming calls/All calls. Additional settings You can set other settings. < Tethering > USB tethering Allows you to share the internet connection with your computer via a USB cable. Wi-Fi hotspot You can also use your phone to provide a mobile broadband connection.
- Page 153 DEVICE < Sound & notification > Sound profile Allows you to set your phone's sound profile. Choose from Sound, Vibrate only. Volume Adjust the phone's volume settings to suit your needs and environment. Ringtone Allows you to set the ringtones for calls. You can also add a ringtone by tapping the upper-right corner of the screen.
- Page 154 Sound effects Tap to set the dial pad touch sounds, key and touch sounds, screen unlock sound and folder sound. Message/call voice notifications Allows the device to read out the incoming call and the message event automatically. < Display > Font type Select the desired font type.
- Page 155 Screen swipe effect Choose the desired type of effect to display when you swipe from one Home screen canvas to the next. Allow Home screen looping Checkmark to allow continuous Home screen scrolling (loop back to first screen after last screen). Help Displays help information for the Home screen.
- Page 156 < Apps > Allows you to view details about the apps installed on your phone, manage their data, and force them to stop. < Default message app > This menu allows you to choose what messaging app to use as your default messaging app.
- Page 157 Encrypt SD card storage Encrypt SD card storage and keep data unavailable for other devices. Set up SIM card lock The device is configured so that it cannot be used when its power is switched on, if the PIN code is not entered. Password typing visible Checkmark to briefly show each character of passwords as you enter them so that you can see what you enter.
- Page 158 Checkmark to select Google voice typing to enter data. Tap the Settings icon to change the Google voice settings. LG Japanese keyboard Checkmark to use the LG Japanese keyboard to input Japanese data. Tap the Settings icon to change the LG Japanese keyboard settings. Voice Search Tap to configure the Voice Search settings.
- Page 159 Toggle the right and left button functions. < Backup & reset > Change the settings for managing your settings and data. LG Backup Backs up all information on the device and restores it in the event of data loss or replacement.
- Page 160 < Accessibility > Use the Accessibility settings to configure accessibility plug-ins you have installed on your phone. Vision TalkBack – Allows you to set up the TalkBack function which assists people with • impaired vision by providing verbal feedback. Message/call voice notifications – Tap to toggle it On or Off.
- Page 161 Touch control areas – Allows you to select an area of the screen to limit touch • activation to just that area of the screen. Accessibility features shortcut Allow you to access selected features quickly when triple-tapping the Home button. Auto-rotate screen Checkmark to allow the phone to rotate the screen depending on the physical phone orientation (portrait or landscape).
-
Page 162: Phone Software Update
Phone software update The mobile phone software update from the Internet For more information about using this function, please visit http://www.lg.com/jp/support. This feature allows you to conveniently update the firmware on your phone to a newer version from the Internet without needing to visit a service centre. This feature will only be available if and when we makes a newer firmware version available for your device. - Page 163 NOTE Your personal data from internal phone storage—including information about • your Google account and any other accounts, your system/application data and settings, any downloaded applications and your DRM licence—might be lost in the process of updating your phone's software. Therefore, We recommends that you backup your personal data before updating your phone's software.
-
Page 164: About This User Guide
About this user guide About this user guide Before using your device, please carefully read this guide. This ensures that you use • your phone safely and correctly. Some of the images and screenshots provided in this guide may appear differently •... - Page 165 Trademarks Copyright ©2015 LG Electronics, Inc. All rights reserved. LG and the LG logo are • registered trademarks of LG Group and its related entities. All other trademarks are the property of their respective owners. Google™, Google Maps™, Gmail™, YouTube™, Hangouts™ and Play Store™...
- Page 166 Accessories These accessories are available for use with the your phone. Quick Start Guide • Battery • USB cable • AC adaptor • Warranty • back cover • NOTE Always use genuine accessories. The items supplied with this product were •...
- Page 167 Troubleshooting This chapter lists some problems you might encounter when using your phone. Some problems require you to call your service provider, but most are easy to fix yourself. Expected Possible causes Possible corrective measures problems There is no microSIM microSIM card in Make sure that the microSIM card is card error...
- Page 168 Expected Possible causes Possible corrective measures problems Dialing error New network not authorised. Confirm the new phone number. In New microSIM Calls not addition, correctly perform the network card inserted. available authorisation. Pre-paid charge Contact the J:COM Customer Center. limit reached. End/Power Key Press the End/Power Key for at least Phone...
- Page 169 Expected Possible causes Possible corrective measures problems Files do not Unsupported file Check the supported file formats. open format The screen If you use a protection tape or case, does not make sure it has not covered the area turn on Proximity sensor around the proximity sensor.
- Page 170 Expected Possible causes Possible corrective measures problems Move the device up and down to focus the QR code and adjust the distance. The QR code is Since they might not be recognised if The QR too small. QR code reader apps were installed code from Google Play, use the QR code cannot be...
- Page 171 Expected Possible causes Possible corrective measures problems After taking photos the save destination The menu does After you have once locked in the cannot be not exist due to the microSD card, restart the camera app. changed to device’s sample The selection screen when the app is the internal concept.
- Page 172 Category Question Answer What functions You can connect a Bluetooth ® audio Bluetooth ® are available via device, such as a Stereo/Mono headset Devices Bluetooth ® or car kit. Contacts data can be synchronised Contacts How can I back up between your phone and your Google Backup Contacts?
- Page 173 Category Question Answer The phone has multilingual capabilities. To change the language: Is it possible to Language change my phone's > 1. Press and tap > Support language? Language & input > Language. 2. Tap the desired language. VPN access configuration is different for each company.
- Page 174 Category Question Answer I downloaded an > 1. Press and tap > application and it Apps > DOWNLOADED. Application causes a lot of errors. 2. Tap the application, then tap How do I remove it? Uninstall. Is it possible to charge my phone using Yes, the phone is charged through the Charger...
Need help?
Do you have a question about the Wine Smart LGS01 and is the answer not in the manual?
Questions and answers