Advertisement
Quick Links
Advertisement

Summary of Contents for DRAGON SLAY Universal Arcade Fightstick
- Page 1 Universal Arcade Fight Stick For PC, PS4 , XB1 and Android USER MANUAL...
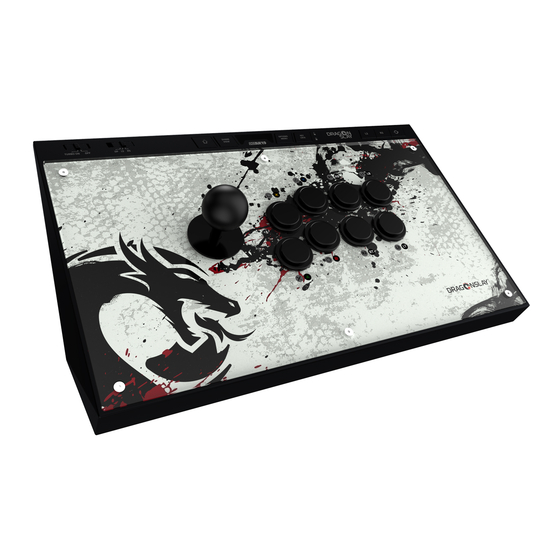
- Page 2 Package Content: • Universal Arcade Stick x 1 • Hex Screw Driver x 1 • Replacement Artwork x 2 • USB Cable (1m) x 1 • User Manual x 1 TURBO STICK MODE LOCK LED SWITCH BUTTON SHARE OPTIONS VIEW MENU LOCK TURBO ON...
- Page 3 SHARE/VIEW Key Lock HOME BUTTON OPTIONS/MENU SHARE OPTIONS VIEW MENU LOCK TURBO ON DP LS RS USB IN CABLE OUT STORAGE COVER...
- Page 4 SCREW DRIVER REPLACEMENT BUTTONS Specification: • Precise and robust Sanwa Denshi parts, Stick and Buttons • Vewlix Style 8 Button Arcade Layout ideal for all fighting games • L3, R3 buttons for added game play options • Turbo mode/switch for all 8 action buttons •...
- Page 5 PC / Android Instruction: 1. Take out the build-in USB cable from the storage space at the back of the Arcade Stick. 2. Connect the USB head to the USB port of PC / Android device. 3. The Arcade Stick will auto into the Xinput mode and ready for play.
- Page 6 controller and Arcade Stick while play. 5. If the PS4 controller didn’t success connect to the Ar- cade Stick, two LOCK LED will both flash 3 times. Please remove the USB cable from the USB port at the back of the Arcade Stick, then repeat step 3 &...
- Page 7 TURBO Function: TURBO function could be set for 8 action buttons. TURN ON: By holding the buttons which you would like set the TUR- BO function, then slide the TURBO switch from “OFF” to “TURBO ON”. When you holding the action buttons which been enable the TURBO function, these button will be output command 10 times per second.
- Page 8 KEY LOCK: KEY LOCK button allow lock buttons during the game avoide press by mistake to disturb the game play. The following five buttons will be lock when press the KEY LOCK button. 1) Back 2) Home 3) Start 4) L3 5) R3 The LOCK LED will turn ON when above buttons been locked, press the KEY LOCK button again to unlock these...
- Page 9 3. Remove the connect cable for the button which you would like for replacement, and holding two side release clip to remove the button from top side. 4. Install the new buttom from top side, then rotate the button you hear a click sound. 5.
- Page 10 Artwork Replacement: Please follow these instruction to replace buttons: 1. Take out the hex screw driver from the storage space at the back of the Arcade Stick. 2. Remove 7 screws at the bottom of Arcade Stick, and re- move the bottom plate.
- Page 11 3. Remove the connect cable for all 8 action buttons, and holding two side release clip to remove these buttons from top side. 4. Use normal flat screw driver to hold the Joystick middle stick not move, then rotate to remove the top ball from the joystick.
- Page 12 5. Remove 4 screws at the top of Arcade Stick, and remove the top panel. TOP PANEL ACTION BUTTONS SCREWS REPLACEMENT ARTWORK PAPER 6. Replace the Artwork Paper. 7. Install back the Top panel, action buttons and top screws. 8. Follow by the cable assignment label to connect correct color cable to each button.
- Page 13 PRECAUTION AND MAINTENANCE 1. Please make sure there is no extreme pressure put on this product. 2. Don’t dismantle this product without permission. 3. This product should be situated away from heat sources such as radiators and heaters. 4. Keep this product dry and avoid any contact with damp or wet areas.
Need help?
Do you have a question about the Universal Arcade Fightstick and is the answer not in the manual?
Questions and answers