Advertisement
Quick Links
Advertisement

Summary of Contents for Eagle Eye Watch
- Page 1 Owner’s Manual...
- Page 2 Quick Setup Guide • Insert the SIM card into the watch. The SIM slot is behind the rubber cover labelled SIM CARD on the left of the watch. Use a fingernail or other small item to prise open the rubber cover.
- Page 3 Charge the watch’s battery. The micro-usb port is behind the rubber cover on the right of the watch. • Turn on the watch. The power button is the large button on the right of the watch marked with SOS and the power symbol.
- Page 4 SE Tracker setup • Install SE Tracker on your phone from the App Store. It’s available for free for Android and iOS. • Once installed, tap the Register button.
- Page 5 Watch already logged in, the other parent will have to sign in using the same log in and password.
- Page 6 • Nickname This is the name which will be applied to the watch. It is recommended to set this to the name of the child who will be wearing the watch. The nickname is used to identify the watch in the app.
- Page 7 Features...
- Page 8 GPS Real-time Positioning Your watch allows you to locate the device in real- time through the SeTracker app. How to locate the watch Open the SeTracker app and login. Once you’re successfully signed in, press the large Map button in the top right of the app’s home screen.
- Page 9 To configure how often the watch sends its location, tap Settings on the home screen and press Location Update Schedule. You can set the watch to send its location every 1 minute (Follow Mode), every 10 minutes (Normal Mode) or every hour (Power Save Mode).
- Page 10 Your watch can make and receive phone calls to pre-approved numbers. In an emergency situation, pressing and holding the SOS button on the side of the watch for three seconds will make the watch dial the pre-approved numbers one at a time until one of them answers.
- Page 11 Settings on the home screen and press SOS Numbers. From here, you can add up to three different emergency contact numbers. The watch will dial each of the three numbers in the order they appear in the list, and will call each entry one at a...
- Page 12 Removal Alarm Once the wearer puts on the watch, a sensor kicks in and starts monitoring the wearer. When the watch is removed, the sensor issues an alert informing the app that the watch has been removed. Configuration To toggle whether or not to receive an alert when the watch is removed, tap Settings on the home screen and press Watch Removal Alert.
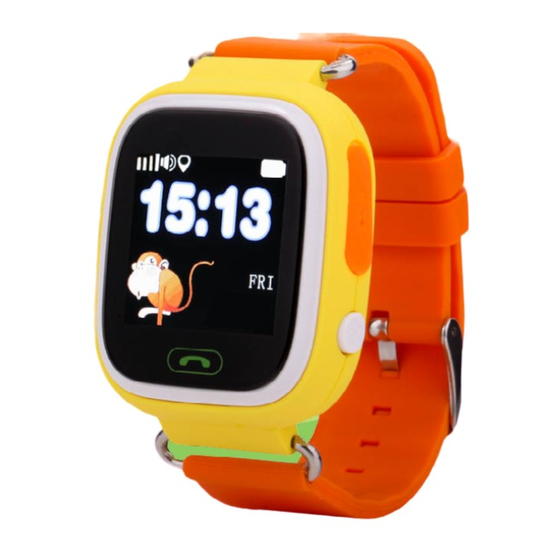
- Page 13 Touchscreen Display The watches have a high resolution touchscreen display, allowing familiar gestures such as swiping and tapping. In fact, the watch only has one physical button, the emergency SOS button on the right-hand side.
- Page 14 The app allows you to specify an area, centred on the watch’s current location, which the watch and wearer are permitted to be. If the watch travels outside this area, the app will issue an alarm stating that the watch has left the area.
- Page 15 On the map screen, tap where you would like the centre of the geofence to be. Give it a name, and adjust how large you would like the geofence to be (minimum 200 metres), then press Save.
- Page 16 Voice Monitoring In an emergency situation, the watch allows you to activate its microphone and listen in to what is happening around it. To activate On the app’s home screen, press Settings. On the settings page, press Sound Guardian. The app will then ask you for a phone number.
- Page 17 Configuration On the app’s home screen, press Health. To activate statistic tracking, press on one of the four categories, enter the child’s settings, and enable Switch. The watch will then begin tracking and reporting on that statistic.
- Page 18 The watch will only accept phone calls from numbers which have been added through the SeTracker app. To add numbers, press Settings on the app’s home screen, then press Phone Book. You can add up to 5 phone numbers to the watch’s phone book.
- Page 19 Phone book page, then tap it. Once you are in the phone book, you can swipe through the entries then tap the contact you wish to call. The watch will dial the number as if it were a phone. Tip: Did you know your child can add his/her friends’...
- Page 20 SMS Messaging The watch is capable of receiving and displaying text or voice messages from the app. Sending messages to the watch From the app home screen, press the Chat icon. This will show you a history of all messages sent to...
- Page 21 Changing between voice and text To toggle between message types, tap the button in the bottom left. This allows you to either type a new message to send as text, or press and hold the Start Recording button to send a voice message.
-
Page 22: App Settings
App Settings The app allows you to configure the watch’s settings, as well as to locate the watch and its wearer in real-time. Settings Press the settings button to configure the watch and set various preferences • SOS Numbers Press this option to add up to three emergency contact numbers to the watch. - Page 23 10 minutes. • Do Not Disturb Press this to enter time periods when the watch will be silent and will not play any alerts. • Contextual Model Press this to change the notification settings for the watch.
- Page 24 Set the app’s language and time zone. The default language is English. • Watch Removal Alert This setting allows you to tell the watch whether or not to send an alert if the watch is removed from the wearer’s wrist.
Need help?
Do you have a question about the Watch and is the answer not in the manual?
Questions and answers