Advertisement
Audible Alarm
Instruction Manual
TYPE : BD
We thank you for purchasing PATLITE Audible Alarm. Before you start using the product,
please read this instruction manual carefully to use the product correctly. Please store
this document in a safe place. Be sure to read this document again when you are about
to perform tasks such as maintenance and repair.
And if you have any questions, contact a branch office or the technical support printed on
the last page.
Safety Precautions
The precautions which must be observed to prevent damage to the person using the
product, to people around it, or to property are described in a manner shown below
The seriousness of injury or damage caused by ignoring the indication and using the
product in a wrong way is categorized with the indications below and descriptions are
added to each of them
The sections with this indication contain "items which could
Warning
cause death or serious injury" if ignored.
The sections with this indication contain "items which could
Caution
cause injury or property damage only" if ignored.
1. Cautions Which Must Be Observed for Safety Use
Warning
Be sure to turn the power off before wiring or installing the product. Failure to do
so may cause electric shock.
Take care to perform wiring correctly. If the wiring in incorrect, internal circuit may
be damaged by fire, and it may also be a cause of fire.
As for the power source, be sure to use this product within the allowable range
of voltage. Failure to do so may be a cause of fire or damage to the product.
When the product is used for security purposes in which safety is emphasized,
be sure to perform daily maintenance, and design a system which is capable
of tackling the occurrence of unlikely event such as malfunctioning or failure.
Be sure to let specialists perform installation task which requires construction work.
Failure to do so may cause electric shock, fire, or falling.
Caution
Before you start working on the product, discharge static electricity
from your body. By touching another grounded metal part with bare hand,
the static electricity can be discharged.
To protect power source circuit and internal circuit of the product,
be sure to install external fuse.
Failures caused by using the product in ways not observing the Warnings and Cautions,
by disassembling or converting the product, or by natural disaster are not covered under
warranty. And do not use the product in ways other than the ways described in this
document.
Other Precautions
Use the product in an environment where there is no electromagnetic or inductive
noise. Speakers are known to generate noise.
Use the product in an environment where there is no corrosive gas.
Failure to do so may cause malfunction.
Do not use the product as fire alarm.
2. Model Indicating Format
Normal-rated voltage
Sound Chart type
Color of body front
24 : 12-24V DC
A Type A
J : Light gray
100 100/220
AC
C Type C
K : Dark gray
D Type D
E Type E
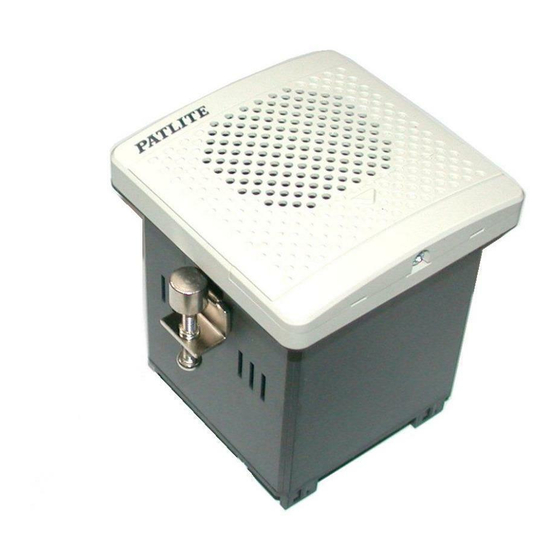
3. Part Names
Front panel
Sound group
Selection switch
Air duct
Waterproofing rubber
for the slot
Volume control
Mounting screw for front
cover (M3X6)
Front cover
Card slot
Mounting hardware
(attachments)
Case
SD card
Terminal block
(Model: SDV-128P Sold separately)
(screw M3X6)
Terminal cover
* PATLITE Corporation is a member of
the SD Card Association
4. How to Install
Install the product according to the procedure below.
Create mounting holes on a mounting surface (board thickness: 1mm - 10mm)
where there is enough space for the mounting hardware. (See the mounting dimensions diagram)
(a) Insert the product from the front of the mounting surface.
(b) Attach the mounting hardware which comes with the product to the holes on the side of the product.
(c) Then fasten the screws of the mounting hardware. (Recommended fastening torque: 0.7 0.1N m)
Confirm that the product and the mounting hardware are installed properly.
(104mm)
Mounting surface
(board thickness: 1mm - 10mm)
+0.7
68
mm
0
(a)
(b)
Mounting
Mounting dimensions diagram
hardware
* Dimensions of the mounting holes
(c)
conform to IEC-61554 (DIN-43700)
Warning
Be sure to turn the power off before installing the product. Failure to do so may cause electric shock.
Caution
Choose a location for the mounting surface where it has enough strength to support the weight of the product, and where
there is less vibration. Failure to do so may be the cause of injury or damage to the product.
Be sure to use both pieces of mounting hardware, and fasten them with the recommended fastening torque. Failure to do
so ay be the cause of injury or damage to the product.
Other Precautions
Secure a enough space in which the mounting hardware can also be installed when choosing a mounting surface.
Install the product on a flat surface without bumps and dips. Failure to do so may weaken its resistance to water and dust.
To prevent the product from falling in places where vibration may be generated, apply thread locking adhesive or the like,
and perform periodic checking of the tightness of the mounting hardware.
Install the product in a way the air ducts are not blocked.
Keep a space more than 6.3mm between the terminal block and the metal surface.
5. How to Perform Wiring
Before wiring the product, remove the terminal cover. And after the completion of the
wiring attach the terminal cover.
For the external contact of signal line, use no-voltage contact circuit such as relay switch
or open collector circuit (NPN type). As for the contact capacity, see the table below.
Contact capacity
Inrush current
Withstand voltage
DC12V or higher
5.5A/6ms at maximum
BD-24
Current capacity
BD-100
7mA or higher
None
Leakage current
0.1mA or lower
ON voltage (Vsat)
(0.5V or lower in case of DC12V)
Wiring examples
BD-100
Wiring when
NPN transistor is used
COM side
CH side
Fuse
CH4
250V 0.5A
CH3
Fuse
125V 0.5A
CH2
100V AC
CH1
COM
* Do not connect the power
sources of 100V and 220V
When circuit is opened: DC12V
simultaneously.
When circuit is closed: 7mA
Wiring when
NPN transistor is used
COM side
CH side
CH4
CH3
No Use
CH2
Fuse
CH1
125V 0.5A
COM
When circuit is opened: DC12V
When circuit is closed: 7mA
Warning
Be sure to turn the power off before you start wiring. Failure to do so may cause electric shock.
The terminal screws should be fastened with the recommended fastening torque (0.3N m). Failure to do so may
cause short circuit due to disconnection of wire, and damage to the product.
When the product is used in places where vibration occurs, perform periodical checking of the tightness of the
terminal screws to prevent letting go of the wires.
Caution
To protect the power source circuit and the internal circuit of the product, be sure to install an external fuse.
Other Precautions
Be careful not to lose the terminal cover.
The use of M3 ring terminals with insulating coating is recommended for the wiring of terminal block to prevent
disconnection of wires.Recommended product: N1.25-3 produced by JST Mfg. Co., Ltd.
(Product confirming to RoHS)
When the product is to be used in a condition in which it is connected to power source, install a switch near the
main body to be able to turn off the power easily for safety reasons.
Confirm that the wiring has been performed correctly before turning on the power.
6. How to Use the Product
6-1 Opening and Closing the Front Cover
Open or close the front cover according to the procedure shown below when
performing tasks such as adjusting the volume of the sound or selecting the tone color
group.
Loosen the mounting screw (M3X6) for the front cover.
(An screw does not fall out.)
Push the lower front cover section (part A in the figure on the right)
lightly with finger to slide it downward.
When a SD card is to be used, remove the waterproofing rubber for the slot.
After completing tasks, attach the parts removed in the procedure from
to
in the opposite order.
(Recommended fastening torque for the mounting screw: 0.3N m)
Waterproofing
rubber for the slot
Sound group
Volume control
selection switch
Card slot
Other Precautions
Be careful not to lose the waterproofing rubber for the slot.
Do not try too hard to slide down the front cover. To do so may cause the front cover to disassemble.
Attach the waterproofing rubber for the slot securely. Failure to do so may weaken the product's resistance
to water and dust.
Fasten the mounting screw for front cover with the recommended fastening torque. In places where
vibrations occur, the front cover may fall or the product may be damaged.
6-2. Selecting a Sound Group
Use the sound group selection switch to select a group from the 16 types
from A to P. Use a flat-blade screwdriver with the blade thickness of 1.0mm or
thinner for turning the switch. (Factory default setting: Sound group A)
When the sound group P is selected, any sound may be combined freely
using an SD card. (Factory default setting: See the table below)
Refer to the section 6-3. How to Combine Sounds for details.
220V AC
Other Precautions
Make sure that there is no misalignment with the sound group
selection switch when selecting.
If there is misalignment as shown in the figure on the right, the
sound group selected may not play.
Sound Chart type A (BD- A)
Sound List
Stutter(rapid intermittent horn)
Beep (slow intermittent horn)
London Bridge is Falling Down
Bell(clear highpitched bell)
Stutter (rapid intermittent horn)
Synthesized Melody Chime
Bell (clear highpitched bell)
Chime
Yelp (rapid siren)
Call Sign
Rapid Hi-Lo
Fur Elise
Melody Chime
Maiden's Prayer
Synthesized Piano
Minuet
Synthesized Bell
Annie Laurie
12-24V DC
Sound groups
Group
Beep (slow intermittent horn)
Stutter (rapid intermittent horn) Bell (clear highpitched bell)
Rapid Hi-Lo
Melody Chime
Stutter(rapid intermittent horn)
Synthesized Melody Chime
Bell(clear highpitched bell)
Fur Elise
Maiden's Prayer
Minuet
Annie Laurie
London Bridge is falling down
Holdiridia
Mary had a little lamb
The Camptown Races
Cuckoo
Blacksmith in the village
On the Avignon bridge
Daydream Believer
Amaryllis
Symphony No. 40
Silent Lakeside
Mountain musician
Romance De Amour
Petrouchka
Grandfather's Clock
Ave Maria
Holdiridia
Mountain musician
Mary had a little lamb
Romace De Amour
The Camptown Races
Cuckoo
Sound Chart type C (BD- C)
Sound List
Stutter(rapid intermittent horn)
Beep (slow intermittent horn)
Bell(clear highpitched bell)
Stutter (rapid intermittent horn)
Synthesized Melody Chime
Bell (clear highpitched bell)
Chime
Yelp (rapid siren)
Call Sign
Rapid Hi-Lo
Can't Take My Eyes off of You
Melody Chime
Synthesized Piano
Synthesized Bell
Gonna Fly Now (Theme for "Rocky")
Sound groups
Group
Beep (slow intermittent horn)
Stutter (rapid intermittent horn) Bell (clear highpitched bell)
Rapid Hi-Lo
Melody Chime
Stutter(rapid intermittent horn)
Synthesized Melody Chime
Bell(clear highpitched bell)
Can't Take My Eyes off of You
Amairono Kamino Otome
Les Champs-Elysees
Canon
Rara Sanshain
Uchuusenkan Yamato
Oshiete
Makenaide
Gonna Fly Now (Theme for "Rocky")
I Don't Want to Miss a Thing
Yozorano Mukou
Aiwa Katsu
Gattsudaze
Odoru Ponpokorin
Front cover
Imasugu Kisu Mi
Haruyo Koi
Les Champs-Elysees
Canon
Gattsudaze
Mounting screw
Rara Sanshain
Uchuusenkan Yamato
for front cover
(M3X6)
Amaryllis
Holdiridia
Symphony No. 40
Mary Had a Little Lamb
Silent Lakeside
The Camptown Races
Mountain musician
Cuckoo
Romance De Amour
Blacksmith in the village
Petrouchka
On the Avignon bridge
Grandfather's Clock
Daydream Believer
Ave Maria
Yelp (rapid siren)
Synthesized Piano
Synthesized Bell
Chime
Call Sign
Chime
Call Sign
Chime
Call Sign
Chime
Call Sign
Chime
Call Sign
Chime
Call Sign
Chime
Call Sign
Chime
Call Sign
Chime
Call Sign
Chime
Call Sign
Chime
Call Sign
Stutter(rapid intermittent horn)
Synthesized Melody Chime
Bell(clear highpitched bell)
Stutter(rapid intermittent horn)
Synthesized Melody Chime
Bell(clear highpitched bell)
Petrouchka
Grandfather's Clock
Amairono Kamino Otome
I Don't Want to Miss a Thing
Les Champs-Elysees
Yozorano Mukou
Canon
Aiwa Katsu
Rara Sanshain
Truth
Uchuusenkan Yamato
Gattsudaze
Oshiete
Odoru Ponpokorin
Makenaide
Imasugu Kisu Mi
Haruyo Koi
Yelp (rapid siren)
Synthesized Piano
Synthesized Bell
Chime
Call Sign
Chime
Call Sign
Chime
Call Sign
Chime
Call Sign
Chime
Call Sign
Chime
Call Sign
Chime
Call Sign
Chime
Call Sign
Chime
Call Sign
Chime
Call Sign
Chime
Call Sign
Stutter(rapid intermittent horn)
Synthesized Melody Chime
Bell(clear highpitched bell)
Stutter(rapid intermittent horn)
Synthesized Melody Chime
Bell(clear highpitched bell)
Odoru Ponpokorin
Imasugu Kisu Mi
Advertisement
Table of Contents

Related Manuals for Patlite BD-24A-J


Summary of Contents for Patlite BD-24A-J
- Page 1 None Leakage current 0.1mA or lower We thank you for purchasing PATLITE Audible Alarm. Before you start using the product, please read this instruction manual carefully to use the product correctly. Please store ON voltage (Vsat) (0.5V or lower in case of DC12V) Sound group this document in a safe place.
- Page 2 Sound Chart type D (BD- D) 2.Transferring the sound combination data In the My Computer of the PC, open the drive into which the SD card is inserted. Sound List 8. Specifications The sound combination data created in "1. Creating the sound combination data" is transferred to this product. Beep (slow intermittent horn) Chime Saafu Tengoku Sukii Tengoku...
Need help?
Do you have a question about the BD-24A-J and is the answer not in the manual?
Questions and answers