
Subscribe to Our Youtube Channel
Related Manuals for iLive IJP557 v1905-01

Summary of Contents for iLive IJP557 v1905-01
- Page 1 Party Projector · Karaoke · Movie · Music System User’s Guide for Model IJP557 v1905-01 For the most up-to-date version of this User’s Guide, go to www.iliveelectronics.com...
-
Page 2: Important Safety Instructions
Safety Instructions & Warnings Important Safety Instructions FCC Warnings • Read these Instructions. Warning: Changes or modifications to this unit not expressly approved by the party responsible for compliance could void the • Keep these Instructions. user’s authority to operate the equipment. •... - Page 3 Battery Warnings WARNING: To reduce the risk of electric CAUTION RISK OF ELECTRIC SHOCK shock, do not remove cover (or back). No DO NOT OPEN • WARNING: Do not ingest battery, Chemical Burn Hazard. user-serviceable parts inside. Refer servicing ATTENTION •...
- Page 4 Table of Contents Setup ....................5 Features Includes Power...
-
Page 5: Setup
Setup Features Includes • Bluetooth Wireless - range 60 ft. • Remote control with CR2025 battery pre-installed • CD/CD+G/DVD player • 1 microphone • USB port - supports MP4, AVI, and MPEG 1,2 files • AC/DC power adapter • Composite video output •... -
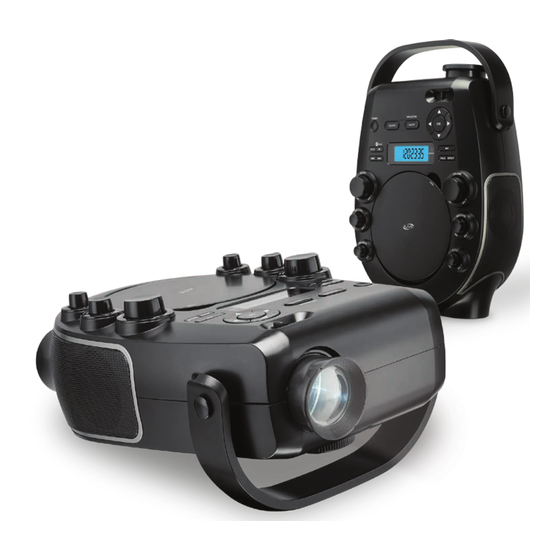
Page 6: Overview
Overview Rear & Top Views... -
Page 7: Remote
1. USB Port 15. Display 2. Audio/Video Outputs 16. Menu / Stop / Pair / Skip Press to access DVD menus. 3. Microphone Inputs Press to stop audio or video (USB, CD, DVD, Bluetooth Modes). 4. DC Power Port Press and hold to pair to a Bluetooth device. Press to skip tracks or chapters. -
Page 8: Remote
Overview Remote Power Projector / AV Out Press to power ON or OFF. Press to play from the projector or AV Outputs. Selecting AV Out Number Keypad will power OFF the projector lens. Use to enter channel Source or track numbers. Press and use the Arrow/Enter Go To buttons to select the source. -
Page 9: Projector Setup
Projector Setup For best results, place the projector in a dark room or other dimly lit area. Projecting onto a smooth, white or lightly colored surface will provide the best picture resolution. Projector Distance: 3-16 ft (1-5 m) Adjust the Lens Tilt Angle to best fit your viewing surface and angle. -
Page 10: Playing Media From Other Devices
Playing Media from Other Devices Playing Media from a Connected USB Storage Device Supports USB drives up to 32GB. 1. Load a USB drive into the USB Port on the rear of the projector. 2. Press the Projector/AV Out button on the projector to turn the lens ON. 3. -
Page 11: Playing Media Through An Hdmi Connection
Playing Media Through an HDMI Connection HDMI offers superior sound and picture quality, and is the easiest way to play media from a laptop, gaming console, or other device with an HDMI output. Requires a HDMI cable (not included) and a device with an HDMI output. 1. -
Page 12: Pairing To A Bluetooth Device And Playing Audio Wirelessly
Playing Media from Other Devices Pairing to a Bluetooth Device and Playing Audio Wirelessly After initial pairing to a Bluetooth device, the unit will stay paired unless unpaired manually by the user, or erased due to a reset of the device. If your device should become unpaired or you find it is unable to connect, repeat these steps. 1. -
Page 13: Sending Media To Other Devices
Sending Media to Other Devices Playing Media on an External Television Requires RCA Composite AV cables (red/white/yellow, not included). 1. Press the Projector/AV Out button on the projector to turn off the lens and play from the AV Outputs. 2. Using RCA Composite cables, connect the Audio/Video Outputs on the rear of the projector to the corresponding RCA Audio/Video Inputs on a television or... -
Page 14: Loading And Playing A Dvd
Loading and Playing a DVD 1. With the unit powered ON, set the Source to DVD Mode. 2. Open the disc door and load a DVD into the projector, label side facing up. 3. Close the disc door. The unit will automatically detect the disc and start playing. Use the remote for play controls, menu navigation, and device options. -
Page 15: Cd, Cd+G & Karaoke
CD, CD+G & Karaoke CD vs. CD+G CD+Gs (CD+Graphics) are CDs that are specially formatted for use with karaoke machines. In addition to the audio tracks, they contain graphics and text for lyrics that will appear while the CD is playing. The unit will automatically detect the type of disc to be played. -
Page 16: Customer Support
Customer Support Contact Information Made Website: www.iLiveElectronics.com Email Support: prodinfo@dpiinc.com Green Email Parts: partsinfo@dpiinc.com Phone Support: 1-888-999-4215 Warranty For Warranty Information and the most up-to-date version of this User’s Guide, go to: www.iLiveElectronics.com International Support Protect for Today Sustain for Tomorrow To download this User’s Guide in English, Spanish, and French, or to get answers to frequently asked questions, visit the support section at: www.iLiveElectronics.com...
Need help?
Do you have a question about the IJP557 v1905-01 and is the answer not in the manual?
Questions and answers
we misplaced the CDs that came with the unit. Are they available for purchase