DeLonghi EC 685 Important Safeguards
Hide thumbs
Also See for EC 685:
- User manual ,
- Instructions for use manual (29 pages) ,
- Manual (15 pages)
Advertisement
Table of Contents
- 1 Important Safeguards
- 2 Save These Instructions
- 3 Short Cord Instructions
- 4 Checking the Appliance
- 5 Instruction for Use
- 6 Description of the Appliance
- 7 Connecting the Appliance
- 8 Description of the Accessories
- 9 Setting Water Hardness
- 10 Tips for a Hotter Coffee
- 11 Cleaning the Drip Tray
- 12 Cleaning the Machine
- 13 Other Cleaning Operations
- 14 Cleaning the Water Tank
- Download this manual
IMPORTANT SAFEGUARDS
When using electrical appliances, basic safety precautions should always be followed, including the following:
• Read all instructions.
• Do not touch hot surfaces. Use handles and knobs.
• To protect against fire, electrical shock and personal injury, do not immerse cord, plug or appliance in
water or other liquid.
• Never allow the appliance to be used by children.
• Unplug from the outlet when not in use and before cleaning. Allow to cool before fitting or taking off
parts, and before cleaning the appliance.
• Do not operate with a damaged cord or plug, or after the appliance malfunctions, or has been damaged
in any manner. Return the appliance to the nearest authorized service facility for examination, repair or
adjustment.
• The use of accessory attachments or spare parts not recommended by the appliance manufacturer may
result in fire, electrical shock or personal injury.
• Do not use outdoors.
• Do not let the cord hang over the edge of the table or counter, or touch hot surfaces.
• Do not place on or near a hot gas or electrical burner, or in a heated oven.
• Plug cord into the wall outlet. To disconnect, turn any control to "off", then remove plug from wall outlet.
• Do not use the appliance for other than the intended use. This appliance is to be utilized for domestic use
only. Any other use is to be considered improper and therefore, dangerous.
WARNING: To reduce the risk of fire or electric shock, do not remove the exterior of the unit or the cover.
Don't attempt to repair or modify the machine, doing so will void the warranty. Repair should be done by
authorized service personnel only!
SAVE THESE INSTRUCTIONS
THIS PRODUCT IS FOR HOUSEHOLD USE ONLY
SHORT CORD INSTRUCTIONS
- A short power cord is provided to reduce risks resulting from becoming entangled in or tripping over a
longer cord.
- Longer, detachable power supply cords or extension cords are available and may be used if care is exer-
cised in their use.
- If an extension cord is used, the marked electrical rating should be at least as great as the electrical rating
of the appliance. If the appliance is provided with 3- wire, grounding type cord, the extension should be
a GROUNDING TYPE 3 - WIRE CORD. The longer cord should be arranged so that it will not drape over the
counter-top or table top where it can be pulled on by children or tripped over.
- Your product is equipped with a polarized alternating current line plug (a plug having one blade wider
than the other). This plug will fit into the power outlet only one way. This is a safety feature. If you are
unable to insert the plug fully into the outlet, try reversing the plug. If the plug should still fail to fit,
contact your electrician to replace your obsolete outlet. Do not defeat the safety purpose of the polarized
plug.
6
Advertisement
Table of Contents

Subscribe to Our Youtube Channel
Related Manuals for DeLonghi EC 685


Summary of Contents for DeLonghi EC 685
-
Page 1: Important Safeguards
IMPORTANT SAFEGUARDS When using electrical appliances, basic safety precautions should always be followed, including the following: • Read all instructions. • Do not touch hot surfaces. Use handles and knobs. • To protect against fire, electrical shock and personal injury, do not immerse cord, plug or appliance in water or other liquid. -
Page 2: Checking The Appliance
1. SAFETY WARNINGS Please note: Danger! Failure to observe the warning may result in life Keep this Instruction for Use. If the appliance is passed to other threatening injury by electric shock. persons, they must also be provided with this Instruction for This is an electrical appliance and may cause electrical shocks. -
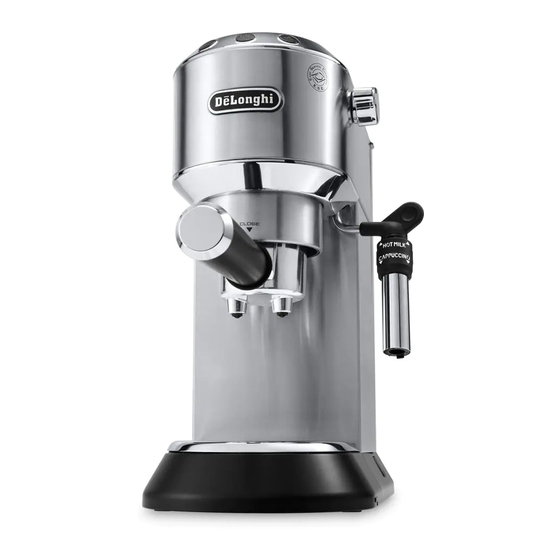
Page 3: Description Of The Appliance
3. DESCRIPTION (page 3) • Arrange the cord in such a way that it cannot be damaged by sharp edges or contact with hot surfaces (e.g. electric The terminology below will be used repeatedly on the following hot plates). pages. •... -
Page 4: Setting Water Hardness
4. Place a container with a minimum capacity of 500 ml The appliance can also be programmed according to the hard- ness of the mains water in the various regions so that descaling under the boiler outlet (A5) (fig. 4) and press the needs to be performed more or less frequently. -
Page 5: Tips For A Hotter Coffee
3. Distribute the pre-ground coffee evenly and press lightly 5. The button flashes to indicate that the selection has with the presser (fig. 8). been saved. Correct pressing of the pre-ground coffee is essential to The appliance exits the menu and is ready for use. obtain a good espresso. - Page 6 ton pressed previously. Delivery is automatically interrupt- 8. Immerse the cappuccino maker in the milk container. ed after a few seconds. Never immerse the black ring (fig. 15). Turn the dial to the • To remove the filter holder, turn the handle from right to position.
-
Page 7: Cleaning The Drip Tray
5. Replace the nozzle, move the ring downwards and put the • Before cleaning the outside of the appliance, turn it off, cappuccino maker back on the connection nozzle, turning unplug from the main socket and allow to cool. it and pushing it upwards until it is attached. 14.2 Cleaning the drip tray 12. - Page 8 4. (Models with water softener filter only) Deliver about 100 Please note: ml of water. During descaling, to clean the boiler outlet, close the steam dial Danger! from time to time to deliver small quantities of descaler from While cleaning, never immerse the coffee maker in water. It is the boiler outlet.
- Page 9 15. EXPLANATION OF LIGHTS Lights Operation Explanation of lights The ON/OFF button is turned on The appliance performs a self-diagnosis cycle, indicated by sequential flashing of the lights When the appliance is turned on Flashing lights: the appliance is heating up to make coffee Lights on steadily: the appliance is ready to make coffee...
- Page 10 The espresso coffee drips from The filter holder has been inserted incor- Attach the filter holder correctly and rotate firmly the edges of the filter holder rectly or is dirty as far as it will go rather than the holes The espresso boiler gasket has lost elas- Have the espresso boiler gasket replaced by Cus- ticity or is dirty...
- Page 11 The appliance does not func- Disconnect the appliance immediately and contact tion and all the lights flash authorised Customer Services. No milk froth is formed when The ring is in the “HOT MILK” position Push the ring into the “CAPPUCCINO” position. making cappuccino Milk not cold enough Always use milk at refrigerator temperature...
Need help?
Do you have a question about the EC 685 and is the answer not in the manual?
Questions and answers