
Summary of Contents for VigaMusicTools intraMic
- Page 1 The first int e r na l m i c r o p h on e for woodwi n d i n s tr u me n ts U S E R ’ S M A N U A L v1.1 14/11/2017 ENGLISH...
- Page 2 2. General overview of the intraMic The two types of cells The preamp Accessories 3. Set up the intraMic on your instrument! The various ways Caution notes prior to installation Installing the intraMic cell Installing the intraMic preamp and coupler 4.
-
Page 3: Introduction
Esay to set up, discreet on stage, the intraMic offers a strong line level signal and can be used with any recording system, or amplifier, mixer, direct injection box, effects looper, effects chain, wireless or not. -
Page 4: General Overview Of The Intramic
While its use will quickly become natural, we encourage you firmly to go through this guide on your first time with your intraMic. Even though every detail of your intraMic has been designed with great care to ensure the standard accoustic operation of your instrument, be sure to properly follow these instructions in order not to mess with your instrument or damage your intraMic’s cell. -
Page 5: The Two Types Of Cells
Now, let’s take a closer look to the core parts of your intraMic. The two types of cells There are two types of cells for the intraMic. Identifying wich type you own is done by looking at th medallion on the connecting part of the cell. -
Page 6: The Preamp
The preamp The preamp is essential to the intraMic’s operations! It restores the characte- ristics of the sound radiated outside the instrument, with a completely analog technology. It is this preamp that you will plug easily into your recording/effects device, thanks to its strong line level signal. -
Page 7: Accessories
• Connectors : phone connector 3.5mm / 6.35mm (1/4’’) • CAUTION : even if it looks like a standard 3.5mm connector, this line is intraMic-specific. Any other standard line could not work. Other available output cables : wireless transmitter adapter, XLR (make sure to disable a potential phantom power!), etc. - Page 8 Elastic mounting hooks (supplied) Available in sizes 200 mm and 130 mm, they are used to fix the coupler, the preamp, the wireless transmitters, etc. Storage and maintenance supplied accessories Ventilated cell storage case Note: The lugs of the Type 1 cell prevent it from sliding freely into the storage case.
-
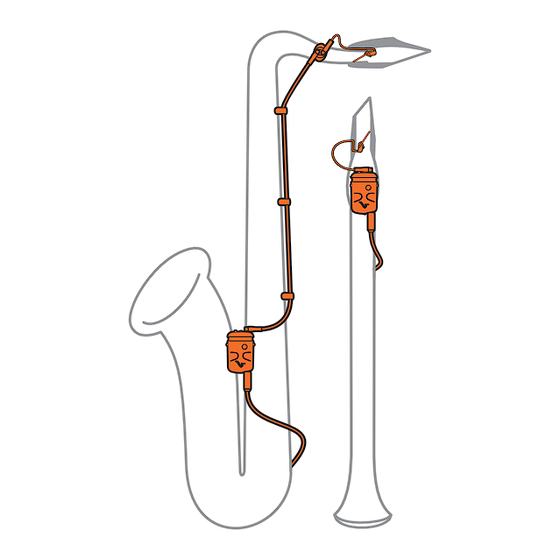
Page 9: Set Up The Intramic On Your Instrument
The cell will then be directly connected to the preamp. • or use the mounting «with coupler» The cell will be connected to the preamp through the intraMic coupler and the extension MCX cable. This way might be useful when you want (or need to) ins- tall the preamp away from the mouthpiece for practical or aesthetical reasons. -
Page 10: Caution Notes Prior To Installation
Caution notes prior to installation • Please only set up intraMic when all the cables are unplugged. • If using an optional XLR output cable, make sure to disable the phantom power of the next device ! Excessive voltage applied on the output of the intraMic preamp could lead to permanent damages. - Page 11 3. Insert the mouthpiece that will hold the assembly. view from above view from above cell inserted up to the lugs cell fully inside the neck Sectional view of a correct assembly in the case of saxophones. - the cell is in the mouthpiece (Type 1) or in the neck (Type 2), well held against the top of the bore.
- Page 12 Installation on clarinets Mounting is identical whatever the cell Type. However, if you’re playing the bass clarinet, only the Type 2 cell will maintain a reliable position thanks to its longer metal buckle. 1. Insert the cell fully into the mouthpiece, metal buckle down, cable up. mouthpiece 2.
- Page 13 Careful-use tips while installing the intraMic cell. • Avoid as much as possible any harsh folds of the flat cable, favor progressive curves. • Limit repetedly folding the flat cable in the same place; if folding is essential (often the case on the clarinet), do not smooth the cable between each use and use the same fold each time you use it.
-
Page 14: Installing The Intramic Preamp And Coupler
If you’re using the mounting « with coupler », start by attaching the coupler as next to the neck as possible so you can connect the intraMic’s cell to the coupler. If you’re using the « simple » mounting, you can go on directly with attaching the preamp to your instrument. - Page 15 It’s pretty much up to you to decide what will be the best configuration. So you get ideas, a few examples are displayed hereafter. Various loops and hooks sizes are available to help you mount the intraMic’s parts on various instruments (and various places on instruments).
- Page 16 A few mounting examples (non-exhautive list) : wireless transmitter The preamp can also be belt-worn, pocketed, left on the ground or attached to a wireless transmitter. Elastic hooks will let you attach a transmitter on your saxophone’s bell for instance. how to use our elastic hooks...
-
Page 17: Fine Tuning And Intramic Cell Types
4. Fine tuning and intraMic cell Types Suggested settings for « brightness » and « presence » on the preamp - soprano, alto, tenor saxophones : brightness / presence - baritone saxophone, clarinet : brightness / presence - flute: brightness... - Page 18 How to actually adjust the preamp’s input gain ? The adjustment is made with the screwdriver provided, wich you should insert very gently into the hole at the back of the preamp housing. The increase in gain is made by turning slowly clockwise. The orange LED serves as an input level indicator.
-
Page 19: Which Cell Type To Choose
Which cell Type to choose ? Two Types of cells are available for the intraMic in order to fit with the broa- dest range of intruments. Identifying the two Types is done thanks to the indicator found on the cell’s connector. -
Page 20: Storage And Maintenance
5. Storage and maintenance Storing the intraMic’s cell While playing, the appearance of a small amount of condensation and splash on the surface of the cell and flat cable is normal. It is important to allow the cell to dry after each use. -
Page 21: Intramic Cell Maintenance
Why is maintenance necessary? The cell is designed to evacuate the condensation that forms continuously in the bore and has a hydrophobic coating. However, depending on the conditions of use, the hydrophobic properties may deteriorate more or less rapidly and maintenance is therefore necessary. - Page 22 How to proceed with the maintenance ? 1. When the cell is dry, use the cleaning brush, after wiping it, to remove impurities. To avoid getting impurities into the vent, rotate the brush in the direction shown in the figure. At the end of this step, the cell must have found a black color.
- Page 23 What precautions should be taken ? CAUTION! • Do not force on the finer parts of the cell : spoiler, interior of the spoiler, metal buckle. • Work in good visibility conditions, with lighting and a magnifying glass if necessary. If in doubt, entrust this work to VIGA MUSIC TOOLS or your luthier.
-
Page 24: Changing The Intramic Preamp's Battery
Changing the intraMic preamp’s battery When to change your preamp’s battery? When the LED goes off, it means that your intraMic preamp will work during at least 4 hours, which leaves time to finish a performance in progress before changing the battery (CR2032). -
Page 25: Technical Specifications
6. Technical Specifications Technical specifications of the intraMic cell Color : black Weight : 2g Length : 12mm (excluding metal buckle) Length of the metal buckle : 22mm (Type 1), 25mm (Type 2) Length of the flat cable : 9cm... -
Page 26: Warnings & Limited Liability Disclaimer
7. Warnings & limited liability disclaimer Warnings : - The intraMic system is made of small parts to be handled with care! - Do not force on the connectors at any time. - Do not expose parts to a source of heat (sun, radiator, stove, etc.) or excessive cold. -
Page 27: Warranty
8. Warranty The intraMic is covered by a limited 2 years warranty starting form the pur- chase date by the first user of the new product. During the warranty period, the product will be repaired free of charge for parts and labor. Do not return the product without contacting us. - Page 28 Please use the specific arrange- ments for dealing with them. IntraMic, VigaMusicTools are trademarks of VIGA MUSIC TOOLS SAS. The other trademarks are the property of their respective owners. All rights reserved. © VIGA MUSIC TOOLS SAS 2017...
Need help?
Do you have a question about the intraMic and is the answer not in the manual?
Questions and answers