
Summary of Contents for Ansr Audio Scan700
- Page 2 Scan700 Professional Wireless by Ansr Audio...
- Page 3 equipment equipment To avoid potential damage from a leaking battery, remove batteries if the transmitters will not be used for a long period of time. more...
- Page 4 AW-75...
- Page 5 AW-75 10. RF Level Indicator: 5- segment meter glows to indicate RF signal strength. For this, more is better. If no signal is indicated, your receiver will mute. 11. AF Level Indicator: 5- segment meter glows to indicate RF signal strength. Will move with your voice level.
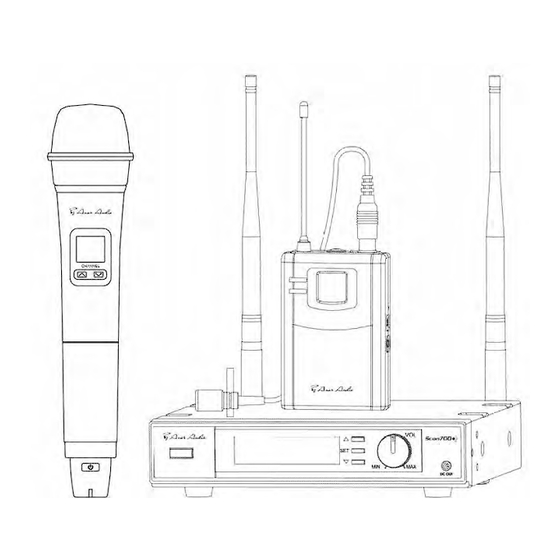
- Page 6 AW-71 4. AW-71 Handheld Microphone condenser element is clear and precise. Rechargeable AA batteries are included, but good quality alkalines may also be used, just in case someone forgets to recharge the transmitter. CHANNEL 1. Grille: Protects the microphone capsule and helps reduce breath sounds and wind noise. 2.
- Page 7 AW-72 The bodypack transmitter operates in UHF band frequency with PLL synthesized control. UHF 700 preprogrammed selectable frequencies to avoid interfer- ence. Various uni-directional electret condenser cartridge options. Use 1.5V x 2 AA size dry or rechargeable batteries for low operating cost. 1.
- Page 8 SET UP WIRELESS 6. Set Up 6.1 Connecting the Receiver • • Plug the DC 12V 500mA power supply into the power connector on the back of the receiver. • Connect the receiver output to the audio mixer or amplifier input, using a standard AC/DC ADAPTER audio cable with 3-pin XLR connectors or ¼...
- Page 9 MANUAL MODE SET UP Pressing the △ or ▽ to select the “MANUAL” mode. Press the ”SET” button for 2 seconds until “MUTE” is shown and the LCD display is flashing, then release the button. • Adjust the channel setting of the transmitter according to the receiver’s channel setting.
- Page 10 AUTO-SCAN MODE SET UP Using the △ or ▽ button to select the “SCAN” mode. Press the ”SET” button for 2 seconds until “MUTE” shows and the LCD display is flashing, then release the button. next • Adjust the channel setting of the transmitter according to the receiver’s channel setting.
- Page 11 AUTO-SCAN MODE SET UP Preset Group Mode Use the △ or ▽ button to select the “PRESET” mode. Press the ”SET” button for 2 seconds until “MUTE” shows and the LCD display is flashing, then release the button. Release button and let LCD display •...
- Page 12 SET UP 6.3 Set Up The Handheld Microphone / Bodypack Transmitter • Open the battery cover and insert batteries into the battery compartment conforming to the polarity (+)(-) marks. • Unscrew the handheld Mic and press to open the battery cover to insert the battery into the battery compartment and confirm the marks of the polarity (+) (-).
- Page 13 SET UP CHARGING CONNECTION CHANNEL 6.4 Charging connection • When the LCD display shows the low battery BATT. power level and the battery inserted is rechargeable. • Using the supplied DC plug cable directly connect to DC out on the receiver and BATT.
- Page 14 Charging Connecting Diagram Charge time varies with Connect the supplied DC1.5 cable to the receiver and the microphone. depth of discharge . The batt e ry level on the LCD display of transmitter is flashing until charging is completed. ** Turn transmitter p ower off when charging.** Do not attempt to recharge alkaline batteries.
- Page 15 installs, With antenna holders (part AW-AM), the booster (part AW-AB) can be secured easily as part of the mount. Consider the AW-AB in cable runs 15 feet or more. Good quality 50 ohm cable is recommended. AW-AM antenna mount and AW-AB booster can be mounted to a wall or on a mic stand. AW-AB.
- Page 16 Turned on? your mixer/amp more interfering with each other. Unique, built in recharging system saves money and time by ending the previous stream of batteries into the trash. Plug it in when you’re done, it’s ready when you are. clean...
Need help?
Do you have a question about the Scan700 and is the answer not in the manual?
Questions and answers