Table of Contents
Advertisement
1. After fitting the castor wheels as per the
instructions, place heater on a flat surface
ensuring there is at least 90cm clearence
all around and over the top of the heater.
Do Not Place items on or against the heater.
3. Turn the Thermostat control down
(anticlockwise) until you hear it click off.
5. With the heat selector switches set to either
"I", "II" or "I and II", turn the thermostat control
up slowly (clockwise) until you hear it click On.
The heater will now start to heat. Adjust up or
down to your desired temperature setting.
Note: As the thermostat
maintains room temperature
it will switch on and off. As it
switches on and off, you may
notice a blue flash from
inside the heater.
This is not dangerous and
is no cause for alarm.
If you have any query, please feel free to call our friendly customer service team
on our toll free number: 1800 079 124 or via email info@hegroup.com.au.
THIS IS IMPORTANT TO YOUR SAFETY.
PLEASE TAKE A MINUTE TO READ IT CAREFULLY
BEFORE SWITCHING ON YOUR NEW HEATER.
QUICK START GUIDE
2. Insert Plug into Power Point and switch on.
Note: Do not use with power boards or
double adaptors, etc. as it may overload
your power point and trip your power.
4. Switch either or both switches to
the "I" or / and "II" postion. The indicator light
in the switch will illuminate.
"I" Only is Low Heat
"II" Only is Medium Heat
"I & II" is High Heat
"O" is OFF
Ensure the switch in the
timer is set to "I" for manual
operation.
6. Do Not Operate while unattended
Press the heat selector swithces to position
"O" (off), then turn power off at the power
point and unplug. Always Unplug when not
in use.
Advertisement
Table of Contents

Summary of Contents for Target T11FOCH16
- Page 1 QUICK START GUIDE THIS IS IMPORTANT TO YOUR SAFETY. PLEASE TAKE A MINUTE TO READ IT CAREFULLY BEFORE SWITCHING ON YOUR NEW HEATER. 1. After fitting the castor wheels as per the 2. Insert Plug into Power Point and switch on. instructions, place heater on a flat surface Note: Do not use with power boards or ensuring there is at least 90cm clearence...
- Page 2 Page 2 of 20...
- Page 3 Oil Filled Column Heater with Timer User Manual T11FOCH16 Input: 220 - 240Va.c. 50Hz 3 Heat Settings 1000W / 1400W / 2400W Rev 1 Note: The specifications and/or components of this appliance are subject to change without prior notice. Page 3 of 20...
- Page 4 Page 4 of 20...
- Page 5 Important Safeguards ............6 Component Diagram .............8 Before Use ................9 Fitting the Castor Wheels ............9 Method of Heating ............... 12 Operation ................12 Low, Medium and High Heat Settings ..........12 Timer ....................14 Cleaning ................15 When the Appliance is Not in Use ........16 Cord Storage...................
-
Page 6: Important Safeguards
Important Safeguards When using electrical appliances, basic safety precautions should always be followed, including the following: Carefully read this instruction manual before using appliance. • Keep appliance out of reach of young children. • This appliance is not intended for use by persons (including children) with reduced physical, sensory or •... - Page 7 • Unplug this appliance before cleaning or storing or when unused for long periods of time. Any type of servicing, apart from ordinary cleaning, must be carried out by an authorised service centre • or qualified dealer. There are no user serviceable parts in this appliance. •...
-
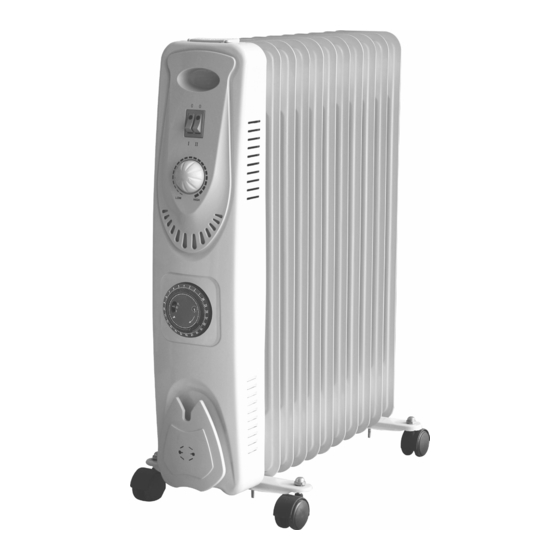
Page 8: Component Diagram
Component Diagram Item Description Handle Power Selection Switches (3 Heat Setting) with Power Indicator Lights Room Thermostat / Temperature Control Air Vents Timer Cord Storage Oil Filled Heater Fins Castor Wheels Page 8 of 20... -
Page 9: Before Use
Before Use Congratulations on the purchase of your new Oil Filled Heater. Remove all packaging and dispose of thoughtfully. Before first using your new Oil Filled Heater, it is most important that you read and follow the instructions in this instruction manual, even if you feel you are quite familiar with this type of product. - Page 10 The diagrams following show how to securely attach the castor wheels so that your Oil Filled Heater can easily be wheeled from room to room. The first step is to attached the castor wheels to their mount brackets. NOTE: It Is Very Important that the castor wheels and mounting plates are fitted correctly. Unscrew the Dome Nuts from the castor wheels.
- Page 11 Bottom of Heater NOTE: It Is Very Important that the castor wheels and mounting plates are fitted correctly. • Turn the heater upside down. Take care as the heater is heavy. • Remove the wing nuts from the U-Bolts and then position the U-Bolt between the end fins and hold in place as shown.
-
Page 12: Method Of Heating
Method of Heating The heating fins are filled with a special oil that conducts heat from the heating element out to the metal surfaces of the fins. This in turn warms the air around them which gently and silently heats the room. You will notice the surfaces in the room (i.e. - Page 13 • Switch “I” and Switch “II”: press both switches to the “I” and “II” positions for “High Heat” setting. Both Indicator Lights in the switches will illuminate indicating power is being supplied. To switch heating off, switch both switches to the “0” position. Both Indicator Lights in the •...
-
Page 14: Timer
6.2 Timer The heater is equipped with a timer so that it can be programmed to switch on and off at your desired time. NOTE: As with all electrical appliances, never use the heater when unattended or asleep. Always switch off and unplug electrical appliances when not in use and when leaving the house. -
Page 15: Cleaning
i.e. With the timer set to the current time (say for example 4pm “16” on the timer) and you wish the heater to turn on at 5pm and turn off at 8pm, push all the Pins outward that are between the numbers 17 and 20. “17 represents 17.00 hours which is 5pm and 20 represents 20.00 hours which is 8pm. -
Page 16: When The Appliance Is Not In Use
When the Appliance is Not in Use 8.1 Cord Storage Wind the cable around the cord storage bracket (Do Not wind on tight) and the plug can be inserted into the bracket if desired as shown. 8.2 Storage When the appliance is not in use or is not going to be used for a long period, disconnect from the electricity supply and store in a dry safe place. -
Page 17: Troubleshooting
Troubleshooting BEFORE contacting a service agent, please check the following points: Symptom Cause Remedy Ensure the power plug is inserted into The Power Plug may not be plugged in the power point correctly and switched to the power point and switched on. Ensure there is power to the power There may be no power to the power point. - Page 18 Allow appliance to heat up and the Burning Smell when first This is normal for first use or for first smell will disappear over a short turned on. use after storing away for some time. period. This will be one or both of the internal Thermostats turning on and off to Clicking Sound during use This is normal for this type of heater.
-
Page 19: Warranty Against Defect
10 Warranty Against Defect WHAT’S COVERED? replacement or refund for a major failure and compensation other reasonably 1.1. H.E. Group Pty Ltd (“us” “we” or “our”) warrants foreseeable loss or damage. You are also this good for a full replacement or refund for a entitled to have the goods repaired or replaced if period of twelve months from the date of the goods fail to be of acceptable quality and the... - Page 20 Page 20 of 20...
Need help?
Do you have a question about the T11FOCH16 and is the answer not in the manual?
Questions and answers