
Subscribe to Our Youtube Channel
Related Manuals for Welby 78-50D4


Summary of Contents for Welby 78-50D4
- Page 1 INSTRUCTION MANUAL deluxe pulse oximeter Item 78-50D4 Please read this instruction manual completely before operating this unit.
-
Page 2: Table Of Contents
INDEX Introduction ..........3 Important Safeguards - Care and Safety Information . -
Page 3: Introduction
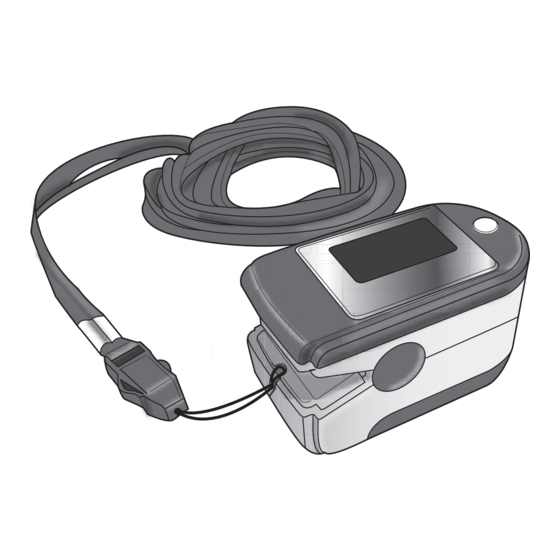
STOP! PLEASE ENSURE YOU HAVE ALL OF THE FOLLOWING PIECES BEFORE USE Unit with Quick-Release Lanyard Instruction Manual IF YOU ARE MISSING ANY PARTS, INCLUDING INSERTS OR INSTRUCTION MANUALS, DO NOT RETURN TO PLACE OF PURCHASE. CONTACT CUSTOMER CARE AT 866-326-1313. INTRODUCTION Please read all instructions carefully prior to first use. -
Page 4: Important Safeguards - Care And Safety Information
IMPORTANT SAFEGUARDS - CARE AND SAFETY INFORMATION PLEASE READ ALL INSTRUCTIONS CAREFULLY BEFORE USE. FAILURE TO READ AND OBSERVE ALL PRECAUTIONS COULD RESULT IN PERSONAL INJURY OR EQUIPMENT DAMAGE. GENERAL CAUTIONS AND WARNINGS • Keep unit and lanyard out of reach of children as the included lanyard may present an entanglement or choking hazard to small children. - Page 5 IMPORTANT SAFEGUARDS - CARE AND SAFETY INFORMATION OPERATING CAUTIONS AND WARNINGS • Never tie or tape Pulse Oximeter to your finger • Explosion hazard: Do not use the product in an explosive atmosphere STORAGE CAUTIONS AND WARNINGS • Never leave the Pulse Oximeter unit in direct sunlight, high temperature or humidity •...
-
Page 6: Features Of Your Device
FEATURES OF YOUR DEVICE Quick-Release Lanyard Power Button Digital Display Battery Compartment (underside) HOW THE PULSE OXIMETER WORKS The Pulse Oximeter works by shining two Light beam sensors light beams into the small vessels or capillaries of the finger to determine the user’s the blood oxygen saturation percentage and pulse rate that is then displayed on the Pulse Oximeter’s screen. -
Page 7: Display Modes
DISPLAY MODES SCREEN DISPLAY ORIENTATION The Pulse Oximeter display can be adjusted to allow for easy viewing from any angle. To change the screen’s orientation, turn the unit on by pressing and releasing the power button. While the unit is ON, continue to press and release the power button until the desired screen orientation is on the display. -
Page 8: Using Your Pulse Oximeter
USING YOUR PULSE OXIMETER The Pulse Oximeter may be used while the user is seated, standing or lying down. The user should not be walking or running during measurements and should take care not to excessively move the arm or hand where the oximeter is attached. PRIOR TO USE Suitable for use on any finger (excluding... - Page 9 USING YOUR PULSE OXIMETER finger, and the sensors inside the unit should align with the finger nail and pad at the tip of the finger. Oxygen Pulse Rate Oxygen Pulse Rate Saturation Battery Saturation Symbol % Sp0 % Sp0 Pulse Waveform Pulse Bar Graph 3.
-
Page 10: Quick-Release Lanyard
QUICK-RELEASE LANYARD The lanyard features a quick-release clip for easy release while in use. CHOKING HAZARD-The included lanyard may present an entanglement or choking hazard to small children. Adult supervision required; never leave children unattended with unit or lanyard. 10 •... -
Page 11: Battery Installation And Replacement
BATTERY INSTALLATION AND REPLACEMENT This unit comes complete with 2 AAA batteries. It is necessary to replace the batteries when the Low Battery symbol appears on the display or when the display does not turn on after the red power button is pressed. 1. -
Page 12: Care And Maintenance
CARE AND MAINTENANCE Before and after each use, carefully swab inside the unit with a soft cloth or cotton swab with rubbing alcohol. Do not pour the alcohol directly on or into the unit. The unit should be stored in a dry environment, within the ideal temperature range of -40°F–140°F(-40°C–60°C). -
Page 13: Troubleshooting
TROUBLESHOOTING or PR is not displaying a reading though the power is on • Reinsert the finger, remain still or PR display readout is unstable and fluctuating highly • Finger may not inserted deep enough • Finger may be trembling, try to remain still The unit will not turn on •... -
Page 14: Specifications
SPECIFICATIONS NAME Deluxe Pulse Oximeter MODEL NUMBER 78-50D4 DISPLAY SYSTEM Digital display/OLED POWER SOURCE 2 “AAA” batteries MEASURING RANGE 0-100% ACCURACY 70-100%, ±2%; ≤69% no definition PULSE RATE MEASURING RANGE 30-250 bpm PULSE RATE ACCURACY 30-250 bpm, ±2 % AUTOMATIC SHUT-OFF... -
Page 15: Warranty
TWO-YEAR LIMITED WARRANTY Congratulations on your purchase of a Deluxe Pulse Oximeter. Your Pulse Oximeter is covered by the following limited warranty commencing upon the date of purchase for a period of two years, and subject to the following terms and conditions: The warrantor warrants that its Pulse Oximeter will be free from defects in materials and workmanship under normal consumer usage for as long as the original purchaser owns the product. - Page 16 FOR FUTURE REFERENCE AND ATTACH YOUR RECEIPT BELOW. This information is necessary should you need to contact Customer Care in the future. Model: 78-50D4 Name: Pulse Ox Fit Deluxe Pulse Oximeter Date Purchased: _____________________________ Store Name: ________________________________ Lot No. (located on the bottom of the monitor)
Need help?
Do you have a question about the 78-50D4 and is the answer not in the manual?
Questions and answers