
Related Manuals for Bushwhacker Batman D2

Summary of Contents for Bushwhacker Batman D2
- Page 1 Infrared Digital Wildlife Camera ◎12MP&1080P ◎Time-lapse Video ◎Write protect ◎48pcs IR Lens Model No.:Batman D2...
-
Page 2: Table Of Contents
CONTENTS Quick Start Guide ..............1 Introduction ..............1 1.1 Application ..............1 1.2 Battery ................ 2 1.3 SD Card ............... 2 1.4 USB Function .............. 4 1.5 Attention ..............4 Camera Overview ..............6 2.1 Camera Front Structure ..........6 2.2 Camera Internal Structure .......... - Page 3 6.2.3 Firmware Upgrades .......... 21 6.3 FAQ ................22 6.3.1 Please do the following checks if camera can not start or work normally ..........22 6.3.2 Factory Default Setting ........23 Warranty Policy ..............25 Appendix I:Standard Packing List ..........27 Statements ..................
-
Page 4: Quick Start Guide
Quick Start Guide Introduction Batman D2 wildlife game camera (also called hunting camera/trail camera) is a scouting device. It can be triggered by sudden change of ambient temperature caused by moving game in a region of interest, which is detected by a highly sensitive Passive Infra-Red (PIR) sensor, and then take pictures or video clips automatically. -
Page 5: Battery
Battery This product can be powered by battery 5 or an external power adapter.。 A. Battery-powered Please use high-quality alkaline batteries, nickel-metal hydride batteries or rechargeable batteries. The camera supports two groups of battery-powered, each group of four batteries, in order to improve the performance of the proposed installation of 8 batteries. - Page 6 is turned on! Note: Before inserting an SD memory card, it is recommended to format the SD card, turn off the SD card lock protection, and insert the SD memory card correctly by the logo. The following table lists the different capacity of the SD card can shoot the number of pictures and video length (the value is for reference only), we can choose to purchase the appropriate capacity of the SD card.
-
Page 7: Usb Function
1080P 720P 1317 WVGA 1757 1206 2360 USB Function This product can be connected via USB to a computer or TV. The camera is connected to the USB port of the computer via the USB data cable, and the key is dialed to TEST. The camera displays the "MSDC"... - Page 8 needs to keep at least 5seconds before you can shut down or cut off power, otherwise it may causes upgrade failure. When install camera please make sure there are not moving objects in 3m area in front of lens such as branches, leaves, weeds, strings, color ribbon and other objects which may fluttered in the wind to avoid potential false triggers.
-
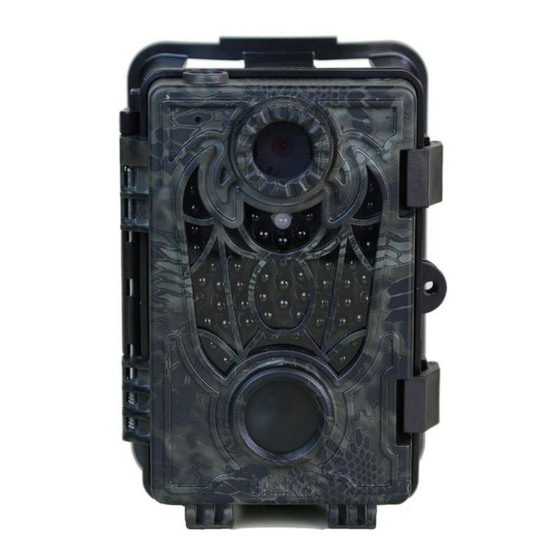
Page 9: Camera Overview
Camera Overview 2.1 Camera Front Structure... -
Page 10: Camera Internal Structure
2.2 Camera Internal Structure Quickly use the camera Switch: 1. Switch to ON, the camera into the work mode (into the work mode, the work indicator will flash red and blue lights 8 times, the display will show the countdown, the official entry into the work mode, the display will close the display). -
Page 11: How To Start The Camera Quickly
3.1 How to start the camera quickly... -
Page 12: Menu Function Table
Menu Function Table Press "MENU" key to enter the menu, press ▲, ▼ key to move the cursor to select various function options, "OK" key to confirm. Press "REPLAY" to enter playback mode. Press the "EXIT" key to return to the previous menu or exit the menu. Menu function is related, part of the menu option will not appear because of the relevant function and display as gray. - Page 13 Camera takes multiple consecutive Shooting photos according to user’s settings 1/2/3/6 per each trigger event. Higher resolution produces better 640*480P/720*480P/ quality videos, but creates larger 1280*720P/ Video Size files that take more of SD card 1920*1080P capacity and longer time to write to the SD card.
- Page 14 interval. After this period of time, PIR will resume waiting for the trigger state. The user can set the sensitivity PIR level Low/Normal/High of the infrared sensor as needed. Used to set the camera's working Timer Off/On time period, this setting period, the camera will not work.
- Page 15 separately. When closed, all stamps are not displayed. 4 characters, each character can Password be arbitrarily selected in 0-9, Off/On 1234 such as forget the password, please contact the dealer. Beep Off/On Turn the key on or off. Sound Format Yes/No Format SD Card 4 characters, each character can...
- Page 16 26543: DSP version number; 82: MCU version number. Playback Delete Cancel Delete current image current file Delete Delete Cancel Delete all images files Delete Auto replay all images, it will be Slide Show stop when press “OK” key Lock Current/ Lock important images to avoid Unlock Current/ deleting accidentally.
-
Page 17: Main Features And Parameters
Main Features and Parameters 5.1 Main Features: 1)Photo Size:1MP/3MP/5MP/8MP/12MP 2)HD Video: 720P@30FPS, 1080P@17FPS, sounds recording can be turned on or off. 3) In "Camera + Video" Mode, camera takes both pictures and video at every trigger event. 4)Time-lapse Video: Camera take a picture based on programmed interval time and it turns it into a video. - Page 18 places, such as parking lot, courtyard etc. 13) Date, time, temperature, moon phase and battery power can be stamped in the pictures. 14) 7 operation buttons beep sound on/off available. 15) Support SD Card up to 32GB. 16) Extremely long in-field battery life (in standby mode, up to 8 months with 8*AA batteries) 17)...
-
Page 19: Technical Parameters
5.2 Technical Parameters Item Parameters Camera Video Mode Camera+Video Time-lapse Video 1MP:1280× 960 3MP:2048× 1536 Image Size 5MP:2592× 1944 8MP:3264× 2488 12MP:4000× 3000 WVGA: 640x480 VGA: 720x480 Video Size 720P: 1280x720@30fps 1080P: 1920x1080@17fps Work Mode Day/Night, Switch automatically Lens FOV=50° , F=2.5, Auto IR-Cut IR Flash 82 Feet/25 Meters IR Setting... - Page 20 Beep Sounds On/Off Memory SD Card(≦32GB) PIR Level High/Normal/Low PIR Sensing 82 Feet/25 Meters Distance PIR Sensor Angle 50° Trigger Time 0.6 Seconds(When using 2GB SD card) PIR Sleep 5 Seconds~60 Minutes, Programmable Shooting Numbers 1/2/3/6 Photos Lock partial or all photos to avoid being deleted; Protection Unlock Video Length...
- Page 21 Power Supply 4× AA, Expandable to 8× AA External DC 6V/2A Power Supply 330μA Stand-by Current Stand-by Time 4~8 Months(4× AA~8× AA) Power 160mA (+1140mA when IR LED lights up) Consumption Low Battery 4.6V Alarm Interface TV-out, USB,SD card slot,6V DC External Mounting Strap;...
-
Page 22: Others
Others 6.1 Replay With “REPLAY” button and other buttons can review/play/delete photos and videos in SD card; Photos can zoom in/zoom out/move; Nine-rectangle-grid mode to view images; Lock/unlock photos; Slide show, etc. Image Review: After press “REPLAY” button through ◄/► can review photos/videos in SD card. - Page 23 times play speed. Slide Show Auto play images in the way of slide show. On “Replay” mode, press “MENU” button and choose “Slide Show”, through ◄/► can set interval time “3 seconds”, “5 seconds”, “8 seconds”. Note: When auto play images, the video files will only show the first scene, not play the whole video.
-
Page 24: Details Of Partial Function
Details of Partial Function 6.2.1 Timer Set camera to work within specified time period every day. Outside the time period the camera will not be triggered or take photos/videos, it supports 2 groups of timer set. Default set: Off, “00:00——00:00” Off, “00:00——00:00”... -
Page 25: Faq
Follow the steps below to implement the upgrades: Ready formatted a SD card; Copy the files of the new version of the software files named "ISP_SD.bin" and "Rom_Code_D2_01 _ ***** - **. Bin" into the SD card root directory. Insert SD card to camera, while press "OK" button switch camera to “TEST”... -
Page 26: Factory Default Setting
6.3.2 Factory Default Setting Item Parameters Work Mode Camera Picture Size 5MP(2592× 1944P) Shooting Numbers Video Size 1280x720P Time-lapse Video 2592× 1944P Resolution Video Length 5 Seconds Video Recording PIR Sleep 1 Minute PIR Level Middle Timer Time lapse Language Simplified Chinese Time &... - Page 27 Device No. Restore Factory Defaults Version D2-01-26861-82...
-
Page 28: Warranty Policy
WARRANTY The warranty suits for all authentic Bushwhacker products. If your purchasing product with any quality problem, you can obtain one year warranty. - Page 29 4. Damage in process of use 5. Product lost. 6. Out of one year warranty. Please keep the warranty card for guarantee to keep in repair. The warranty policy applies to the authorized dealer by Bushwhacker and buyer who purchase directly from factory only.
-
Page 30: Appendix I:standard Packing List
Appendix I:Standard Packing List Quantity Part Name Digital Camera USB Cable TV Cable Strap Manual Warranty... -
Page 31: Statements
Statements The manufacturer reserves the right to amend the content due to editing or typographical errors, product upgrades and other factors which may causes discrepancies. Amendments will be applied to latest user’s manual. These are subject to change without prior notice.
Need help?
Do you have a question about the Batman D2 and is the answer not in the manual?
Questions and answers