Table of Contents
Advertisement
Advertisement
Table of Contents
Troubleshooting

Related Manuals for Omnitracs MCP50

Summary of Contents for Omnitracs MCP50
-
Page 1: Troubleshooting
MCP50 Installation and Troubleshooting Guide 80-JB566-1 Rev. G October 2015... - Page 2 Omnitracs endeavors to ensure that the information in this document is correct and fairly stated, but Omnitracs is not liable for any errors or omissions. Published information may not be up to date, and it is important to confirm current status with Omnitracs.
-
Page 3: Installation Contents
Installation Contents Component Overview Activation Installation Planning Vehicle Telematics Module 50 (VTM50) Installation Antenna Installation Display Interface Unit 50 (DIU50) Installation Power/IO Cable Connection Scanner Optional Accessories 10. System Verification 80-JB566-1 Rev. G MAY CONTAIN U.S. AND INTERNATIONAL EXPORT CONTROLLED INFORMATION... - Page 4 Installation Contents 80-JB566-1 Rev. G MAY CONTAIN U.S. AND INTERNATIONAL EXPORT CONTROLLED INFORMATION...
-
Page 5: Important Safety Information
If you are a Third-party Device Manufacturer or Application Developer, it is your responsibility to provide appropriate warnings regarding the safe use of your device(s) in conjunction with Omnitracs equipment. Applications should not require the driver to divert his attention from the road while driving a vehicle. - Page 6 Safety Advice Important Safety Information 80-JB566-1 Rev. G MAY CONTAIN U.S. AND INTERNATIONAL EXPORT CONTROLLED INFORMATION...
-
Page 7: Component Overview
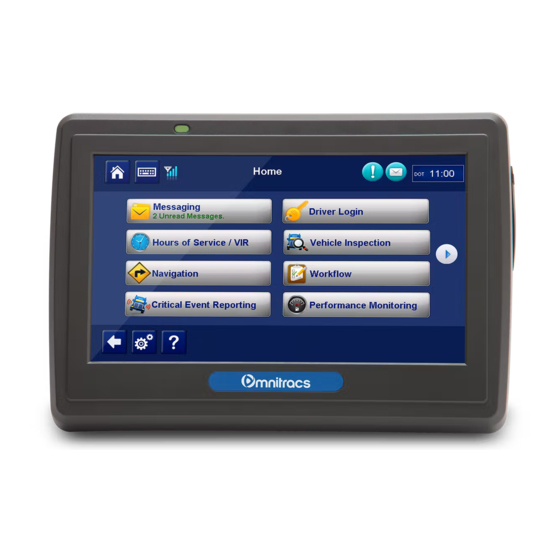
Component Overview Components Component Overview Components Antenna The antenna includes a cellular modem and GPS receiver. • Dimensions: 4 1/8 x 2 1/8 x 1 1/8 inches • Weight:6 ounces • Cable attached for connection to VTM (cellular/GPS leads) • Cable length: 7 feet Display Interface Unit 50 (DIU50) A color graphical display that integrates touchscreen functionality. -
Page 8: Vehicle Telematics Module 50 (Vtm50)
Vehicle Telematics Module 50 (VTM50) Component Overview Vehicle Telematics Module 50 (VTM50) The VTM provides power to the display and processing of vehicle data. • Dimensions: 6 1/2 x 3 3/4 x 1 1/2 inches • Weight: 12 ounces • Supports J1587 and J1939 vehicle data protocols •... - Page 9 You should have also received the following product documentation. Ensure you leave all documents in the cab of the vehicle. • MCP50 Quick Reference Card (80-JB662-1) • HOS DOT Quick Reference Card for use with the MCP50 (80-JB918-1) • VIR DOT Quick Reference Card (80-JA348-1) • MCP50 Getting Started Guide (80-JB107-1) 80-JB566-1 Rev.
- Page 10 Product Documentation Component Overview 80-JB566-1 Rev. G MAY CONTAIN U.S. AND INTERNATIONAL EXPORT CONTROLLED INFORMATION...
- Page 11 This assigns the unit to the correct customer account and registers it on the cellular network. MCP50 activation requires access to the Customer Portal. Contractors and Service Centers must work with the customers to activate units. The online activation process may take up to 2 hours to complete. To perform the online activation: Using your supplied credentials, log into: https://customer.omnitracs.com.
- Page 12 Online Activation Activation You will then see the main Activations screen. From here click Continue under System Activation. 80-JB566-1 Rev. G MAY CONTAIN U.S. AND INTERNATIONAL EXPORT CONTROLLED INFORMATION...
- Page 13 Activation Online Activation Select the serial numbers of the VTMs that are planned for installation. Click Add Selected Units. The VTMs added will be shown in the top right corner. You could also use the Enter Units tab to either type or paste in a list of units. Then click Continue.
- Page 14 Online Activation Activation Verify that these are the VTMs you want to install. Click Submit. You will then see a screen confirming that the activation process has begun. This process could take up to 2 hours to complete. 80-JB566-1 Rev. G MAY CONTAIN U.S.
- Page 15 Activation Online Activation To verify that the unit you are installing is activated, click Activation History. Choose what types of activations you want to see. You will then see a screen similar to the following. Note: You can only search previous replacements. 80-JB566-1 Rev.
- Page 16 Operational Profile. A customer can select which applications a given unit should have. Those applications that are not available will not be selectable at the MCP50 display (grayed out). In the sample screen below, Workflow is showing as not available.
- Page 17 Activation Application Management Click on Manage Operational Profiles. 80-JB566-1 Rev. G MAY CONTAIN U.S. AND INTERNATIONAL EXPORT CONTROLLED INFORMATION...
- Page 18 Application Management Activation A screen similar to the below will list the available Operational Profiles. 80-JB566-1 Rev. G MAY CONTAIN U.S. AND INTERNATIONAL EXPORT CONTROLLED INFORMATION...
-
Page 19: Installation Planning
Installation Planning Regulatory Compliance Information Installation Planning Regulatory Compliance Information FCC/IC Compliance Statement This device complies with part 15 of the FCC Rules. Operation is subject to the following two conditions: (1) This device may not cause harmful interference, and (2) This device must accept any interference received, including interference that may cause undesired operation. -
Page 20: Tools And Supplies Recommended For Installation
Safety, Reliability, and Accessibility Installation Planning Safety, Reliability, and Accessibility • Use eye protection when using a drill/performing work that may be hazardous to the eyes. • Use ear protection in noisy work areas. • Wear appropriate clothing/uniforms and safety shoes. •... -
Page 21: Vehicle Telematics Module 50 (Vtm50) Installation
Vehicle Telematics Module 50 (VTM50) Installation Installing the VTM50 Caution The VTM50 must be secured to prevent movement. Movement will affect operation. Location and Orientation • Install the VTM within the truck’s dash • It is essential that the VTM is securely mounted to a solid surface. The accelerometer inside the VTM will not work properly if it’s not secured. - Page 22 Securing the VTM50 Vehicle Telematics Module 50 (VTM50) Installation Securing the VTM50 Use provided Dual Lock tape or self-drilling screws to mount and secure the VTM to a solid surface within the dash. Using Dual Lock Tape (Used for most installations) Separate the two sides of the Dual Lock tape.
-
Page 23: Antenna Installation
Antenna Installation The antenna must be installed horizontally/flat in the dash or on top of the dash. It must be oriented as shown below. There is a label on the side of the antenna that indicates which side of the antenna is the top. Install as high up in the dash as possible. In dash On top of dash with Customer Approval only... -
Page 24: Installing Antenna
Installing Antenna Antenna Installation GPS Screen 1.00 7/12 Installing Antenna Separate the two sides of the supplied Dual Lock tape. Clean the surface of the antenna where the Dual Lock tape will be applied with the provided alcohol wipe. Once the surface is dry, adhere one side of the Dual Lock tape. Apply firm pressure to the tape. -
Page 25: Display Interface Unit 50 (Diu50) Installation
Display Interface Unit 50 (DIU50) Installation Selecting a Mounting Location IMPORTANT SAFETY INFORMATION WARNING Do not locate the display unit where it obstructs the driver’s field of vision, distracts the driver from the driving task, interferes with the driver’s operation of controls or displays, or creates a safety hazard. -
Page 26: Installing The Display
Installing the Display Included with the MCP50 system is RAM mounting hardware. Always use the supplied backing plate to strengthen the support for the mount. Once a suitable location is selected, verify that there is nothing behind the mounting surface that might be damaged by drilling holes. - Page 27 Display Interface Unit 50 (DIU50) Installation Installing the Display Drill 3/16" holes for the mounting bracket and backing plate using the backing plate as a template. Attach the RAM mount ball joint to the dash using the supplied 8x32 screws, lock washers, and backing plate.
- Page 28 Excess cable can be a tripping hazard. Ensure cable is not draped where it will interfere with either the driver or passenger as they move within the cab. Caution Never connect the MCP50 display cable and the power cable directly to each other. Only connect these cables to the MCP50 VTM. 80-JB566-1 Rev. G...
-
Page 29: Power/Io Cable Connection
The Power/IO cable is used to connect to a truck’s Diagnostic Connector. It provides both power and the necessary vehicle data for the MCP50 system. There are multiple masterpacks depending on the truck type. See the individual Truck Installation Suggestion documents for more information. -
Page 30: Connecting The Power/Io Cable
Verify by pull testing the connector. Caution Never connect the MCP50 display cable and the power cable directly to each other. Only connect these cables to the MCP50 VTM. For 6-pin or 9-pin cables, connect the ignition wire to a 12 VDC ignition switched source. - Page 31 OFF and accessory position. Note: Trucks wired to accessory for ignition may experience issues with applications using data. The MCP50 unit is expecting data when it sees an ignition on signal.Trucks do not send data in the accessory position. 80-JB566-1 Rev. G...
- Page 32 Extending MCP50 Ignition Wire Power/IO Cable Connection WARNING Stow and secure any excess cable behind the dash panel. 80-JB566-1 Rev. G MAY CONTAIN U.S. AND INTERNATIONAL EXPORT CONTROLLED INFORMATION...
-
Page 33: In-Cab Scanner Installation
In-Cab Scanner Installation Overview For scanners to work on the MCP50 both the application software and operating system must meet the minimum requirements as described below. Minimum Requirements • Software version CA0921R. • Windows CE operating system LT0038 and higher. -
Page 34: Mounting The Scanner
Installation Guidelines In-Cab Scanner Installation Installation Guidelines Install the scanner in the cab of the vehicle in a location that is convenient and safe. This can be on a vertical or horizontal surface. The scanner cannot obscure the driver’s view of the road. -
Page 35: Installing The Scanner
Connect the smaller end of the scanner cable to the USB port on the end of the scanner. Connect the scanner cable to the MCP50 using the USB port on the display. Store excess scanner cable where it will not be damaged and will not obstruct the driver or hinder truck performance. -
Page 36: Sending A Scan
Sending a Scan In-Cab Scanner Installation Tap the Calibrate button. Wait a few minutes for the calibration to complete. Tap the Scan tab to return to the scanning home screen. Sending a Scan On the Home screen, tap the Scanning button. Select the Document Type from the drop-down list. -
Page 37: Cleaning The Scanner
In-Cab Scanner Installation Cleaning the Scanner Tap the Scan Page button. Note If the preview box is checked, a preview page will appear. Tap the Accept button. Tap the Done button. Select the active Driver ID from the drop-down list, and enter the Load and Trailer #. Tap the Send button. - Page 38 Return Material Authorization (RMA) Process for Scanners In-Cab Scanner Installation Return Material Authorization (RMA) Process for Scanners Request an RMA from BCS Solutions: http://www.bcssolutions.com/mcpscn/rma BCS Solutions arranges shipment of a replacement component to you. Return the failed component to the address specified by BCS Solutions. 8--6 MAY CONTAIN U.S.
-
Page 39: Pto (Power Take-Off) Overview-Optional Connection
The loose white/red wire labeled Digital1_IN, in the Power/IO cable is the PTO wire. The MCP50 system detects an active PTO device when it sees 12 volts (active high). A switch that goes active to ground will require a relay. - Page 40 Wiring to an Air Pressure Switch for Air-activated PTO If the air pressure switch is not wired to 12 VDC, make sure to remove the ground wire and attach a fused wire from the MCP50 ignition source. MCP50 Connect Power/IO wire...
-
Page 41: Pto Data Input Verification Procedure
Optional Accessories PTO Data Input Verification Procedure PTO Data Input Verification Procedure Start the vehicle. Turn the PTO switch ON. Navigate to the System VDS screen. Tap the green up and down arrow button at bottom of the screen (circled below). Verify either PTOP or PTOC has a green dot under the Index column and shows “On”... - Page 42 PTO Data Input Verification Procedure Optional Accessories Verify through the Performance Monitoring screens that the PTO application is recording correctly. Start the vehicle. Turn the PTO device ON. Navigate to the PTO screen. Tap the Performance Monitoring button the tap PTO tab. Note: If the performance monitoring button is grayed out, Performance Monitoring is not enabled.
- Page 43 System Verification Performing System Verification Shortly after you power up the MCP50, the Driver Warning screen appears. After tapping the OK button, the MCP50 Home screen displays. Tap the arrow on the right until you see the System button, then tap the System button.
- Page 44 Chapter 15: Cellular Signal Strength Problems if red X. Cellular End To End Will show a green checkmark if the unit is successfully transmitting with Omnitracs and received an acknowledgement back. See Chapter 14: Cellular End to End Problems if red X.
- Page 45 System Verification Performing System Verification Second page of tests Use scroll bar to see all results. CDD and Ignition On should have a green checkmark. CDD Database Sync Will show a green checkmark when database has been synchronized with NOC (usually takes 5 to 10 minutes after unit is first powered up).
- Page 46 Performing System Verification System Verification 10-4 80-JB566-1 Rev. G MAY CONTAIN U.S. AND INTERNATIONAL EXPORT CONTROLLED INFORMATION...
-
Page 47: Troubleshooting Contents
Troubleshooting Contents 11. Troubleshooting Best Practices 12. Display Screen is Dark or Blank 13. DIU Problems 14. Cannot Send Messages 15. Cellular End to End Problems 16. Cellular Signal Strength Problems 17. CDD Database Sync Problem 18. GPS Fix Problem 19. - Page 48 Troubleshooting Contents 80-JB566-1 Rev. G MAY CONTAIN U.S. AND INTERNATIONAL EXPORT CONTROLLED INFORMATION...
-
Page 49: Troubleshooting Best Practices
• Power/IO cable Use a Test Cart to Perform Bad Part Verification/Double Checking If an Omnitracs MCP50 part is diagnosed bad on a truck, insert the failed part on the test cart. • If it continues to fail, part should be RMAd. - Page 50 Check System Voltage Measurements and Grounding Troubleshooting Best Practices Check System Voltage Measurements and Grounding Use the same ground reference that the particular circuit uses. • Check the VTM50 LED. • Verify that vehicle battery and cables are in good condition. •...
-
Page 51: Display Screen Is Dark Or Blank
Display Screen is Dark or Blank Problem: Display Screen is Dark or Blank If the display is blank or dark it could be: • Unit is asleep (i.e. ignition off, and power down timer exceeded) • Power source or Power/IO cable problem •... -
Page 52: Problem: Display Immediately Goes Blank When Ignition Is Turned Off
This is the power down time. If the display screen immediately blanks out when the ignition is turned OFF, this could be caused by: • The MCP50’s power-down time or total time is set to zero. - Check the host software configuration. -
Page 53: Diu Problems
Volume. Tap the + (plus) or - (minus) buttons to adjust. Tap the Test button to play back a message in the volume level chosen. • When the vehicle ignition is turned OFF, the display screen stays on until the MCP50 power-down timer expires then it goes dark. The power-down timer is configured by the customers’... -
Page 54: Problem: Touchscreen Non-Responsive/Calibration
Problem: Touchscreen Non-responsive/Calibration DIU Problems Problem: Touchscreen Non-responsive/Calibration If you are tapping anywhere on the touchscreen and the screen is not responding quickly or the screen arrow is not where the screen was touched, the touchscreen may not be calibrated properly. -
Page 55: Cannot Send Messages
If problem persists, test with known-good VTM. If problem still persists, Call Omnitracs Customer Support at 800-541-7490 for assistance. 80-JB566-1 Rev. G 14-1... - Page 56 Problem: Cannot Send Messages Cannot Send Messages 14-2 80-JB566-1 Rev. G MAY CONTAIN U.S. AND INTERNATIONAL EXPORT CONTROLLED INFORMATION...
-
Page 57: Cellular End To End Problems
Cellular End to End Problems Problem: Cellular End to End Test Fails If the Cellular End to End test is failing when performing a system verification, the likely cause is the system has not been properly activated. To see the details of this information: Highlight the Cellular End To End Line. - Page 58 Problem: Cellular End to End Test Fails Cellular End to End Problems 15-2 80-JB566-1 Rev. G MAY CONTAIN U.S. AND INTERNATIONAL EXPORT CONTROLLED INFORMATION...
-
Page 59: Cellular Signal Strength Problems
Cellular Signal Strength Problems Problem: Cellular Signal Strength Fails If the Cellular Signal Strength test is failing when performing a system verification, or the cellular icon at the top of the screen shows a red X and no colored bars, follow the steps below. - Page 60 Problem: Cellular Signal Strength Fails Cellular Signal Strength Problems Verify that the truck is at a location where there is known to be good cellular coverage. Check to ensure there are no metal obstructions above the antenna. If there are no obstructions, inspect the antenna and antenna cable to ensure there is no damage.
-
Page 61: Cdd Database Sync Problem
Once it acquires all settings and configurations, it will go into the desired state of Sync complete. If an MCP50 is installed and powered up and has not gone to a database state of Sync Complete within 10 minutes: Verify that the unit has been properly activated. - Page 62 Problem: CDD Database Sync Test Fails CDD Database Sync Problem 17-2 80-JB566-1 Rev. G MAY CONTAIN U.S. AND INTERNATIONAL EXPORT CONTROLLED INFORMATION...
-
Page 63: Problem: Gps Fix Test Fails
Normally the GPS positioning system will update positioning data every second at the MCP50, as shown in the Last Update field of the System->GPS tab. The desired value for the Mode field is 3-D, although No Fix may show when the antenna is temporarily blocked or in a garage. - Page 64 Problem: GPS Fix Test Fails GPS Fix Problem If the vehicle is in the open with a clear view of the sky, the mode should show 3-D. The Last Update time should be current, Precision should be <2 and at least 5 Satellites should be used in the fix.
-
Page 65: J1587 Packet Detection Problem
J1587 packets. If packets are not detected, check the connections to the J1587 data link and verify that it is properly configured. In 8xx code and higher, the MCP50 will auto detect J1587 bus traffic. 80-JB566-1 Rev. G 19-1 MAY CONTAIN U.S. AND INTERNATIONAL EXPORT CONTROLLED INFORMATION... - Page 66 Problem: J1587 Packet Detection Fails J1587 Packet Detection Problem 19-2 80-JB566-1 Rev. G MAY CONTAIN U.S. AND INTERNATIONAL EXPORT CONTROLLED INFORMATION...
-
Page 67: J1939 Packet Detection Problem
Note: If the Core Data Items and J1587 tests pass (i.e. green check), it’s acceptable for the J1939 Packet Detection test to fail. This would mean that the MCP50 system is getting its vehicle data from the J1587 link. Many pre-2007 trucks do not submit J1939 packets. - Page 68 Problem: J1939 Packet Detection Fails J1939 Packet Detection Problem 20-2 80-JB566-1 Rev. G MAY CONTAIN U.S. AND INTERNATIONAL EXPORT CONTROLLED INFORMATION...
-
Page 69: Ignition On Detection Problem
ON position and shows 0 VDC in the OFF position. WARNING You must connect the MCP50 ignition wire to a true switched ignition source, not an accessory source. To confirm a true ignition source, use a digital volt meter to verify that the source has approximately 12 VDC when the key is in the ignition ON position and shows O VDC in the OFF and accessory position. - Page 70 Problem: Ignition On Test Fails Ignition On Detection Problem 21-2 80-JB566-1 Rev. G MAY CONTAIN U.S. AND INTERNATIONAL EXPORT CONTROLLED INFORMATION...
-
Page 71: Core Data Problem
Core Data Problem Problem: Core Data Item Test Fails The Core Data Items test verifies that specific engine items are being received from one or both of the data links (J1587/J1939). Those items are: • Speed • RPM • Distance LTD •... - Page 72 Problem. • If J1939 fails, see Chapter 19: J1939 Packet Detection Problem. If MCP50 is receiving data and the core data item test still fails, call Omnitracs customer support. 22-2 80-JB566-1 Rev. G MAY CONTAIN U.S. AND INTERNATIONAL EXPORT CONTROLLED INFORMATION...
-
Page 73: Vtm Led Indicator
VTM LED Indicator VTM Performance—LED Indicators In a normal operating environment, the LED will be OFF. Other operating modes are shown below: State VTM indicator Action Normal Mode None Sleep Mode None Boot up and A Red LED will blink ON and OFF at Give unit 5 minutes to boot or recover System Recovery irregular frequencies. - Page 74 VTM Performance—LED Indicators VTM LED Indicator 23-2 80-JB566-1 Rev. G MAY CONTAIN U.S. AND INTERNATIONAL EXPORT CONTROLLED INFORMATION...
-
Page 75: Acquiring Network Problem
Acquiring Network Problem Problem: Stuck on Acquiring Network Screen When an MCP50 unit boots up, it will attempt to get the system time/date from either the cellular network or from GPS. Under normal circumstances, it will get these values in 30 seconds to a minute and load the applications. - Page 76 Problem: Stuck on Acquiring Network Screen Acquiring Network Problem Reseat the antenna connections to the VTM. Inspect the cable connections to ensure there isn’t any damage. If the problem persists after reseating the cable connections, test with a known-good antenna. Ensure there are no obstructions above the antenna. If the problem still continues, test with a known-good DIU.
-
Page 77: Performance Monitoring Troubleshooting
This can be set up via the Vehicle Data Configurator on the Customer Portal. The Performance Monitoring application records data from the vehicle such as speed, distance, RPMs, and fuel used.The data is retrieved from the truck by the MCP50 and sent to the host computer, either manually or automatically at preset intervals. - Page 78 If any data items are not present: Ensure the MCP50 is configured for the right Data Bus using the Vehicle Data Configurator. If problem persists, contact Omnitracs Customer Support at 800-541-7490 for assistance.
-
Page 79: Performance Monitoring Faults And Descriptions
(e.g., wires reversed) causing a positive reading for speed while the vehicle is stationary. Bad Ignition Ignition OFF and speed Problem with MCP50’s ignition line wiring or (MCP50) or RPM non-zero. fuse. RPM Sensor Engine posted PID... - Page 80 - J1708 selection parameter set wrong. (MCP50) RPM = 0. - Data link connection problem. - Driver using ignition position for accessory operation. - MCP50 ignition line wired to accessory position. MCP50 Speed signal constant A pulse generator may have been connected Speed for more than 5 to either the MCP50 or the engine.
-
Page 81: Critical Event Reporting Troubleshooting
CER host system. Events are processed two minutes after they occur. Normal Performance In order for the CER feature to function, the MCP50 must be connected to the vehicle’s data link wires. Critical events can be triggered by a: •... -
Page 82: Event Not Triggered
Event Not Triggered Critical Event Reporting Troubleshooting Event Not Triggered CER Verify Configuration To access CER information, go to the Home screen and tap the Critical Event Reporting button. If this button is grayed out, then CER service for the unit must be enabled from the Customer Portal. - Page 83 Critical Event Reporting Troubleshooting CER Verify Configuration Field Value CER Enabled/Disabled If enabled, the MCP captures CER events. Speech Enabled/Disabled If enabled, the text in the alert pop-ups is spoken. Hard Braking Minimum Speed The speed at which mobile unit detects hard brake events. Hard Braking Deceleration Rate The rate of deceleration that triggers a hard brake event (Default = 9 MPH/SEC).
-
Page 84: Events Triggered In Error
• Roll stability events are sent from the power train or braking control units installed on the truck. The MCP50 system acts as a pass through for these devices. If false events are being recorded, those devices should be investigated. -
Page 85: In-Cab Scanner Diagnostic Procedure
In-Cab Scanner Diagnostic Procedure Overview For scanners to work on the MCP50 both the application software and operating system must meet the minimum requirements as described below. Minimum Requirements • Software version CA0921R. • Windows CE operating system LT0038 and higher. - Page 86 In-Cab Scanner Diagnostic Procedure Abnormal Performance Note Only scanners ordered through and obtained by BCS Solutions are supported by Omnitracs. These scanners are specifically configured for Omnitracs in-cab products. https://omnitracs.bcssolutions.com/q/mcpscn/default.aspx If the scanner is not detected by the application or does not scan a document and you have...
-
Page 87: Installation Procedure
Connect the smaller end of the scanner cable to the USB port on the end of the scanner. Connect the scanner cable to the MCP50 using the USB port on the display. Store excess scanner cable where it will not be damaged and will not obstruct the driver or hinder truck performance. - Page 88 Installation Procedure In-Cab Scanner Diagnostic Procedure Insert the black and white calibration page or plain white paper into the slot. Tap the Calibrate button. Wait a few minutes for the calibration to complete. Tap the Scan tab to return to the scanning home screen. Send a scan.
-
Page 89: Return Material Authorization (Rma) Process For Scanners
In-Cab Scanner Diagnostic Procedure Return Material Authorization (RMA) Process for Scanners Tap the Scan Page button. Note If the preview box is checked, a preview page will appear. Tap the Accept button. Tap the Done button. Select the active Driver ID from the drop-down list, and enter the Load and Trailer #. Tap the Send button. - Page 90 Return Material Authorization (RMA) Process for Scanners In-Cab Scanner Diagnostic Procedure 27-6 80-JB566-1 Rev. G MAY CONTAIN U.S. AND INTERNATIONAL EXPORT CONTROLLED INFORMATION...
-
Page 91: Appendix Contents
A. Wiring Diagrams and Charts B. Environmental and Power Requirements C. General Wiring and Installation Guidelines D. Standard RMA Procedure E. Upgrading the MCP50 Using USB Memory Sticks Preventive Maintenance Inspection G. Component Information H. Installation Form 80-JB566-1 Rev. G... - Page 92 Appendix Contents 80-JB566-1 Rev. G MAY CONTAIN U.S. AND INTERNATIONAL EXPORT CONTROLLED INFORMATION...
-
Page 93: Wiring Diagrams And Charts
Wiring Diagrams and Charts MCP50 Wiring Diagram 80-JB566-1 Rev. G MAY CONTAIN U.S. AND INTERNATIONAL EXPORT CONTROLLED INFORMATION... - Page 94 6-pin Power/IO Cable Wiring Diagrams and Charts 6-pin Power/IO Cable 08AAA_050 SIGNAL J1708/J1587 DATA LINK+ J1708/J1587 DATA LINK- +12VDC BATTERY GROUND 80-JB566-1 Rev. G MAY CONTAIN U.S. AND INTERNATIONAL EXPORT CONTROLLED INFORMATION...
- Page 95 Wiring Diagrams and Charts 9-pin Power/IO Cable and Paccar Adapter Cable 9-pin Power/IO Cable and Paccar Adapter Cable 08AAA_051 SIGNAL SIGNAL BATTERY GROUND J1708/J1587 DATA LINK+ +12VDC J1708/J1587 DATA LINK- J1939 DATA LINK+ OEM_CAN_H J1939 DATA LINK- OEM_CAN_L 80-JB566-1 Rev. G MAY CONTAIN U.S.
-
Page 96: Volvo/Mack 2014 Or Newer Obdii Style Connector
Volvo/Mack 2014 or newer OBDII style Connector Wiring Diagrams and Charts Volvo/Mack 2014 or newer OBDII style Connector Note: While this cable uses OBDII style connector, it is not compatible with standard OBDII cables found in most non-commercial cars, trucks, and vans. SIGNAL Ignition J1939 CAN (High) - Page 97 Wiring Diagrams and Charts Hino Hino P2: Blue US-built vehicle P3: White: Japanese-built vehicle SIGNAL Battery Chassis Ground (batt return) CAN high CAN low Ignition 80-JB566-1 Rev. G MAY CONTAIN U.S. AND INTERNATIONAL EXPORT CONTROLLED INFORMATION...
-
Page 98: Display Interface Unit 50 (Diu50) Cable Connector Pin Callouts
Display Interface Unit 50 (DIU50) Cable Connector Pin Callouts Wiring Diagrams and Charts Display Interface Unit 50 (DIU50) Cable Connector Pin Callouts Pin 1 Pin 15 Note: the DIU50 has no user-serviceable parts. SIGNAL DIU_PWR DIU_GND 7, 14 DIU_TX DIU_RX DIU_RTS DIU_CTS DIU_DTR... -
Page 99: Environmental And Power Requirements
800 MHz 1x 1900 MHz EVDO (when supported) The MCP50 system has no user-serviceable parts. The DIU50 contains a permanent lithium coin cell for maintaining the real time clock; proper recycling or disposal per local law is required for all components of MCP50. - Page 100 MCP50 Environmental and Power Requirements Environmental and Power Requirements 80-JB566-1 Rev. G MAY CONTAIN U.S. AND INTERNATIONAL EXPORT CONTROLLED INFORMATION...
-
Page 101: General Wiring And Installation Guidelines
General Wiring and Installation Guidelines Making Electrical Connections - Standard Installations For standard MCP50 installations, the only electrical connection needed to the truck will be the power/IO cable and an ignition wire lead. Cable connectors are used at the VTM for the antenna, power/datalink, and display. - Page 102 General Wiring and Installation Guidelines Approved Omnitracs Electrical Connectors The wiring for the MCP50 system is expected to be inside the cab. The only Omnitracs- approved electrical connections other than standard connectors are crimp butt splices and crimp ring terminals. Connections are typically made by mating the two connectors. Many of the following general guidelines apply to non-standard MCP50 connections where the Power/ IO cable must be cut because it does easily mount in the truck’s dashboard.
- Page 103 General Wiring and Installation Guidelines Butt Splicing Butt Splicing • Omnitracs recommends Nylon insulated, seamless butt connectors with inspection windows. • Heat-shrinkable butt connectors are preferred. Make sure the size of the butt splice is appropriate for the job. A good butt splice has these characteristics: •...
- Page 104 Crimping General Wiring and Installation Guidelines Crimping • When crimping a butt-spliced wire or cable, be sure the insulated butt splice is crimped using the insulated position on the crimp tool and not the crimping “tooth” of the tool. • Crimping butt splices incorrectly can result in a severed wire and a failed wire connection. Caution DO NOT crimp on the crimp “tooth.”...
- Page 105 General Wiring and Installation Guidelines Crimping After crimping the inside of both ends of the butt splice on the “insulated” area of the crimping tool, next crimp the outside of both ends of the butt splice. Wire crimp Crimping Tool Crimp here 03AAA_271 Crimping locations...
- Page 106 Ring Terminals General Wiring and Installation Guidelines Do a pull test. Pull on both ends of the wires to ensure a solid butt-spliced connection exists. The crimped butt splice securely grips the insulated wires. 03AAA_282 WARNING If using heat shrinkable crimps, DO NOT use a heat gun or open flame near combustible materials.
-
Page 107: Proper Grounding
General Wiring and Installation Guidelines Proper Grounding Install the ring terminal on the ground connection using one of the following options: Screw Lock Washer Star Washer Flat Washer Flat Washer Terminal Connector Terminal Connector Terminal Flat Washer 03AAA 285 Proper Grounding When establishing a good chassis ground, avoid areas that may be potentially isolated from ground by a hinge or bad welds. -
Page 108: General Installation Guidelines
General Installation Guidelines General Wiring and Installation Guidelines General Installation Guidelines • Determine the most direct and protected route when routing cables to connect the components to each other and to the vehicle. • Do not trim cable lengths to fit a specific vehicle. •... -
Page 109: Standard Rma Procedure
For customers, to return failed equipment, go to Omnitracs Customer Portal at https://customer.omnitracs.com For service centers only, please return equipment to Omnitracs at the following address. Make sure that the RMA number is marked clearly on the outside of the box. - Page 110 Standard RMA Procedure 80-JB566-1 Rev. G MAY CONTAIN U.S. AND INTERNATIONAL EXPORT CONTROLLED INFORMATION...
-
Page 111: Upgrading The Mcp50 Using Usb Memory Sticks
• Confirm that he has listened to any unopened audio files. This is necessary only if your company uses Omnitracs Content Delivery service. Deleted audio files will not be resent to the vehicle. • Determine if certain special services are enabled for this vehicle. - Page 112 • Before: Your company’s System Administrator needs to take steps to ensure the data is not lost by manually extracting the performance data stored in the vehicle’s MAS. For the Omnitracs Services Portal, instructions are in Performance Monitoring: Administration and Configuration Guide (80-JA316-6). For AS/400®, they can refer to the SensorTRACS/400 User's Guide, Version 2.3 (80-30597-4).
-
Page 113: Checking The Software Versions Installed
Checking the Software Versions Installed Checking the Software Versions Installed Shortly after you power up the MCP50, the user interface screen displays. Use the right arrow to get to the System button. Tap the System button. Tap the System tab to bring up the System Screen. Tap the Version button at the bottom right to access system information about the MCP50. -
Page 114: Upgrading Only The Mas50 Software
Upgrading Only the MAS50 Software Upgrading the MCP50 Using USB Memory Sticks Upgrading Only the MAS50 Software Make sure the MAS50 is powered ON, ignition ON. Insert MAS50 Software memory stick into the USB port on the right side of the DIU. - Page 115 Confirm the upgrade is complete by checking that it shows SyncComplete on the System screen and the MCP50 software version on the Version screen. Also verify that the VIOP is the latest revision (refer to MAS50 External Release Notes, 70-JC513-1).
- Page 116 Upgrading Only the MAS50 Software Upgrading the MCP50 Using USB Memory Sticks 80-JB566-1 Rev. G MAY CONTAIN U.S. AND INTERNATIONAL EXPORT CONTROLLED INFORMATION...
-
Page 117: Preventive Maintenance Inspection
Preventive Maintenance Inspection How Often Should Inspections Be Performed? • Omnitracs recommends inspections be performed at least once every 90 days. • During normally scheduled vehicle preventive maintenance inspections. Performing System Verification • Verify proper DIU50 operation. From the Home screen, tap the Diag tab. Tap Run All button. -
Page 118: Inspecting The Display Interface Unit 50 (Diu50)
Inspecting the Display Interface Unit 50 (DIU50) • Verify the DIU50 screen is clean. Omnitracs recommends that you use a soft cloth and either plain water, glass cleaner, or mild soap to gently clean the surfaces of the DIU50 as well as the display screen. -
Page 119: Component Information
Component Information MCP50 System Component MCNs Referenced in this Guide System component Illustration Notes Display interface unit CV90-JB425-106 50 (DIU50) Antenna Kit 65-JB514-2 includes install kit, mount kit, and cable assembly Antenna only CV90-JB251-7 Vehicle Telematics CV90-JB424-100 Module 50 (VTM50) 80-JB566-1 Rev. - Page 120 MCP50 System Component MCNs Referenced in this Guide Component Information System component Illustration Notes Display interface unit CV90-JB425-710 (DIU50) holster DIU Mounting Kit with 65-JB313-1 Nut plate, RAM mount Backing plate/ Nut 50-JB290-1 plate only DIU Mounting Kit: 50-J9978-1 Specifically for...
- Page 121 Component Information MCP50 System Component MCNs Referenced in this Guide System component Illustration Notes Power/IO cable 45-JB556-1A Most 2006 and 9-pin black J1587/ newer trucks. J1708 and J1939 (Transition late 250 Kbs 2005-2006.) Separate ignition connection required. Volvo/Mack J1587/ 45-JB859-1A...
- Page 122 MCP50 System Component MCNs Referenced in this Guide Component Information 80-JB566-1 Rev. G MAY CONTAIN U.S. AND INTERNATIONAL EXPORT CONTROLLED INFORMATION...
-
Page 123: Installation Form
Installation Form Installation Work Order Details (MCP50) ______________ _____________ Active High________ Active Low (relay required) I find the service rendered and materials installed in connection with the above mentioned work to have been completed in a satisfactory manner. Driver/Customer Signature: _________________________________________ Date: ____________________ 80-JB566-1 Rev. - Page 124 Installation Form 80-JB566-1 Rev. G MAY CONTAIN U.S. AND INTERNATIONAL EXPORT CONTROLLED INFORMATION...
Need help?
Do you have a question about the MCP50 and is the answer not in the manual?
Questions and answers