Table of Contents
Advertisement
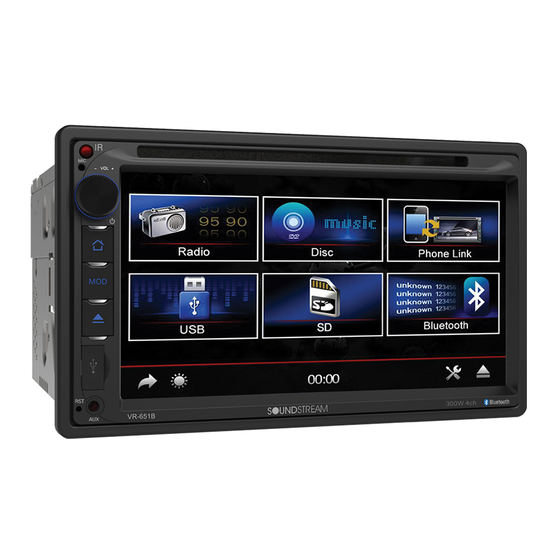
VR-651/VR-651B
2 DIN 6.5" Monitor
Touch Screen
DVD/CD/MP3/MP4
AM/FM Radio
Support Bluetooth (Only for VR-651B model)
Owner's Manual
Take the time to read through this owner's manual.
Familiarity with installation and operation procedures will help you obtain the best
Performance from your new DVD-receiver.
Advertisement
Table of Contents
Troubleshooting

Related Manuals for Soundstream VR-651

Summary of Contents for Soundstream VR-651
- Page 1 VR-651/VR-651B 2 DIN 6.5” Monitor Touch Screen DVD/CD/MP3/MP4 AM/FM Radio Support Bluetooth (Only for VR-651B model) Owner’s Manual Take the time to read through this owner’s manual. Familiarity with installation and operation procedures will help you obtain the best Performance from your new DVD-receiver.
-
Page 2: Warning
WARNING! To promote safety, certain functions are disabled unless the parking brake is on. The Unit is designed to detect parked status and must be connected to the power supply side of the parking brake switch. Improper connection or use of his connection may violate applicable law and may result in serious injury or damage. -
Page 3: Table Of Contents
CONTENTS WARNING! ......................... 2 OPERATION PRECAUTIONS ..................2 CONTENTS ........................ 3 ACCESSORIES ......................4 INSTALLATION / UN-INSTALLATION ............... 5 WIRING CONNECTIONS ................... 6 PANEL………..……………………………………………………………………………..7 REMOTE CONTROL ....................8 REMOVE BATTERY ....................10 MAIN MENU ......................10 RADIO PLAYER ....................10 DVD PLAYER ...................... -
Page 4: Accessories
ACCESSORIES Package contains the following accessories for installation and operation of the unit. (1) Washer, Spring 1 each Washer, M5 Nut (2) Mounting Strap (3) Bolt (4) Screw (5) Mounting Collar (6) Release Key (7) Screw (8) Rubber Cushion Warranty card Remote Control User Manual Trim ring... -
Page 5: Installation/Un-Installation
Installation/Un-Installation Note Before starting installation of the unit, make sure the wiring is connected properly. Use only the parts provided with the unit to ensure proper installation. The use of unauthorized parts may cause malfunction. Install the unit where it does not get in the driver’s way and will not injure the passenger in case there is a sudden stop, like an emergency stop. -
Page 6: Wiring Connections
Wiring Connections Make sure you have good chassis ground. A good ground connection will eliminate most electrical noise problems. A good chassis ground requires a tight connection to the vehicle’s metal chassis. The area around the ground connection should be clean, bare metal without rust, paint, plastic, dust, or dirt for a good electrical connection. -
Page 7: Panel
PANEL 1. IR Sensor IR Remote control signal receiving window. Max distance is 6-8 meters, 45 angels. 2. VOL Button Rotate VOL to increase or decrease the volume. Press it to show the main menu. 3. POWER/MUTE Button Press it to turn on the unit. Press and hold for 2 seconds to turn the unit off .Press the button briefly to Mute .Please note that the volume will be muted on all audio output connector. -
Page 8: Remote Control
REMOTE CONTROL 1. POWER Power on or off. 2. MODE button Press it to select the mode: Radio, DISC (if there is a disc in unit), USB (if there is a USB device in the unit), CARD (if there is a SD/MMC card in the unit) and AV IN. 3. - Page 9 12. SETUP button In DVD mode press it to enter the setup menu. 13. EJECT button Press it to eject the disc. 14. Cursor buttons Use the buttons to select the menu item. the title, track or to show next frame. 15.
-
Page 10: Remove Battery
27. VOL- button Press to decrease volume level. 28. AUDIO/GOTO button In DVD mode press it to select the audio language. In VCD mode, press it to select the sound track in the sequence of MONO L =>MONO R =>STEREO. Go to: in DVD mode press and hold for 2 seconds to show TIME SEARCH menu, select number and confirm to go to certain position directly. -
Page 11: Radio Player
RADIO PLAYER To start Radio, tap RADIO button on main menu screen. Touch this icon to select MUTE ON or OFF. Touch this icon to select EQ POP ROCK CLASS JAZZ FLAT OFF Touch this icon to choose the bands: FM1, FM2, FM3, AM1, AM2. Touch this icon to select LOUD ON or OFF. -
Page 12: Usb/Sd/Mmc Operation
Touch it to pause/play. Touch it to present stop. Touch it to skip to the previous track. Touch and hold for 2 seconds to retune to the beginning of the track. Touch it to skip to the next track. Touch and hold for 2 seconds to activate fast forward (FF) search in a track. -
Page 13: Av-In Mode
AV-IN MODE To start AV-IN Mode, tap on AV-IN button from main menu screen. Connect the external audio/video signal source to this unit. Select AV-IN mode in the main menu or by pressing repeat Mode button on the front panel. Note: If there is no external video input, the TFT displays “NO SIGNAL”. -
Page 14: Bluetooth Section(Only For Vr-651B Model)
BLUETOOTH SECTION(Only for VR-651B model) Warning: Driving and having a telephone conversation at the same time is dangerous, please park your car before having a telephone conversation. The supplier waves any and all liability when this warning is not followed. To enter Bluetooth mode, please tap Bluetooth icon on main menu or press mode button on remote. -
Page 15: Steering Wheel Control
icon to see dialed calls history mode. icon to see received calls history mode. icon to see missed calls history mode. The unit can download automatically all the date from the mobile Phone. Dialed /Received/Missed calls are saved In History mode. The calls in each category are orderly saved from the latest one to the final one.. -
Page 16: Notes On Disc
NOTES ON DISC — Only use groundless loudspeakers. — Use only loudspeakers of minimal 40Watt, using fewer watts may result in damaging your loud speakers at higher volumes. — Use 4~8 (Ohm impedance) loudspeakers only; using higher or lesser impedance may damage the unit. -
Page 17: Troubleshooting
TROUBLESHOOTING Symptom Cause Remedy Power does not turn Replace with fuse of the same amperage. Fuse is blown If the fuse blows again, consult your store (No sound is of purchase produced.) In correct wiring Consult your local retailer. 1. Turn off the unit. 2. -
Page 18: Troubleshooting
TROUBLESHOOTING SYMPTOM CAUSE SOLUTION IF THE POWER SUPPLY IS PROPERLY THE CAR IGNITION IS CONNECTED TO THE CAR NOT ON. ACCESSORY SWITCH THE IGNITION KEY NO POWER TO “ACC”. THE FUSE IS BLOWN. REPLACE THE FUSE. DISC CANNOT BE PRESENCE OF DISC REMOVE THE DISC IN THE PLAYER INSIDE THE PLAYER THEN PUT A NEW UPWARD. -
Page 19: Technical Specifications
TECHNICAL SPECIFICATIONS General Power supply: 11~16V DC Current consumption: max. 10 A Maximum power output: 50W x 4 channels (max) DVD/SVCD/VCD/HDCD/MP3/MP4/VIDEO/CDDA/Picture Compatible formats: CDCD-R/-RW/DVD±R/±RW playback Dimensions (W x D x H) / 185*115*160 mm/2 kg weight: Working temperature - +60 range: ESP function: 10 sec. - Page 23 FCC WARNING This device complies with Part 15 of the FCC Rules. Operation is subject to the following two conditions: (1) This device may not cause harmful interference, and (2) this device must accept any interference received, including interference that may cause undesired operation.
Need help?
Do you have a question about the VR-651 and is the answer not in the manual?
Questions and answers