
Related Manuals for ATP Electronics ET-933


Summary of Contents for ATP Electronics ET-933
- Page 1 User Manual Professional Sound Level Meter Please read this user manual thoroughly before using this unit and keep it for your future reference.
-
Page 3: Table Of Contents
Contents 1. Safety ..............1 2. Applications and Features ........2 3. Specifications ............3 4. Meter Description ..........4 5. LCD Display Description ........5 6. Operation Instruction ........... 6 7. Calibration ............9 8. Basic Operation ..........10 9. -
Page 4: Safety
Safety Read the following safety information carefully before attempting to operate the meter. Use the meter only as specified in this manual; otherwise, the warranty may be invalidated. ◆ Environment conditions: Altitude up to 2000 meters RH≤90%(Non-Condensation) Operating Temperature: -20°C ~ 60°C ◆... -
Page 5: Applications And Features
2. Applications and Features This Sound Level Meter is designed to meet the measurement requirements of safety engineers, health and safety legislation, industrial safety officers and sound quality control in various environments like factories, schools, construction sites etc. ◆ ◆ Max/Min/Data Hold ◆... -
Page 6: Specifications
3. Specifications Applied standard Frequency range 31.5Hz~8kHz Dynamic range 50dB Measuring level Lo:30dB~80dB Med:50dB~100dB range Hi:80dB~130dB Auto:30dB~130dB Accuracy ±1.4dB Time weighting FAST: 125ms – SLOW: 1s Microphone 1/2 inch electret condenser microphone Display 3½ digits LCD display with a resolution of 0.1dB Frequency weighting A &... -
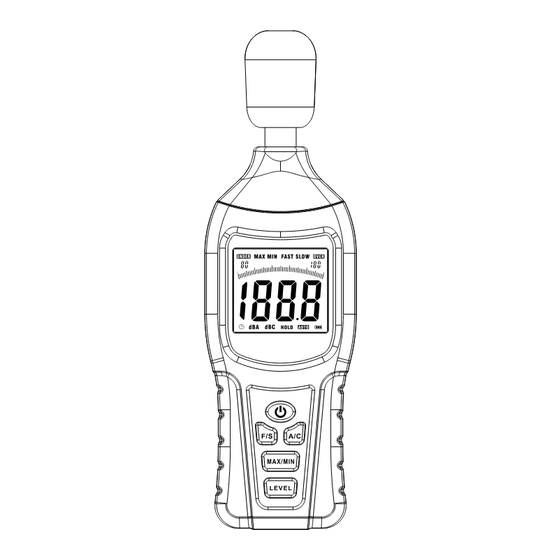
Page 7: Meter Description
4. Meter Description ①Microphone ②LCD display ③Frequency weighting A/C selection key ④MAX/MIN Key ⑤Range Level selection key ⑥Response time FAST/SLOW selection key ⑦Power ON/OFF key ⑧Battery Compartment... -
Page 8: Lcd Display Description
5. LCD Display Description ①Under-range icon ②MAX hold ③Min hold ④Fast sampling time icon ⑤Slow sampling time icon ⑥Over-range icon ⑦Level range display ⑧Analog bar ⑨Measurement reading ⑩Battery icon ⑪Auto range icon ⑫Data hold icon ⑬dBC icon ⑭dBA icon ⑮Auto power off icon... -
Page 9: Operation Instruction
6. Operation Instruction (1) Power ON/OFF: Turn the meter on by pressing the " " button for 1 second. To turn the meter off, press and hold the " " button for approx. 3 seconds then release the button. (2) Backlight: After turning the meter on, momentarily press the "... - Page 10 (4) FAST/SLOW selection With the meter powered on; press the “ ” button to select FAST or SLOW measurement mode. FAST: Fast sampling time measurement, 1 time per 125ms. SLOW: Slow sampling time measurement, 1 time per second. (5) MAX/MIN With the meter powered on, press and hold the "...
- Page 11 (6) Data HOLD: After turning the meter on, momentarily press the " " button. "HOLD" icon will appear on the LCD, which indicates the data is frozen. To release the held reading, press the button again. (7) Level range selection: Press the “...
-
Page 12: Calibration
7. Calibration The recommended recalibration period is 1 year. Calibration, repairs or servicing should only be performed by ATP Instrumentation Ltd. -
Page 13: Basic Operation
8. Basic Operation (1) Open battery cover and install a 9-volt battery in the battery compartment. (2) Press the ‘ ’ button to select desired level range. (3) Select ‘dBA’ for general noise sound levels or ‘dBC’ for measuring peak sound levels. (4) Select ‘FAST’... -
Page 14: Notes
9. Notes (1) Do not store or operate the meter in high temperature or humidity. (2) Remove the battery when the meter is to be stored for long periods of time to avoid battery leakage. (3) Wind blowing across the microphone will affect the noise measurement. -
Page 15: Accessories
10. Accessories ① User Manual ② Wind Muffler ③ Regulator Rod ④ 9V battery... - Page 16 ATP Instrumentation Ltd Tournament Way Ashby-de-la-Zouch Leicestershire LE65 2UU Sales: 01530 566 800 sales@atp-instruments.co.uk Repair and Calibration: 01530 566 804 technical@atp-instruments.co.uk www.atp-instrumentation.co.uk...
Need help?
Do you have a question about the ET-933 and is the answer not in the manual?
Questions and answers