Table of Contents
Advertisement
Model #AEC-9332BSD-AC16W-WF
USE AND CARE GUIDE
ROBOTIC LED FLOOD LIGHT WITH VIDEO CAMERA
Windows 2000 / XP / Vista / 7 / MAC
OS
LISTED
Micro Memory Card
1GB SD ~ 32GB SDHC (max) Class 4
THANK YOU
We appreciate the trust and confidence you have placed in Nightwatcher through the purchase of this motorized LED flood light
with Wi-Fi camera. We strive to continually create quality products designed to enhance your home. Visit us online to see our full
line of products available for your home improvement needs. Thank you for choosing Nightwatcher!
Advertisement
Table of Contents

Summary of Contents for aurum AEC-9332BSD-AC16W-WF
- Page 1 Model #AEC-9332BSD-AC16W-WF USE AND CARE GUIDE ROBOTIC LED FLOOD LIGHT WITH VIDEO CAMERA Windows 2000 / XP / Vista / 7 / MAC LISTED Micro Memory Card 1GB SD ~ 32GB SDHC (max) Class 4 THANK YOU We appreciate the trust and confidence you have placed in Nightwatcher through the purchase of this motorized LED flood light with Wi-Fi camera.
-
Page 2: Table Of Contents
Table of Contents Specifications ............5 Table of Contents............2 Safety Information............2 Nightwatcher Overview ..........6 Warranty.................3 Installation………………………………………………..What Is Operation-Programing your Nightwatcher.... 8-11 Covered………………… ……….…………………3 System Set Up (Link Camera with WIFI Network)12 What Is Not Images Functions..........18 Covered…………………………………………3 Troubleshooting………………………………………….. -
Page 3: Warranty
CAUTION: Do not immerse the light fixture in the water. Do not mount the light fixture against flammable surfaces. Warranty 12 MONTH WARRANTY WHAT IS COVERED 12 month limited warranty from date of purchase. Please retain proof of purchase. The manufacturer reserves the right to replace or repair the faulty unit. -
Page 4: Pre-Installation
Pre-installation PLANNING INSTALLATION Never attempt to turn the light head by hand as this can damage the internal motor components. NOTE: Before attempting any installation or maintenance, ensure that the electrical supply is switched off and the circuit fuses removed or the circuit breaker is in the “OFF”... -
Page 5: Package Contents
Pre-installation (continued) PACKAGE CONTENTS NOTE: Nightwatcher Wi-Fi camera is designed to illuminate, record video and produce audio warnings when a person enters the detection area. While it will detect a moving heat source, there is no guarantee implied that it will provide total security or prevent illegal entry. -
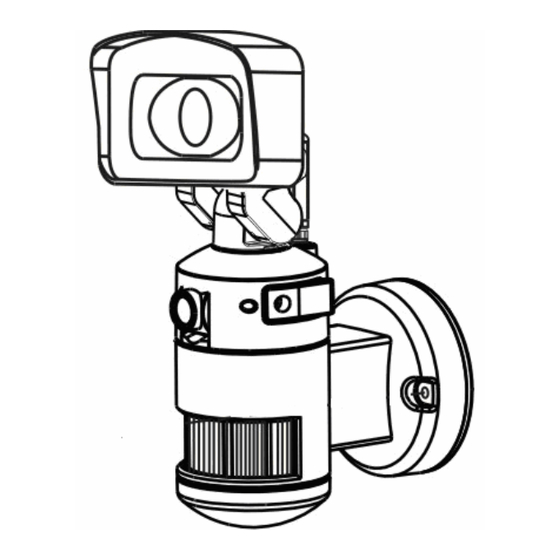
Page 6: Nightwatcher Overview
Nightwatcher Overview Top View Front View Bottom View Side View Camera angle adjustable downward by 25 degrees... -
Page 7: Installation
Installation Mounting and wiring the light Mounting and wiring the light fixture fixture (Continued) Installing your Nightwatcher on a wall or DANGER: building surface - use cross bar Incorrect voltage may cause electric shock. If you are not sure, please contact your retailer. □... -
Page 8: Operation-Programing Your Nightwatcher
Installation Operation Detection range Adjusting the settings... -
Page 9: Installation
Installation □ This light is equipped with three motion sensors: zone 1 □ Selecting working mode: There is a “Mode” LED covers 60 degrees, zone 2 covers 100 degrees and indicator hidden inside the motion detector window that zone 3 covers 60 degrees. There is a 220 degree will display different colored lights when switching maximum total in all three zones. -
Page 10: Installation
Installation Operation (continued) Removing and formatting the Adjusting the settings memory card... -
Page 11: Installation
Installation □ Before removing the micro card from the card slot, please Camera LED indicator press the mode button on the bottom of the Nightwatcher □ The LED light next to the card compartment indicates for 3 seconds to stop the light from turning – the ‘Mode’ the function status of the camera by using different LED will flash orange. -
Page 12: Installation
Installation Operation (continued) On-board controls Recording audio message... - Page 13 Installation □ Recording: NOTE: 1. Press the SET/REC button for 3 seconds, and you You must press the “Mode” button on the bottom of the unit for 3 seconds to disable the rotation of the light. will hear a single beep. After the beep, start recording your message by talking into the microphone.
- Page 14 Operation (continued) Viewing recorded videos Viewing image by computer through a card reader. □ Press the push button on the bottom of the unit for 3 seconds to disable the unit. □ Open the waterproofed cover on the unit. □ To remove Micro card, press on micro card to eject then pull out.
-
Page 15: System Set Up (Link Camera With Wifi Network)12
Operation (continued) Operation System Set Up (Link camera with WIFI Network) 1.1 Link camera with Smart phone/Tablet (AP Mode) □ Using smartphone or tablet to launch “Smart Guard HD” APP from APP store (iOS) or Google Play store (android). Download. □... - Page 16 Operation (continued) ※ If there has below message “ Cannot connect to internet through “Smart Guard HD” or Internet connection unstable “Smart Guard HD “ shown on the screen, please disregard the message and you still can continue next step. The different smartphone/tablet will show the different message.
- Page 17 Operation (continued) □ Select your home AP from the site survey menu. □ Enter Home AP password if is encrypted, and click “Join” □ Click “OK” and exit the app. □ Wait for 60 seconds camera boot up again and link to WiFi AP router. If Join home AP connection is successful, LED indicator besides waterproof cover will display a RED light.
- Page 18 Operation (continued) □ Launch “Smart Guard HD” APPs again and you will see video streaming from Smart Guard HD. Note: You may access your camera from anywhere as long as there is internet access. 1.3 Set Camera name and password: Select Wi-Fi Setting. You can change SSID name and password Select Wi-Fi Setting.
- Page 19 Operation (continued) 1.5 Frequency Setting: Set Power Frequency 1.6 PIR Notification: Send PIR Notification signal to your smartphone/tablet □ Click OFF: Not to send PIR Notification signal □ Click ON: To send PIR Notification signal and press “ ” for the selected camera. Click “Notification” that also can send the □...
- Page 20 Operation (continued) NOTE: If you click on ” PIR Notification” and there has no micro SD card inside the unit, when PIR is triggered, it will send PIR Notification signal continuously to your smartphone until no any 1.7 Set Description name: You can set your own name for this Description. □...
-
Page 21: 2.0 Images Functions
Operation (continued) 2.0 Images Functions 2.1 SNAP SHOT: Take one still picture for each snap shot and picture will be saved in smart phone. 2.2 RECORD □ Click “REC” icon to start Manual Record. The left bottom side will show Red Ball icon. Record a video at 20 seconds and video will be saved in smart phone. - Page 22 Operation (continued) 2.3.1 Camera SD card: View the recording files from SD card 2.3.2 Mobile Phone: View the recording files from smartphone 2.4 Light control: The user can click this Bulb Icon to change the light to be AUTO control or Manual control ...
- Page 23 Operation (continued) 2.5 SETTING: Please read the above point 1.1~1.7 2.6 Check APP version If there is SD card inside the product, the screen will show this icon If there has no SD card inside or can not read SD card, the screen will show this icon 2.7 Check APP version ...
- Page 24 Operation (continued) Firmware Online Update NOTE: We have detected a new software. Please press Upgrade FW to start. Don't switch off camera and wait for approx 3 minutes until upgrade is completed. Please make sure your APP is the newest version. This upgrade will not change your network settings.
-
Page 25: Troubleshooting
Operation (continued) 2.9 The speed-flow is shown on the right bottom corner of the screen When the network speed is getting slow or unstable, the screen will display “The video session would be ended in 4 minutes “. After 4 minutes, the screen will show “Camera disconnected”, press OK and it will go back to Camera List. 2.9 LED indication on the product AP Mode Flash slow in RED... -
Page 26: 22Care And Cleaning
Remedy: Turn the circuit breaker off for about 10 seconds and then turn back on. The light should go through its set up routine and adjust the head for proper operation. 2. The Night Watcher has stopped recording to the micro Card Remedy: The date needs to be set for the Night Watcher to record correctly. - Page 27 Q: What happens when the card is full? A: It automatically overwrites the oldest file with the latest video clip – this means you do not have to remove the memory card unless you wish to review or save the video files Q: Can I change the “light illumination time”? A: No, it has been programmed to illuminate for 3 minutes per motion detection.
-
Page 28: Fcc Statement
FCC STATEMENT 1. This device complies with Part 15 of the FCC Rules. Operation is subject to the following two conditions: (1) This device may not cause harmful interference, and (2) This device must accept any interference received, including interference that may cause undesired operation. 2.
Need help?
Do you have a question about the AEC-9332BSD-AC16W-WF and is the answer not in the manual?
Questions and answers