Table of Contents
Advertisement
Intelligent Trail Camera
12M, 1080P/30FPS, IP68, MMS /SMTP
Technology Innovation from EREAGLE
User Manual
E1 Series
Thank you for purchasing our camera series products.
Before attempting to connect or operate this product, please read these
instructions carefully and keep this manual for future use.
V112 ED-E1S-TM-01
Advertisement
Table of Contents

Summary of Contents for EREAGLE Ere-E1S
- Page 1 Intelligent Trail Camera 12M, 1080P/30FPS, IP68, MMS /SMTP Technology Innovation from EREAGLE User Manual E1 Series Thank you for purchasing our camera series products. Before attempting to connect or operate this product, please read these instructions carefully and keep this manual for future use.
-
Page 2: Table Of Contents
------------------ CATALOG ------------------ CAUTION 1. General Information 1.1. Product introduction 1.2. Feature 1.3. Graphic Illustration 2. Installation and location selection 2.1. Bandage installation 2.2. Seal the bottom cover 2.3. Installation location selection 3. Quick start 3.1. Battery installation 3.2. SD/TF Card installation 3.3. - Page 3 4.13. Password 4.14. SD/TF Card Format 4.15. SD Card Cycle 4.16. Default Setup 4.17. Software Version Information 4.18. View, Delete the image and video 4.19. Auto power off 4.20. Laser positioning 4.21. Quick setting Photo and video 4.22. Low power alert 4.22.
- Page 4 This equipment has been tested and found to comply with limits for a Class A digital device, pursuant to part 15 of the FCC Rules. These limits are designed to provide reasonable protection against harmful interference when the equipment is operated in a commercial environment.
-
Page 5: General Information
General Information 1.1. Product introduction The Ereagle trail camera is a smart IR surveillance waterproof device. It can take high quality photo (up to 12M pixels(Interpolated), real 5M pixels and video automatically with the preset parameter by customer, triggered by any movement of the human being and animal by the highly sensitive PIR sensor. The double D/N filter IR cut switcher helps while the ray of light is not good and then take clearer photos and videos. -
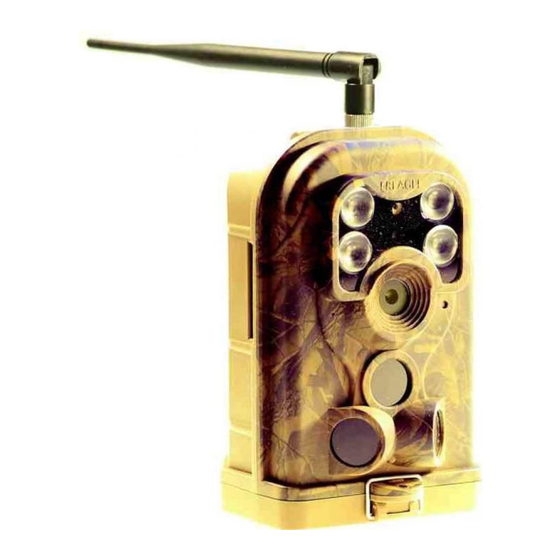
Page 6: Graphic Illustration
1.3. Graphic Illustration S afe -Gu a rd An te nn a Po rt L oc k Hole IR LED A nt iskid Nigh t Se ns or La se r Poin te r Sta tu s LED St rap H ole Le ns Mic ro ph on e Main PIR... - Page 7 USB Po rt TF Por t Tes t/O N/ OFF DC Po rt Switc he s SIM Por t 14.DC Part. Used for external power supply, support DC 6V/2A power supply connection. 15.USB Part connect PC with USB cable. 16.TF Part To store video, image and data information.
- Page 8 Spe ak er LCD Disp la y View Bu tto n Men u But to n 19.LCD Display For viewing video and image information and menu display. 20.View Button For viewing video and image information. 21.Menu Button For menu setting operation. 22.Speaker Play video sound.
-
Page 9: Installation And Location Selection
2. Installation and location selection 2.1. Bandage installation The camera is designed with a bandage hole for fixing the camera. Thread the bandage from one side to another side of the hole, then fix the bandage in a solid trunk of the tree, you can adjust the tension of bandage to adjust the camera position, tighten it after the adjustment. -
Page 10: Quick Start
3. Quick start According to the instruction of above parts, operate the corresponding button, then you can complete the basic operation. 3.1. Battery installation Prepare 4 x AA / 8 x AA / 12 x AA group of alkaline batteries, a group needs at least 4 x AA alkaline batteries. -
Page 11: Enter Test Mode And On Mode
3.4. Enter Test mode and ON mode There are three mode for the switch, OFF, TEST and ON mode. OFF:When the switch to the OFF position, the camera will be power off automatically. TEST:When the switch to the TEST position, the camera enters the preview test status, you can manually start taking pictures, record videos, view photos and videos, set the parameters and so on. -
Page 12: Guide For The Setup Menu (In The Camera)
3.5. Guide for the setup menu (in the camera) The following description is mainly for the use of menu parameters. Main Sub Items Function and Application Items Select Network Operators 【OFF】: Turn off the remote communication function. In this mode all communication related functions are invalid. - Page 13 Audio Record This setting is used to turn on or off sound while recording Boot Sound Set whether the start beep is turned on or off. Key Sound Set whether to turn on or off the key beep. Select PIR trigger mode, you can use Main PIR trigger or Side PIR + Main PIR trigger mode.
- Page 14 This option controls whether shooting is triggered on or off for the set time Timer period. Turns on or off interval timer. When this setting is turned on, the PIR will stop triggering. Time Lapse [Interval shooting time]: Take pictures by the time it set, not effect by PIR trigger effect.
- Page 15 When Password is on, the camera needs to input a password to enter in test mode. Password After opening the password, the camera itself has a default password, in order to ensure security, it is recommended that users re-enter the new password and password confirmation.
-
Page 16: Advanced Operation
4. Advanced Operation 4.1. Mode Description Test Mode Enter this mode, the red light flashes, the camera automatically enter the real-time preview interface. After the system automatically detects with normal status the indicator lights will turn off. After a few seconds, the PIR status can be observed by the color of the flashing indicator. Red indicates the side PIR is triggered and blue indicates the main PIR is triggered. -
Page 17: Set Camera On Pc
PC setting software. PC-side software is stored in the camera menu, can be downloaded through the menu operation to the SD card. The latest updates software are available on the EREAGLE website. Setting steps: 1. - Page 18 General parameter setting interface MMS setting interface...
-
Page 19: Menu Operation Method
4.3. Menu operation method Users can enter the menu and set parameters in the camera test mode; Alternatively, use PC-side software for parameter settings. Setting method: 1.Press the "MENU" button to pop up the setup menu. 2.Press "UP" and "DOWN" to move the cursor to select the corresponding option or parameter. Press "MENU"... -
Page 20: Audio Settings
Setup Time date and time 18:42:54 and time, please set Auto off. Automatic acquisition time and date is only for mms camera ERE-E1S The date and time set manually will be lost when the battery taken out for 20 seconds. -
Page 21: Time Lapse
4.8. Time lapse This feature allows the camera automatically record images or videos at specified time intervals for a specified number of days and time periods. You can set three time periods per day and weekly repeat. Timed Trigger Shooting: Users can set the time period to work every day after the timer shooting is started. -
Page 22: Night Lighting
4.10. Night lighting This setting helps to improve the effect of insufficient light illumination change at sunrise and sunset. Correct setting of this parameter can improve the shooting effect. Here you can set the day/night automatic switching, night mode or day mode. In night mode, you can also set the light level to control the photo brightness. -
Page 23: User Interface Stamp
Send Number: This function is mainly used to limit the number of messages sent by the camera every day, which helps the user to control the cost. When the function is not set to 0, the interval is 10 minutes after each message is sent, and the message can not be sent again after the trigger shooting. To prevent duplication of information and waste the cost. -
Page 24: Default Setup
4.15. TF Card Cycle After starting the TF Card Cycle, when TF card memory is full, the new recorded file will automatically overwrite the old file. 4.16. Default Setup For error of the parameter settings, the device will restore all settings to factory default settings. This operation will make the camera automatically shut down, need to restart the camera to restore the factory Settings to take effect. -
Page 25: Auto Power Off
to cancel delete or delete all options. Press the "MENU" key to confirm the operation. 6.Press the "MENU" button to enlarge the picture. You can press "UP", "DOWN", "LEFT" and "RIGHT" keys to zoom in to view the picture details. 7.For videos, press "LEFT"... - Page 26 If user wants to upgrade to the latest firmware version, you need to download the latest version of the corresponding software upgrade package from our official website. Then extract the firmware. bin file in the folder to the SD/TF card, insert the SD/TF card into the camera, and then switch to test mode. The camera will automatically enter the upgrade program, turn off the camera and remove the SD/TF card after finishing, and then change the SD/TF card without software upgrade package.
-
Page 27: Other Operation
5. Other operation 5.1. Connection of external power There is an external power input interface at the bottom of the camera, you can use the external power supply to charge, For example, solar battery, DC power supply, storage batteries and so on. External power supply must be with DC 6V 2A The bottom of the waterproof cover will be opened for external power supply, so the camera waterproof grade will be reduced. -
Page 28: Tv Video Cable Use
5.3. TV Video Cable Use The video cable is used to connect the camera to a TV or monitor, making it easy to view pictures or videos on a larger screen. Plug the video RCA cable into the AV input of the TV or monitor, and connect the other end to the camera AV connector. -
Page 29: Tf Card Capacity Data Sheet
5.4. TF card capacity data sheet Data sheet below will show you the capacity of different size of SD card.Then you will know which size of SD card fit your need. Resolution Pixel File size TF Card Capacity Picture amount 3.725G 21100 7.45G... -
Page 30: Warranty Information
6. Warranty Information If the camera malfunction, please see the following guide operation, if the malfunction can’t be solved, please contact our local distributor. General malfunction Self-test and solution Check whether the batteries are installed correctly, the external power camera can’t be open whether open circuit or not, the SD card capacity size meets requirement, confirm the switch is not on OFF position. -
Page 31: Appendix Technical Specification
7. Appendix Technical Specification Model ERE-E1B ERE-E1C ERE-E1S Photo and video Image Sensor: 5Mega pixel 1/3 "HD color CMOS image sensor Sensitivity: 0.005 Lux / F1.2 / 30IRE (LED off) Effective pixels: 2560×1920 / 4915.2K 12M/8M//5M/3M/2M/1M Photo Definition: 4608×2592/3624X2448/2560×1920/2048×1536/ 1920×1080/1280×720 Shooting No.:... - Page 32 Storage, Power Supply and Power Consumption Memory: 4G~64G, TF Card, Class 10 SD Card Cycle Save: ON/OFF Power supply: 4A×AA /8A×AA /12×AA alkaline batteries or rechargeable batteries(1.2~3.7V) Stand-by Time: 5~8 months(4A×AA ~ 12×AA) External Power Input: DC 6V / 2A Auto Power OFF:...
-
Page 33: Packing List
8. Packing list item Accessories Quantity Camera unit USB cable Camera bandage Warranty card and brief manual... -
Page 34: Dimension
9. Dimension 145mm 90mm 80mm... - Page 35 To protect the environment of earth, EREAGLE pay more attention to environment in the whole production process, and take various measures to provide customers with more environmentally and friendly product. Toxic and harmful substance or elements Hexavalent polybrominated Item name...
- Page 36 (Applicable in the European Union and other European countries with separate collection system) This marking shown on the product or its literature, indicates that it should not be disposed with other household wastes at the end of its working life. To prevent harm to the environment or human health from uncontrolled waste disposal, please separat e this from other types of wastes and recycle it responsibly to promote the sustainable reuse of material resources.
Need help?
Do you have a question about the Ere-E1S and is the answer not in the manual?
Questions and answers