Table of Contents
Advertisement
Advertisement
Table of Contents

Related Manuals for Orcam MyEye


Summary of Contents for Orcam MyEye
- Page 1 OrCam User Guide MyEye and MyReader Version 8 June 2017...
- Page 2 No license or rights are hereby transferred to the user of this guide and said guide shall remain the sole and exclusive property of OrCam. No part of this guide shall be used, reproduced, translated, converted, modified, adapted,...
-
Page 3: Table Of Contents
Table of Contents About the OrCam Device ................... 3 Assembling the OrCam Device .................. 7 Getting Started ......................11 Reading and Recognizing with OrCam ..............13 Face Recognition and Learning ................20 Products, Banknotes and Colors................22 OrCam System Messages ..................25 Configuration and Personalization................ -
Page 4: About The Orcam Device
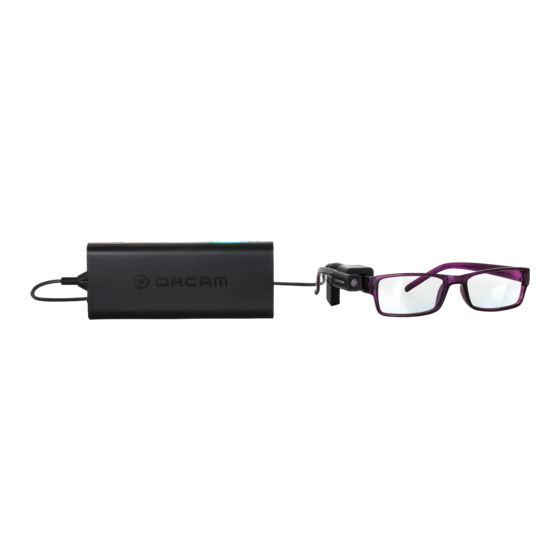
OrCam Components To help orient you with the OrCam device, the top of the device is the side with the full OrCam logo including the word ORCAM. The OrCam Device consists of two main parts, The Head Unit and the Base Unit. - Page 5 The Head Unit features a camera, an earpiece, a microphone, and a cord that connects to the OrCam Base Unit. When you first receive the OrCam delivery box, and prior to initial use, you need to assemble the camera mount and connect it to your eyeglasses frame .
- Page 6 Volume Higher/ LED Indicator Lower Trigger Button is the blue button (yellow for OrCam MyReader) on the opposite side of the Volume button, on the same side as the rubber flap. It has three functions: 1. Activating the Camera: A short press activates the camera and initiates reading text or recognizing faces, products, banknotes or colors.
- Page 7 When the light is flashing red, it indicates that the OrCam device is charging. When the light is green, it indicates that the OrCam device is powered on. When there is no light, it indicates that the OrCam device is suspended or powered off.
-
Page 8: Assembling The Orcam Device
These include: 2 mounts, 8 rubber spacers (2 each of four sizes) and an Allen key. Two mounts are provided so you can use the OrCam device with more than one pair of glasses, such as your regular eyeglasses and reading glasses or sunglasses. - Page 9 Unit, it is possible to remove it with a small screwdriver. Attaching the Mount to Eyeglasses The Head Unit of the OrCam device is designed to be mounted on the right side of your eyeglasses. Therefore, the mount must be placed on the right side of the frame.
- Page 10 If you hear a high-pitched, double-beep, the camera is adjusted correctly. Note: If the camera is angled too high or too low, the OrCam camera may not be accurately triggered, and may not perform correctly.
- Page 11 Ensure that you can move freely and that there is no tension on the cord between the Base and Head Units. Cleaning the OrCam Device Base Unit Clean the Base Unit immediately if it comes in contact with anything that may be sticky or cause stains.
-
Page 12: Getting Started
Getting Started Initial Charging of the OrCam Device Before you begin using the OrCam device, you must initially charge it for a period of eight hours. An OrCam charger is included in the OrCam box. To charge the OrCam device: 1. - Page 13 Version 8 is ready. Battery is [this many] percent charged.” 2. f you did not hear the phrase, “OrCam is ready,” or you are not sure that the unit is on, press one of the volume buttons (UP or DOWN). If the device is on, you will hear a response to your action.
-
Page 14: Reading And Recognizing With Orcam
Version 8 Reading and Recognizing with OrCam The OrCam device reads to you when you point at a text or press the Trigger button. The OrCam MyEye device can also recognize faces and products. It can recognize all entered faces and products as well as pre-loaded products, such as banknotes. - Page 15 If there is text in the same frame as a recognized face, the OrCam device will say the name of the person and then read the text. If a face is detected, but not recognized, then reading will begin after the appropriate face recognition announcement.
- Page 16 Version 8 Changing the Reading Speed It is possible to adjust the reading rate, or speed, of the OrCam device readback. To change the reading speed while reading, press and hold the Trigger button as you simultaneously press the Volume Up or Down button. You will hear the device reading speed increase or decrease appropriately.
- Page 17 12 inches (30 cm), the camera will automatically detect it and the OrCam device will begin to read it to you. For optimal use, make sure at least 3 edges of the page are in the camera’s view frame.
- Page 18 “There may be more text below. Please raise the text and point again.” In this case, you can point to the lower part of the page, and the OrCam device will begin reading from the beginning of the last paragraph.
- Page 19 If there is text in the same frame as a recognized face, the OrCam device will say the name of the person and then read the text. If a face is detected, but not recognized, then reading will begin after the appropriate face recognition announcement.
- Page 20 OrCam User Guide Version 8 If the OrCam device does not recognize what it sees, it lets you know by making a chime sound. If you hear a chime, try again, and make sure that you are pointing at the text or a pre-entered product.
-
Page 21: Face Recognition And Learning
Version 8 Face Recognition and Learning You can personalize your OrCam MyEye device by teaching it to recognize faces. This can assist you when you need to identify people such as friends, family and co-workers. These features are not available on the OrCam MyReader. - Page 22 Not enough light for learning. The current lighting in the room is not sufficient to allow the OrCam device to learn a new face. Please try again in an area with brighter lighting.
-
Page 23: Products, Banknotes And Colors
Barcode Identification You can identify a product by holding the barcode directly in front of the OrCam device camera or by pointing to the barcode on the item’s packaging. It is best to hold the product at a distance of approximately 12 inches or 30 centimeters. - Page 24 OrCam User Guide Version 8 available in the pre-loaded database, the OrCam device will announce “unfamiliar barcode”. Note: Barcode identification is automatically enabled by default. It can be activated manually or disabled in the Product Recognition Settings menu. This feature is still not yet fully operational in all localities and barcodes in memory may be limited in number.
- Page 25 Did not learn this side. The OrCam device did not recognize the additional side of the product. If no additional product sides are needed, proceed in recording the product name. Done with this side. You may point three times at another side of the product or stop now.
-
Page 26: Orcam System Messages
OrCam User Guide Version 8 OrCam System Messages Following is a list of some of the OrCam system messages that you are likely to hear during normal operation. OrCam Version 8 is ready. Battery is [this many] percent charged. Initial greeting. OrCam is now ready to begin operation. - Page 27 OrCam needs to cool down before you can use it; shutting down, please wait. The temperature of the OrCam device is too high. Please allow it to rest for a few minutes and resume normal operation. If the problem persists, contact support.
-
Page 28: Configuration And Personalization
Version 8 Configuration and Personalization This section details the settings of the OrCam device that can be changed to fit the personal preferences of the user. These settings include the reading speed (rate), voice, gestures, outputs, automated face recognition, tap, touch reading, and more. - Page 29 OrCam User Guide Version 8 Audio Settings Menu Options In the setup menu, you can customize the following for your OrCam use: 1. Reading Rate 2. Change Volume 3. Reading Language 4. Reading Settings 4.1. Touch Reading 4.2. Date Format 4.3.
- Page 30 Reset All User Settings to Default 8.5. Camera Light Compatibility 8.6. Tap Functionality 8.7. Light Conditions Notifications 8.8. OrCam Contact Information 8.9. Device Serial ID 8.10. Software Version Info 9. Exit *[Items marked with an asterisk are] not available in OrCam MyReader. PAGE 29...
- Page 31 The OrCam device will announce the current time. If you keep your hand in place for more than 2 seconds, the OrCam device will announce the current time, day of the week and the date.
-
Page 32: Instructions For Software Update Using An Sd Card
Remove the Old SD Memory Card Before you can insert the new SD card you received from OrCam, you must first remove the SD card currently in the device. 1. Open the rear cover of the device by pushing a paper clip (or something similar) into the notched opening. - Page 33 Update the OrCam software The update process is initiated automatically by plugging the power charging cable into the OrCam device with the new SD card inside. The power charging cable needs to remain connected throughout the update process. 1. Wear your glasses with the Head Unit attached so that you can hear the OrCam messages.
- Page 34 Your device is now ready to use. Verify that the update is complete 1. If you wish, you can verify that the OrCam device has been updated. Turn the OrCam device off and then on again as you normally would.
-
Page 35: Troubleshooting
Lighting and Other Considerations Just as we need a certain level of lighting to enable us to read, the OrCam device is sensitive to light, too. It operates best in a brightly lit area. When using the OrCam device, consider the following: Avoid shining strong light into the camera. - Page 36 OrCam User Guide Version 8 If the OrCam device has been unused for five days or longer, the battery level messages may become inaccurate. In the event that the device does not hold a charge, plug it in and charge it for eight hours without interruption. If this does not solve the problem, please contact OrCam Support.
- Page 37 Memory is full. Cannot learn additional products/faces. The OrCam device can remember up to 150 products and 100 faces. If you have added that many products or faces, you may have to delete some before you can add any more.
- Page 38 If you hear the announcement “Update Process Failed”, please contact OrCam Support. Software Version You may be asked by an OrCam support representative to check the version of your OrCam device’s software. Please point at the following phrase. OrCam Please Tell Build...
- Page 39 Version 8 Reset Device It is possible to remove information stored in the OrCam device’s internal database. The following commands will remove all faces or products from the device’s memory, or reset the device back to its default factory settings and also remove both faces and products from memory.
-
Page 40: End-User Terms And Conditions
Product or take any other action to the detriment of OrCam’s IP Rights in such. OrCam shall be entitled to make periodic upgrades to the Product as it deems necessary. Customer shall fully cooperate with OrCam in making such upgrades and any effort to prevent such upgrades shall be deemed a fundamental breach of this Agreement. - Page 41 Customer. LIMITATION OF LIABILITY OrCam will not be liable to Customer or any other third parties (whether under the laws of contract, torts or otherwise) with respect to the use of, or otherwise in connection with the Product: for any loss or damages, whether direct, indirect, special, punitive, exemplary or consequential;...
- Page 42 OrCam User Guide Version 8 GOVERNING LAW, JURISDICTION These Terms and Conditions shall be governed by and construed under and in accordance with the laws of the State of New York without reference to conflict of laws principles. Any dispute...
- Page 43 Original proof of purchase/delivery is required from the owner in order to obtain this coverage. OrCam will repair or replace, at its discretion, any product that is determined by OrCam to be covered under this Limited Warranty. OrCam will not be responsible for conditions arising as a result of intentional damage or misuse of the product.
- Page 44 INCLUDING WITHOUT LIMITATION, THE IMPLIED WARRANTIES OF NON-INFRINGEMENT OF THIRD-PARTY RIGHTS, MERCHANTABILITY AND FITNESS FOR A PARTICULAR PURPOSE. ORCAM DOES NOT WARRANT THAT THE PRODUCT WILL BE ERROR FREE OR “BUG” FREE, WILL OPERATE WITHOUT INTERRUPTION, THAT ANY IMAGES OR SOUNDS PRODUCED BY THE PRODUCT WILL BE ACCURATE OR THAT THE OPERATION OF THE PRODUCT WILL BE SECURE AND HEREBY DISCLAIMS ANY AND ALL LIABILITY ON ACCOUNT THEREOF.
- Page 45 United Kingdom. Telephone: +44 20 8123 8056 Fax: +44 1923 859 810. CE Compliant Restriction of Hazardous Waste Electrical and Electronic Refer to User Compliant Substances Directive Equipment Directive Compliant - Instruction Guide Compliant (materials and Contact OrCam for proper components) disposal PAGE 44...
- Page 46 Base Unit is covered and protected. Do not use the OrCam device in heavy rain, when at the beach or swimming pool, or in or near a bathtub or shower. Do not submerge the OrCam device in any type of liquid.
- Page 47 OrCam User Guide Version 8 Notes PAGE 46...
- Page 48 Welcome to OrCam! We are pleased to present you with your new OrCam device. OrCam is very intuitive. All you have to do is point. See for yourself.
Need help?
Do you have a question about the MyEye and is the answer not in the manual?
Questions and answers